

First some good news,
On 21st November, 2010, our little blog received its 10,000th comment!
Thank you so much for making this happen.
Those of you reading chandoo.org for a while know my penchant for comments. I have learned a lot of excel tips & ideas just by reading the comments you posted on this blog. I think comments are one of the best parts of this blog. So, naturally, I wanted to celebrate this milestone, with something big & awesome.
My intention was to download all the 10,000+ comments and play with the data to come up with something outstanding, like a dashboard. It took me 2 days to conceptualize and create this beauty.
10,007 comments visualized in an Excel Dashboard:
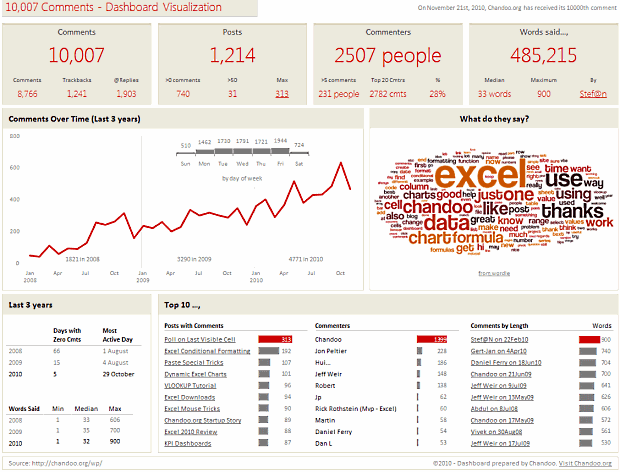
[click here for a larger version]
Summary of Findings from the Dashboard:
- Out of 10,007 comments, 8766 are comments left by people and 1241 are ping-backs (a comment made automatically by other blogs when they link to chandoo.org).
- Roughly 20% of comments are @ replies.
- 31 posts had more than 50 comments each. The maximum comments were 313 on the last visible cell poll.
- These 10,007 comments came from 2507 unique people. Top 20 commenters made 28% of comments.
- Median words per comment are 33. You said a total of 485,000 words so far. Impressive.
- There were only 5 days with zero comments in 2010 (as against 66 in 2008 and 15 in 2009).
- Fridays are most popular days for commenting with 20% comments coming in.
Learn How Dashboard is Constructed in a Crash Course:
I made this dashboard with lots of love & coffee. Of course, coffee wont magically turn data into in-cell charts. We need to arm twist our data and get the insights out ourselves.
That is why I made an hour long tutorial explaining how I constructed this dashboard. In the video I explain how I came up with the design, what formulas I used to cleanse & process the data, how various charts were constructed, what techniques I have used to put this together.
As this video is kind of advanced training on dashboards, I have decided to sell it. You can get a copy of the video & unlocked excel files for $37.
What you get with the purchase:
- A HD video explaining the dashboard construction process
- Same video in iPod compatible format for watching on the go.
- 2 Excel files, the original version & instructor version (unlocked)
Please note: You will not enjoy the video if you are an Excel beginner. Instead go thru Excel Dashboards page to equip yourself with necessary dashboard & charting skills before getting a training like this.
How is this Dashboard Made?
If you are curious to know which nuts & bolts are used in the dashboard, read up:
- The chart showing monthly trend of comments and day of week distribution are 2 different charts, one arranged on top of other.
- The word cloud showing relative frequencies of words used in comments is made using wordle. This is the only non-native Excel part of the dashboard.
- The Top 10 tables at the bottom are incell charts with some fancy colors.
- I have used pivot tables, SUMPRODUCT, SUMIFS, INDEX+MATCH, VLOOKUP formulas to process the data.
- Word counts are generated by processing the comment text using this technique.
Download the Dashboard File:
Click here to download a locked copy of the dashboard [mirror here]. You can examine the dashboard, but you can not alter it as it is password protected.
If you want an unlocked copy, you can get it by purchasing the video tutorial. Click here (or here).
A Big Thank You
A big, warm, cuddly thanks to you for making 10,000 comments. Everyday, your comments teach me new tricks on Excel & make me better at what I do. I am sure you feel the same about others comments.
Special thanks to top commenters – Jon Peltier (228), Hui (186), Jeff Weir (148), Robert (138), Jimmy (62), Rick Rothstein (60), Martin (58), Daniel Ferry (54), Dan l (53). Also, kudos to Stef@n for leaving a 900 word comment, the longest ever.
How do you like the dashboard?
Do you like the dashboard? Do you find it insightful? What modifications you would have made to it? Go ahead and share your ideas and tips with us. Please leave a comment.
PS: And get a copy of the training video if you work with dashboards a lot. I am sure you can pick up few tricks to become even more awesome.


60 Responses
My most often used variation of this is to remove blanks from a list.
Suppose column A contains information but some of the rows are blank. I want to return a continuous list of information without the blanks so I do…
Your original formula looks like this:
=IFERROR(INDEX($B$1:$B$20,SMALL(IF($A$1:$A$20=$E$2,ROW($A$1:$A$20)),ROW()-2),1),””)
I want to look for non-blanks and all my data is in column A so I change it to:
=IFERROR(INDEX($A$1:$A$20,SMALL(IF($A$1:$A$20″”,ROW($A$1:$A$20)),ROW()-2),1),””)
Ctrl+Shift+Enter, fill down and ta-da! A nice continuous list of information without any blanks.
=IFERROR(INDEX($A$1:$A$20,SMALL(IF($A$1:$A$20″”,ROW($A$1:$A$20)),ROW()-2),1),””)
The original post chopped out my ‘does not equal’ for some reason. This is how it should look
And again ?????
My sincerest apologies Sohail, I didn’t mean to trash your comments section like this. I’ll stop replying now.
Lol! You didn’t trash the comments Desk Lamp! On the contrary my friend that contribution is brilliant, much appreciated, Thanks!
Hi Sir,
I am not able get any value by using below formula.
=IFERROR(INDEX(DeliveriesMaster!$H:$H,SMALL(IF(Criteria!$A$3=DeliveriesMaster!$A:$A,ROW(DeliveriesMaster!$H:$H)-7,””),ROW()-3)),””)
I want try
help me
Great stuff. I laughed. I cried. I hurled.
Personally I would use a PivotTable and Gordon Ramsay. But hey…as long as we cook the books, then each to their own, I’d say.
Hehe, beautiful retort Jeff
I won’t recommend the use of ROW()-2 because everything gets mess if you insert a row(s) before the row 2. The alternative would be ROWS(E$3:E3).
Regards
Hi Elias,
I tried doing what you have suggested here.
Ading any additional row messes up everything like you siad. But using the formula that you have suggested, shows only one value for the entire array. Would you please help me undersatand your method. I feel I may not be doing it correctly.
Regards
Thank you Sohail. Great post. The comments are also very helpful.
PS! Jamie Oliver was a great choice.
Thanks Denice! Jamie’s always a great choice, we’re from the same county, I’m a big fan!
I’ve been using data with multiple occurrences for awhile now, and was glad to see the question I’ve been trying to ask and don’t know how finally got answered. Now if I can be brave enough to use this, is another question.
What I usually do is just add another column to the end of my data =IF((COUNTIF($B$2:B2,B2))=1,1,””) where B is my unique identifier and then just do multiple COUNTIFS with it.
For multiple Occurrences and Criterias, I just add another column to Concatenate my unique identifier and the other criteria =$B2&” “&$C2, then add another column using the same =IF((COUNTIF($B$2:B2,B2))=1,1,””) but this time use the column where I placed the concatenated data.
Any ideas how to lessen the number of columns I use without using any Arrays or VBA’s?
Hi Mando,
Are you pretty much asking for an alternative way to do this without VBA/Array Formulas? If so, I would recommend not doing that, Arrays make things a bit easier. The method you wrote looks like it will increase work, I’m always in search of efficiency in the long term 🙂
It’s both illogical and unnecessary to use a construction for SMALL’s (or LARGE’s) k parameter which consists of the ROW function (either in its unqualified form, i.e. ROW(), or with a reference, e.g. ROW(A1)) +/- some constant.
Not only is such a construction necessarily dependent upon the row number in which the user decides to place the initial formula in the series, but it is also susceptible to error upon row insertions within the sheet.
ROWS (i.e. ROWS($1:1), or ROWS(A$1:A1) if you prefer) gives precisely the same results, though suffers from neither of these two drawbacks:
http://excelxor.com/2014/08/25/row-vs-rows-for-consecutive-integer-generation/
Regards
@Elias and XOR LX, great point and while I use the construct you mentioned in other things, I never really gave it too much thought since I owuldn’t readily insert rows in this sort of thing.
I love the rule of ROW(A1) +/- constant being illogical! Any time I can eliminate something from my arsenal due to redundancy is good. Much appreciated and once again this sort of exchange is precisely why we love Chandoo 🙂
Great post, love this way of retrieving lists of items. Will certainly be giving this a go.
I like this technique a lot and *will* be using it. However how can it be done in 2D. E.g I have a 3 by four table (12 items) and each items is either an “Apple” or an “Orange”. I want to get the row and column position of each occurrence of “Apple” and of “Orange”? How would I do this?
@Mr J
When you say “row and column position”, do you mean relative positions or absolute? For example, if your table was in A10:D12, and the first occurrence of “Orange” was in cell B11, would you want 11 (absolute) or 2 (relative) returned for the row position?
Regards
The master database contain name, designation, salary, passport no, expiry date, joining date, project no. camp name, floor no., flat no., room no., around 20 more column, and this is more than 500 staff member.
i want to make report for the camp and i want use the employee ID to transfer their name, designation, flat no., and their room no only to other sheet using VBA code.
Please help me.
Thanks
Great post, love this way of retrieving lists of items.
This was a great post and I learned a lot. i am attempting to do exactly what this post was about with the exception of direction, i want to go across not down. is this possible?
To summarize for those who will not take the time to go through the whole comments list (and who therefore will avoid some brain overload and save some grey cells), use at the end of your array formulas
ROWS($1:1) instead of ROW()-2
it additionally is more intuitive for understanding the formula:
ROWS($1:1) => displays 1st result
ROWS($1:3) => displays 3rd result
…
Thanks all for this posts & comments
Skrattoune
in the Multiple Occurrences fomula, we couldnt get the second line since its not appear, but when we check your file, i saw there is {} brackets before equal but when we extract it we couldnt see it. how to do that?
Difficult to understand
But I am sure it will be of immense use to me
Very useful post. I worked with the downloadable workbook and did some experimenting to see how each part of the formulas worked. Although I understood most of it, I have a question. What if I wanted the results of my search for each person to be listed by column instead of by row?
Hi all,
thanks for the contribution, it helped a lot.
But what if I need to get the average of the multiple values I get?
Is there a way to get the average of these multiple values directly (without listing them beforehand…my sheet is already busy)?
thanks a lot.
What changes would you make to allow these multiple values to be horizontal rather than vertical, as shown?
Mr. Doo, you are so funny! I did not know the multiple occurrences could be done without a (trial and error) macro.
You make it fun to make a complicated task a Can – Do ! Thanks!
Hi,
It looks super helpful.
However, whatever I do it feels I’m almost there… but every time it’s a mirage.
I’ve a (very) big data table consisting of multiple parameters (about 10) for every value in column A. A problem – same A value may (or may not) appear multiple times in my big table. Luckily, the repetition is always in clusters – one after another (and after the cluster ends, there is no more same A).
The goal – I’ve a subset of data consisting of arbitrary values of column A (each one repeats only once), and I want to get all the parameters for all them (including for the as much as there is same A values). With you function, it fills nicely automatically for only the first A, but only once (without considering multiple occurrence), and then jumps to the next one.
Is there a way to solve this (without tediously manually inserting N rows number for N A’s)? I prefer not using macro’s.
Thank you,
Julia
Does anyone know how to summarise the following data to return the record vertically under the expected result?
Much appreciated …
Data is from A1 to D3
Name “Asset Name#1″,”Asset Name#2″,”Asset Name#3”
ABC Asset 1 Asset 2
ZXY Asset 1
Expected Result:
Name: Asset Name
ABC Asset 1
ABC Asset 2
ZXY Asset 1
Hi
What if I have multiple criteria I need to do this for? So in your example, instead of just “Tom Yorke”, I had a list of first and last names I needed to identify all instances of in a larger file. How would I go about doing that? Thanks!!
Hi,
I have 2 sets of name lists in a spreadsheet and need to find whether the same set of names repeat in the consecutive rows. can anyone please help me.
If your name list is in A column:
B=countif(A)
Should work
hi dear
i have a list of persons(First name space last name) in column A. multiple values are equal to first name and last name. ie. A kumar, b kumar alok das, alok ranjan. now i want multiple entries of all matching first name or second name as per my choice, what is the solution.
Hi,
I have 10 rows. in row 1 there are multiple columns. in few colums some values are present. just i wants to count the coulmn number of first record. how do i get it ?
example
A B C D E F G H I J
10 13 19 12 –> here number 10 position is 3
11 2 5 8 –> here number 11 position is 1
23 45 48 –> here number 23 position is 2
@Arvind
Try:
=INDEX(COLUMN(A1:E1),MATCH(TRUE,INDEX(A1:E1<>0,),0)) Ctrl+Shift+Enter
Copy down
Change Column E to match the last column of your data
Hi
I wonder if you have any tutorial (preferably in video format) concerning your technique of sorting a data table in a dashboard based on user choice control button
Thank you
I am trying to subscribe, but I not getting the confirmation email.
I have tried it few times but its not working.
My email is muntoo76@hotmail.com
Great post! Thanks for presenting a solution to a problem I had. However, how do I expand this to search across multiple worksheets? Thanks!
Just to say that you have been the only person I’ve found to bother explaining the rationale behind your function choices. There were other articles on the internet where people didn’t bother to make the effort. Many thanks.
Is there a text character limit to this formula? It works when I enter a few sentences, but not when I have 10 sentences.
@Peter
I don’t believe so
There maybe with pre-2007 versions of Excel
Can you post a sample data
this is the formula I’m running:
=IFERROR(INDEX(Input!$A$1:$R$201,SMALL(IF(IFERROR(SEARCH($E$2,Input!$D$1:$D$201)>0,FALSE),ROW(Input!$D$1:$D$201)),ROW()-5),COLUMN()),””)
and when I have this text paragraph on the sheet I’m pulling from, it won’t pull in:
“We do need a fair amount of analysis in advance of the meeting. Let’s start with a sensitivity analysis at plan value under various assumptions in terms of what lenders take – say 50% up to 100% in 5% increments. Need to understand dilution at various points to each side as we negotiate. If we can get that in the next hour or so, we can figure out what else would be helpful to negotiations. ”
But when I shorten it to:
“We do need a fair amount of analysis in advance of the meeting. Let’s start with a sensitivity analysis at plan value under various assumptions in terms of what lenders take – say 50% up to 100% in 5% increments.”
It works then..
I like your work. the tread has been very informative.
What I am trying to do get the multiple occurrences fill in columns not rows. AKA while you example has results in a the following format:
Thom Yorke
3
8
10
12
18
I want the result to be
Thom Yorke 3 8 10 12 18
Can you assist with this change?
Great work in this article! Very well explained!
But i need some help…
I want to use the Multiple Occurrences and Multiple Criteria with the Partial Text Search.
Example:
1st criteria: G11
2nd criteria: Varnish
3rd criteria: 1503/5
And i want to use in the 3rd criteria only the “1503” to seeach 1503/5, 1503/6 and 1503/7.
Can you help me with this issue?
Hi chandoo, thanks for your wonderful work.
I am in stuck to find a solution to extract multiple rows (by using index+ small+ if) and extract the multi columns to its rows.(multicolumn data should be combined as single).
I repeated the index function three time to get three column’s data and combine it with wild character and got the required answer. But feel this can be done in better way. so Could you please help to simplify the below formula in alternative way.
{=IFERROR(INDEX(Table1,SMALL(IF(Table1[Tag trim]=LEFT(F75,8),ROW(Table1[Tag trim])-1),1),COLUMN(Table1[MAX. LENGTH (mm)
(22)]))&” X “&INDEX(Table1,SMALL(IF(Table1[Tag trim]=LEFT(F75,8),ROW(Table1[Tag trim])-1),1),COLUMN(Table1[MAX. WIDTH (mm)(24)]))&” X “&INDEX(Table1,SMALL(IF(Table1[Tag trim]=LEFT(F75,8),ROW(Table1[Tag trim])-1),1),COLUMN(Table1[HEIGHT (mm)
(23)])),””)}
Hi. Your help in excel is great. It has being very helpfull in a project I am working on.
I got a question about Multiple Occurrences: I am trying to get all different values from the a same date and return values horizontally.
It ls like this:
Date provider
June 2 A
June 2 A
May 3 A
May 3 A
May3 B
April 4 B
April 4 B
April 4 B
April 4 C
April 4 C
April 4 A
Could you please help me with the formula?
I’ve got a lot of hints from this post and was able to get almost there with my task but there is one problem – string length. I have a long list of stuff given in consequtive columns. I need to peak certain type of data (long string) and put them together in one cell. The text type comes after the text, so schematically one raw of the data looks like this (where Ty My Wy Oni etc is the Type and it repeats):
Text_A Ty Text_B My Text_C Wy Text_D Oni Text_E Ja Text_F Ty Text_G My Text_H Wy Text_I Oni Text_J Ja Text_K Ty Text_L My Text_M Wy Text_N Oni Text_O Ja Text_P Ty Text_R My Text_S Wy
What I want is “Text_A, Text_F, Tekst_K, Text_P” if the search=”Ty”
The following works if the string in Text_X is <256; if logner -forget it
=TEXTJOIN(", ";TRUE;IF($C$4:$AL$4="Ty";$B$4:$AK$4;""))
same with error handling
=TEXTJOIN(", ";TRUE;IFERROR(IF($C$4:$AL$4="Ty";$B$4:$AK$4;"");""))
Most of the Index – Small etc solutions take up several cells to work and that is not an option this time. Any hints, please?
Hi Chandoo,
I have been brainstorming this from past couple of months. I work in reporting team and during month end I pull all incident report which has changed priority from P1-P2-P3-P4, P2-P3-P4 or P3 to P4. Currently, I am performing it manually (4000+ count). Below is the sample excel where I would highlight in a different color if priority changes from P1-P2-P3-P4, P2-P3-P4 or P3 to P4. So basically I want to check column A if it has more than 2 similar value it should check the final priority in column B based on Column C’s updated time and it should return value as P1-P2-P3-P4, P2-P3-P4 or P3 to P4 in Column D.
Number Priority Start time
INC0281369 Priority 2 2017-07-03 13:01:07
INC0281369 Priority 4 2017-07-03 13:04:29
INC0281696 Priority 3 2017-07-26 21:20:16
INC0281696 Priority 4 2017-07-27 00:06:21
INC0281962 Priority 3 2017-07-01 01:13:41
INC0281962 Priority 4 2017-07-01 04:21:12
INC0281974 Priority 3 2017-07-01 01:35:41
INC0281974 Priority 4 2017-07-01 03:25:14
INC0281976 Priority 3 2017-07-01 01:40:25
INC0281976 Priority 4 2017-07-01 03:26:29
INC0281985 Priority 2 2017-07-01 02:03:38
INC0281985 Priority 3 2017-07-04 18:29:34
INC0281987 Priority 2 2017-07-01 02:06:38
Any help would be appreciated
You have done a great job, Bravo!
I want the same result but my “Das hoff” is in multiple sheets. Can you please be kind enough to give me the formula to have the same output but the searches are in different sheets.
Thanks in advance.
Nadeem
Hi! Your instruction is great on this however I am still stuck with my formula. I revert back to INDEX/MATCH but I know my data is skewed. I really hope you can help!
I am working with two worksheets, CREDIT _MEMO_ACCRUAL_MASTER & CM_12 – I will reference them as WS A& WS B.
WS A is the master where my formula starts in column 15, row 2. My index/match is based on multiple criteria, Invoice # & Sku, to lookup the Original Invoice Date from Index sheet WS B. WS B only contains original invoice date, sku, credit date and amount.
WS A:
INVOICE# SKU RESULT FROM WS B
139591 XYZ (BLANK)
139612 ABC 12/11/2017
Currently in “RESULT FROM WS B”
=IFERROR(INDEX(CM_12!$B$2:$B$602,MATCH(CREDIT_MEMO_ACCRUAL_MASTER!B2&CREDIT_MEMO_ACCRUAL_MASTER!F2,CM_12!$D$2:$D$602&CM_12!$F$2:$F$602,0)),0)
The trouble is this:
WS B has reoccuring original invoice date and sku. In other words – invoice 139612 on credit date 11/30/2017 may have several different “original invoice dates” and 10 returned skus, therefore show up in 10 different rows.
WB S:
Invoice # Original invoice date Credit date SKU
139612 08/08/2017 11/30/2017 1234
139612 08/21/2017 11/30/2017 5678
139612 08/30/2017 11/30/2017 1234
I need a formula that will recognize the exact original invoice date for an invoice # and sku. Currently my index/match as you know only results in the first instance.
I tried your index/small/if formula but it didnt work for me. index/small/if is very new to me so I am sure i was doing it wrong somewhere.
I really hope you can help!
Happy New Year!
Hi All,
Great post, which I come back to multiple times !!
Can anyone explain to me how to amend the formula when you want to either exclude (e.g. all the lines NOT concerning DAS HOFF) rather than select a certain value, or when you want to allow more than one value (e.g. the lines where DAS HOFF is linked to US or UK)
Thanks for your help.
Geert.
Great post!
How do I get the output of the multiple occurrences into another coloum instead of on the same row?
Thanks
Thanks for the aide. I have been using this formula but the step by step explanation you have given makes me understand now completely the inside chemistry as to what is happening. Keep it up.
Hi Chandoo
I’ve replicated your exact spreadsheet and it works perfectly, thanks! For my actual application, I’m using a Named Table where:
$B$1:$B$20 = Chandoo[PointlessThing]
$A$1:$A$20 = Chandoo[Person]
Replacing the fixed cell references with the Table[Column] values the array formula produces an output that is one cell below what the actual value is. For example, if my lookup value is Das Hoff with the named table I get Amnesiac, Raging, Limb King, Krautrock, Erasing. When I just use the cell references I get Talented, Knightrider, Baywatcher, SpongeBob, Krautrock. As you can see, outputs when using the named table are actually one row below the intended output.
I’ve varied the formula, from completely deleting the -2 in …ROW()-2, to trying 0-3. I can never get the named table formula to output the same results as the cell reference formula.
I’ve noticed the lateral distance doesn’t matter, only the relative horizontal distance, so for that reason my named table formula starts in cell E3, referencing E2 as the lookup value, and my cell reference formula starts in cell G3, referencing G2 as the lookup value. The Person/PointlessThing columns begin at A1 and B1. The table is named “Chandoo.” So my named table references are Chandoo[Person] and Chandoo[PointlessThings].
As a final note, I’m using data validation, referencing the Person column of the named table as my lookup values in cells E2 and G2.
So I retried the formula with dragging ranges (which automatically populates the range name) and I got this:
=IFERROR(INDEX(Chandoo[[#All],[PointlessThing]],SMALL(IF(Chandoo[[#All],[Person]]=$F$3,ROW(Chandoo[[#All],[Person]])),ROW()-2),1),””)
And it works!
Originally I was hand typing it to make sure I got it all right and was entering this:
=IFERROR(INDEX(Chandoo[PointlessThing],SMALL(IF(Chandoo[Person]=$F$3,ROW(Chandoo[Person])),ROW()-2),1),””)
As you can see, I was missing [#All] preceding the column reference.
That said, this also works when referencing another sheet in the workbook, as long as the relative positions stay the same.
What I’ve run into now is this: Where I want the multiple occurrences to appear are ‘Visit Tear Sheet!F12:F16’
The drop-down data validation is Visit Tear Sheet!F8
The table location is ‘Visit Log’B49:C148
I’ve kinda buried the table at the bottom of a spreadsheet because I don’t want non-tech saavy users to easily find it and screw it up. I know I could let it rest on a separate sheet starting at A1 like our sample data set, but I’m trying to keep the number of sheets to a minimum to keep the weight of the file down.
Instead of the results being in downward rows is it possible to put them in the next columns?
Have you ever had to do this using Power Query? Or, know of a way to do something similar, but using Power Query? I have a huge workbook that uses a method similar to yours, but it’s way to slow using the SMALL and ROW formula so I’m trying to speed it up, but by using PQ. Thank you so much in advance for any help!
Can this method work with wildcards? I tried but I could not find a way to make it work.