

Often when we make a survey to compare various products (or vendors, companies, brands) the results are in the following format:
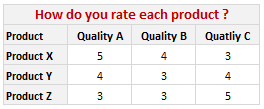
Now, we can visualize such data in several ways. One of the obvious ways to visualize is to make a stacked bar chart. But it results in poor representation of values as we cannot easily compare ratings of one vendor to another. This is where a panel chart would help. A sample panel chart for above data can be like this:

A panel chart (often called as trellis display or small-multiples) shows data for multiple variables in an easy to digest format. It lets users compare in any way and draw conclusions with ease.
Today, I want to discuss how the principles of panel chart can be applied to visualize a complex set of survey results. For this we will use the recent survey conducted by Gartner on how various customers use BI (Business Intelligence) tools. The folks at Tableau have done good analysis of this data and presented the results in this format:
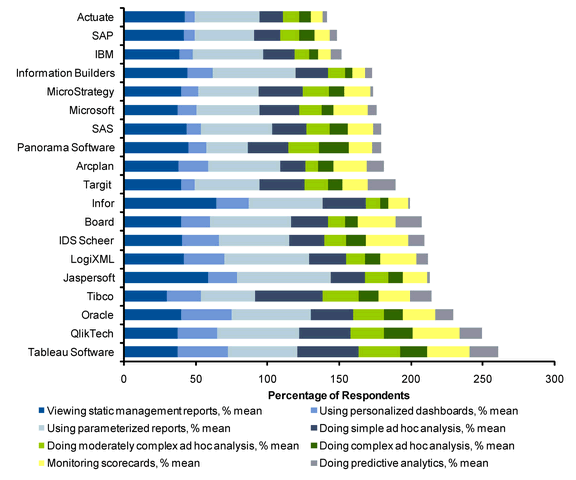
While the above chart is ok, it doesn’t let you compare vendors very well. We can only compare them on first usage, “viewing static management reports”. For everything else, the base line changes, so it is difficult to draw meaningful conclusions if, for example, you want to know which software is getting used more for “doing complex adhoc analysis”.
Jon Peltier has done beautiful analysis of this chart and presented various alternatives in his post yesterday. One of his recommendations is, of course, making a panel chart like this:
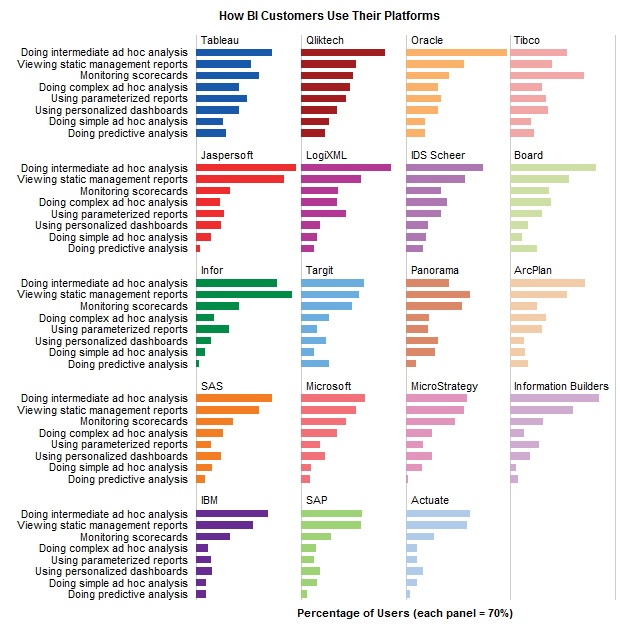
While, Jon’s Panel Chart greatly improves the readability of these survey results, I have 2 problems with it.
- Making such a panel chart in Excel is like baking your own bread. If you are like me, after few hours, you would run to bakery both hungry and frustrated. Panel Charts are not native in Excel. That means, we have to bribe, coax, threaten, protest and bend over backwards to prepare something like this in Excel. Thankfully people have already done that. So we can follow the examples and learn from their lead. [here is a panel chart tutorial from Jon]. However, the point still remains that, creating a panel chart in excel is a pain.
- Once such a panel chart is constructed, it is still pretty rigid. For eg. if you are interested in knowing how IBM as a BI vendor fares, you would like to have the results sorted by IBM’s BI Usages, but doing that in this carefully weaved panel set up means going to square 1 with less dough. So, we are stuck with a panel chart where the values cannot be sorted by any one vendor.
Is there a simpler way to construct panel charts in Excel?
So, I wondered, “is there a better and simpler way to make this chart that would still let me compare values (by BI vendor or BI Usage), let me sort and still save me enough time to drive down to one of the best bakeries in town to get a nice fluffy donut?“.
Of course there is…
The trick is to use Incell Charts. Ahem!
Instead of carefully tweaking chart options, adding dummy series and hiding them in the charts, we can just use incell charts with REPT formula and then align them in the cells. Since Excel naturally has the grid layout, creating panels (or small multiples) is as easy as snapping your fingers. (pls. note, this method of panel chart is only applicable for bar / column charts. If you need panels of line charts or scatter charts, you still need to use the methods suggested by Jon.)
We can also easily add a sorting option and use the lovely LARGE formula to sort the results based on selected vendor.
Here is what I prepared using the above recipe and it took me less than 20 minutes to set this up.

[click here for larger version of this]
How is the above incell panel chart constructed?
I am sure you are eager to know how this chart is constructed. Here is the secret:
- I took the raw data from Jon’s site and then Pivoted it so that we get the survey results in a table (with vendors on top and usages on left).
- I have dedicated a cell to let user select the sort order. Let us call this cell as “K3”
- Based on the vendor selected in K3, I have sorted the entire raw data using LARGE formula (and generous use of MATCH, INDEX, OFFSET formulas as well – examples here and here).
- Then I used the REPT formula to plot the incell bar charts (and the font “play bill” so that the bars look thick and nice).
- I have topped this with conditional formatting so that sorted vendor can be highlighted in different color.
Download the Incell Panel Chart Workbook
Download the Incell Panel chart workbook to play with it. I am sure you will find something useful and fun in that. [mirror download link]
How would you chart survey results?
There are still few problems with this approach though (for eg. adding labels can be a pain), but all in all, this simplifies the charting task and leaves room for adding extra features like sorting, conditional formatting.
Here is a open invitation. We have a long weekend coming up, thanks to Easter. So go ahead and download the original data here. And make your own charts for this survey data. The objective is that we should be able to compare vendors with each other with ease. Save your charts as images and upload them somewhere. Then leave a comment here with that URL so that we all can know how you would chart survey results.
Also, share your opinion on this type of panel charts. What is your experience with them? Do you like / hate panel charts?


48 Responses
I have found that trellis or panel charts provide clear presentations of data that have first been presented in confusing charts with perceptual problems. However, I would never use Excel to create them when it is so much easier to do so with R, S-Plus, Tableau and other software. But beware, I have seen software that offers similar charts but does not keep the scales constant or has other problems.
Chandoo –
Very nicely done. I always forget in-cell charts.
Naomi –
You raise a good point, Excel isn’t the right hammer to install this bolt. However, a lot of people who would like this kind of display at their fingertips don’t have access to a nicer toolset than Excel, nor the time to learn to use such tools. Tableau Public will provide help for both of these issues, but in the meantime, Chandoo and I (and others) will keep providing assistance to the great unwashed.
I think also that bringing awareness of better chart techniques is a worthwhile endeavor itself.
Speaking of better chart techniques, I finally got your book, and I rate it two thumbs up. Simple approaches, clear explanations, good examples.
Jon,
I could not agree more with your comments about Excel. Many clients have essentially said that they don’t want to hear about chart types if they cannot be drawn in Excel. That is why the work that you and others do is so important and why I follow your blogs even if I prefer using other software.
Thanks for your kind words about “Creating More Effective Graphs.” You, Chandoo, and others have added value to it by showing readers how to create the graphs I recommend using Excel.
Very nice!!
An ingenious use of in cell graphs. From now on when everI need for a panel chart , I will think of a in-cell graph.
Well how about a heat map to visualize the data, I have plotted one on my blog, http://www.visualquest.in/ In my visualization I have coupled the heat map with a data table to facilitate precise comparison. The heat map does a great job I think. Take a look.
I have rendered this in Tableau but I am sure there would be a way to replicate the same in Excel.
Cool, I like In-Cell panel graphs and use them frequently in my own work. One tip that I saw in another posting on Chandoo’s blog: use the font Script in size 7 points and the bars look SOLID. Script font comes with either Windows itself or MS Office, I forget which, but anyway if you have Excel on a Windows box you have this font.
Hi Chandoo. I just posted this over at Jon’s blog, then I saw you’d also covered it too:
Here’s my interpretation: A matrix where you can compare differences across platforms compared to the particular platform you select using a data validation list. I used graphs, but overlaid them on top of an excel grid containing the axis labels and some alternate bar formatting.
At http://screencast.com/t/OTYxNmE0 you can see how the other platforms compare to Tableau. From this, we can see that all platforms make equal or more use of their static management reports than Tableau users, with the exception of Tibco. Note that Infor and Jaspersoft users make significantly more use of this function. We can also see that the closest match to Tableau across all measures was Qliktech.
Lets see how all platforms compare to the average platform. http://screencast.com/t/NTA5MzFl
Tableau (and also Qliktech and Tibco) stand out on most measures bar static management reports, but Tableau is only slightly above the average in terms of parameterized reports.
My amended spreadsheet (Excel 2007) is at http://cid-f380a394764ef31f.skydrive.live.com/self.aspx/.Public/Panel%20chart%20matrix%203.xlsm if anyone wants to play around with it.
Hi again Chandoo. I love your incell implementation. Question: Why are you adding (0.0000001)*ROWS($B$3:$B3) to the raw data?
@Jeff: I am adding a small but unique fraction so that I can sort the values using LARGE() coupled with MATCH(). We have to do this because large doesnt behave properly when there are duplicates in the list. For eg. if a list has 10,20,30,30,40,50 and you ask for LARGE(list,3) it gives 30, and large(list,4) also gives 30. But when I match for 30 in the list, it returns the first occurrence of 30 and the position will always be 3 (so we will never really be able to find the matching description for that fourth item).
To avoid this, we just make the entire list unique by adding incremental fractions to each and every value.
This is a technique I have learned from Robert Mundgl of ClearlyandSimply.com.
I hope my explanation made sense to you.
Btw, very cool implementation of panel charts. Thanks for sharing the file with us. Here is your donut 🙂
@Matt: You can also use the PlayBill font (it scales nicely and the text is also readable so that you can add labels to your incell charts)
Ahhh. Cool. In that case, if I’m correct then instead of duplicating the data, you could have pointed directly from the raw data, and array-enter the following Sort Order formula in cell C16:
{=MATCH(LARGE(OFFSET(‘raw data’!$C$3,0,$C$14-1,8,1)+(0.0000001)*ROWS($B$3:$B3),ROWS($C$16:C16)),OFFSET(‘raw data’!$C$3,0,$C$14-1,8,1)+(0.0000001)*ROWS($B$3:$B3),0)}
…and then just copied it down. The difference is, my formula adds the unique incremental fractions to the raw data on the fly, using the bit +(0.0000001)*ROWS($B$3:$B3) which is appended to both offset functions.
Then you just have to change the ‘sorted values’ cells so they also point to the raw data.
I’ll email you my amended spreadsheet…can’t get it to upload to skydrive for some reason.
Whoops, slight error with the above formula. Plus I decided it was simlpy easier to delete the raw data sheet, and paste the raw data over the incrementally adjusted data.
So the correct formula should have been:
{=MATCH(LARGE(OFFSET($C$3,0,$C$14-1,8,1)+{0.0000001;0.0000002;0.0000003;0.0000004;0.0000005;0.0000006;0.0000007;0.0000008},ROWS($C$16:C16)),OFFSET($C$3,0,$C$14-1,8,1)+{0.0000001;0.0000002;0.0000003;0.0000004;0.0000005;0.0000006;0.0000007;0.0000008},0)}
…i.e. i added the following in after both OFFSET functions:
+{0.0000001;0.0000002;0.0000003;0.0000004;0.0000005;0.0000006;0.0000007;0.0000008}
…and then array entered the formula into cell c16 on the calculations sheet, then copied it down. This extra addition adds the incremental fractions on the fly.
You should be able to download the file from http://cid-f380a394764ef31f.skydrive.live.com/self.aspx/.Public/bi-vendor-incell-panel-chart%20jeff.xls
You can scale “in-cell charts” by using the following formula:
=REPT(“|”,(data_point*100/MAX(data_range))*CELL(“width”,this_cell)/(14+NOW()*0))
where:
data_point is the relative reference of the 1st point in the data_range
data_range is the absolute reference of the data
this_cell is the relative reference of the cell containing the formula
Formula is not completely volatile, so you must press F9 after adjusting column widths.
Scaling is not perfect (zooming affects it) but works OK.
@Jeff… of course array formulas can be used. Thanks for sharing the cool implementation with us 🙂
I shy away from array formulas in the examples on this site as they are difficult to explain. A helper series in the “calculation” sheet is much easier to understand.
@David… wow.. very good use of CELL formula to scale incell charts. Donut for you 🙂
Here is another way of scaling which I found on another website
=REPT(“?”,TRUNC(A1/2))&IF(MOD(A1/1,2)>0,”?”,””)&” “&B1&”%”
in this case cell A1 contains the value divided by a number (in this case 2).
the last part after the & appends a value from cell B1 and a text label – in this case a % sign
Chandoo…I think your in-cell graphs would be fairly easy to convert to dot-plots, in line with Naomi’s guest post over at http://peltiertech.com/WordPress/some-comments-on-dot-plots-guest-post/#comment-30400
On your marks, get set, go PHD go…
@Andrew.. very good tip.. I use scaling factor sometimes to normalize data too…
@Jeff.. and I went.. the post should be up at http://chandoo.org/wp/2010/04/09/dot-plot-panel-chart/ in a few hours…
Can’t wait. Meanwhile, I’ve invented a whole new graph style for this dataset…the smiley face plot. Check out my spreadsheet at http://cid-f380a394764ef31f.skydrive.live.com/self.aspx/.Public/Dot%20plot%20matrix.xlsx
Okay, here’s a screenshot (closeup) http://screencast.com/t/NDFhMTc1
And here’s the whole dashboard: http://screencast.com/t/ZWZiYzUwZmUt
Jeff –
Those smileys are no good. You have to encode other values in the degree of smile/frown, the height and width of the face, how open the eyes are, what color the faces are, and other features I won’t enumerate.
Then you’ll have a set of glyphs, which have a remarkably low effectiveness to embedded effort quotient.
By “have to”, I mean “ought to”, of course.
You’re right, Jon. How about this? http://screencast.com/t/OTU0YzBhYjA
Jeff – It’s a start, but at least use some CF to apply red-amber-green to the smileys, and maybe keep the jolly roger black.
Just realised that not everyone might have unicod fonts installed. So here it is again in a common font:
http://screencast.com/t/OWRmODA4
I would like to build on incell type chart or other method to have a table of data with cell colour a proportion of other splits of the data, ie if my cell value is 100, and of this 100 33 is say attribute A, and 66 B, then 1/3 of cell is pale green and 2/3 cell is red with the number 100 still legible. How could this be achieved. It is an easy way to visualise extra dimensions of data in a 2-D way.
Chandoo…slight correction to your post above: where you say (pls. note, this method of panel chart is only applicable for bar / column charts) you should add that they only work where the numbers being graphed are positive.
You can of course modify your spreadsheet so that you have one column for negative values and one for positive ones. This is what I’ve done for a chart I posted in the comments of a post by a guest blogger Edouard Buning at Jon Peltier’s site. See http://peltiertech.com/WordPress/sp500-recovery-by-sector/
Screenshot:
http://cid-f380a394764ef31f.skydrive.live.com/self.aspx/.Public/Chartbusters%20S^0P%20500.JPG
Workbook:
http://cid-f380a394764ef31f.skydrive.live.com/self.aspx/.Public/chartbusters%20s^0p%20500.xlsx
…although you can certainly use incell charts to display negative numbers in another column, as I’ve done here:
Screenshot:
http://cid-f380a394764ef31f.skydrive.live.com/self.aspx/.Public/Chartbusters%20S^0P%20500.JPG
Workbook:
http://cid-f380a394764ef31f.skydrive.live.com/self.aspx/.Public/chartbusters%20s^0p%20500.xlsx
this comes from my comments on a great guest post by Edouard Buning at Jon Peltier’s blog at http://peltiertech.com/WordPress/sp500-recovery-by-sector/
whooops, duplicate comment. I thought the first one had disappeared.
@Jeff… sometimes the blog commenting engine is acting up and throwing empty pages on submit. Dont freak out and rewrite your comments. All your comments belong to my DB.
btw, you can also so some cleaver offsetting of space characters to create +ve and -ve effect in the incell charts and then apply conditional formatting (ahem!!!) to show diff colors for + and – values…
Duh! I always do this typo. Read “Clever” not “Cleaver”
@jon
Hi Jon,
What does the 14+NOW do in this formula?
quote:You can scale “in-cell charts” by using the following formula:
=REPT(”|”,(data_point*100/MAX(data_range))*CELL(”width”,this_cell)/(14+NOW()*0))
Oh and sorry, if i was to incorporate this in some vba to automate the process, how would i automate the F9? would i do a cells.autofit then switch the calculation from to manual to automatic? Looking to incorporate it in a report that i’d previously used incell data bars in, however as these are not backwards compatible they’re of no use to anyone we send the report to. thanks. Ben
@Ben I think you meant to address that comment to David. Looks like the NOW() part just essentially forces the formula to recalculate any time you press F9, but I’m not quite sure why you would actually need that given F9 should trigger a recalculation of the CELL(“width”,this_cell) part.
Thanks Jeff, Is the 14 of particular relevance to the cell width or anything, couldn’t really work that out?
My other query with this is that my data range will change each time, would i have to declare a range or name a range and then add it into my formula in vba in place of the actual cell refs?
@ben. To me, it looks like the 14 is just a scaling factor that David chose, that makes the incell charts the width he wants. I.e. if he had used say 10, then the charts would be wider, and if he had used 20 then the charts would be thinner. Note that the *100 is also a scaling factor. So you could increase 100 or decrease the 14 by and it would have the same effect.
I don’t think you need to automate the f9, because anytime the book is opened (or anytime that someone changes a cell value) then excel will do a recalc and scale the chart accordingly.
I’m not quite sure what you mean re the range changing. Can you elaborate?
@jeff. Yeah i played around with it a bit and it seems to vary the distance from the end of the bar to the cell border, with 14 it goes tight to the border, 14.3 seems more aesthetically pleasing to me as it has just a smidgen of padding at the start and end of the border.
With regards to the range changing…one of the reports i will be using it for is Jobs Carried out per Town, one firm may cover ten towns, another twenty, therefore a set formula wouldn’t work. I got around it my naming a range based on the excerpt below and then using the named range in the formula instead of specific cell references:
Range(“C3:C” & Range(“C3”).End(xlDown).Offset(-1, 0).Row).Name = “DataT”
Range(“D3”).Select
ActiveCell.FormulaR1C1 = _
“=REPT(“”|””,(RC[-1]*100/MAX(DataT))*CELL(“”width””,RC)/(14.3+NOW()*0))”
Range(“D3”).Select
It seems that if the cell width is changed the bars don’t adjust so i’ve put a simple “calculate” in the procedure later on which fixes it.
My next project is to work out how to conditionally format the highest value bar. I’ve managed to get it working for the figure in the C col but not the REPT bar in the D col.
(col b=town,col c=number of jobs, col d= incell data bars)
worked it out:
=$C3>=LARGE($C$3:$C$10,1)
Hi, very impressive work. But I’m struggling to work out how the sort order changes in the calculations sheet (cell c16 to C22) when a new vendor is selected using the drop down box in the first sheet.
You raise a good point, Excel isn’t the right hammer to install this bolt. However, a lot of people who would like this kind of display at their fingertips don’t have access to a nicer toolset than Excel, nor the time to learn to use such tools. Tableau Public will provide help for both of these issues.