

Over at PTS Blog, my dear friend & charting guru, Jon Peltier has an interesting post on using dot plots to visualize Murders & Suicides data by US States. Here is a sample of the charts he recommends for such data.
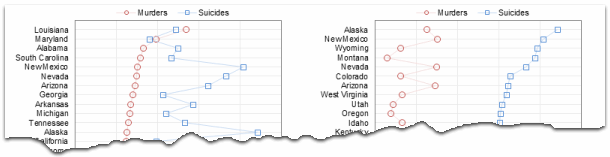
If you are curious how he made these charts, well, he used dot plot chart utility to create them.
Not that murders & suicides fascinate me, but I wanted to play with this data myself and see how we can visualize it. So I emailed Jon and asked him to share the raw data. Being a lovely chap Jon is, he immediately sent me the data. So here we are, playing with gory data on a Friday.
Suicides & Murders by US States – An Interactive Excel Chart
Here is a demo of the chart I came up with.
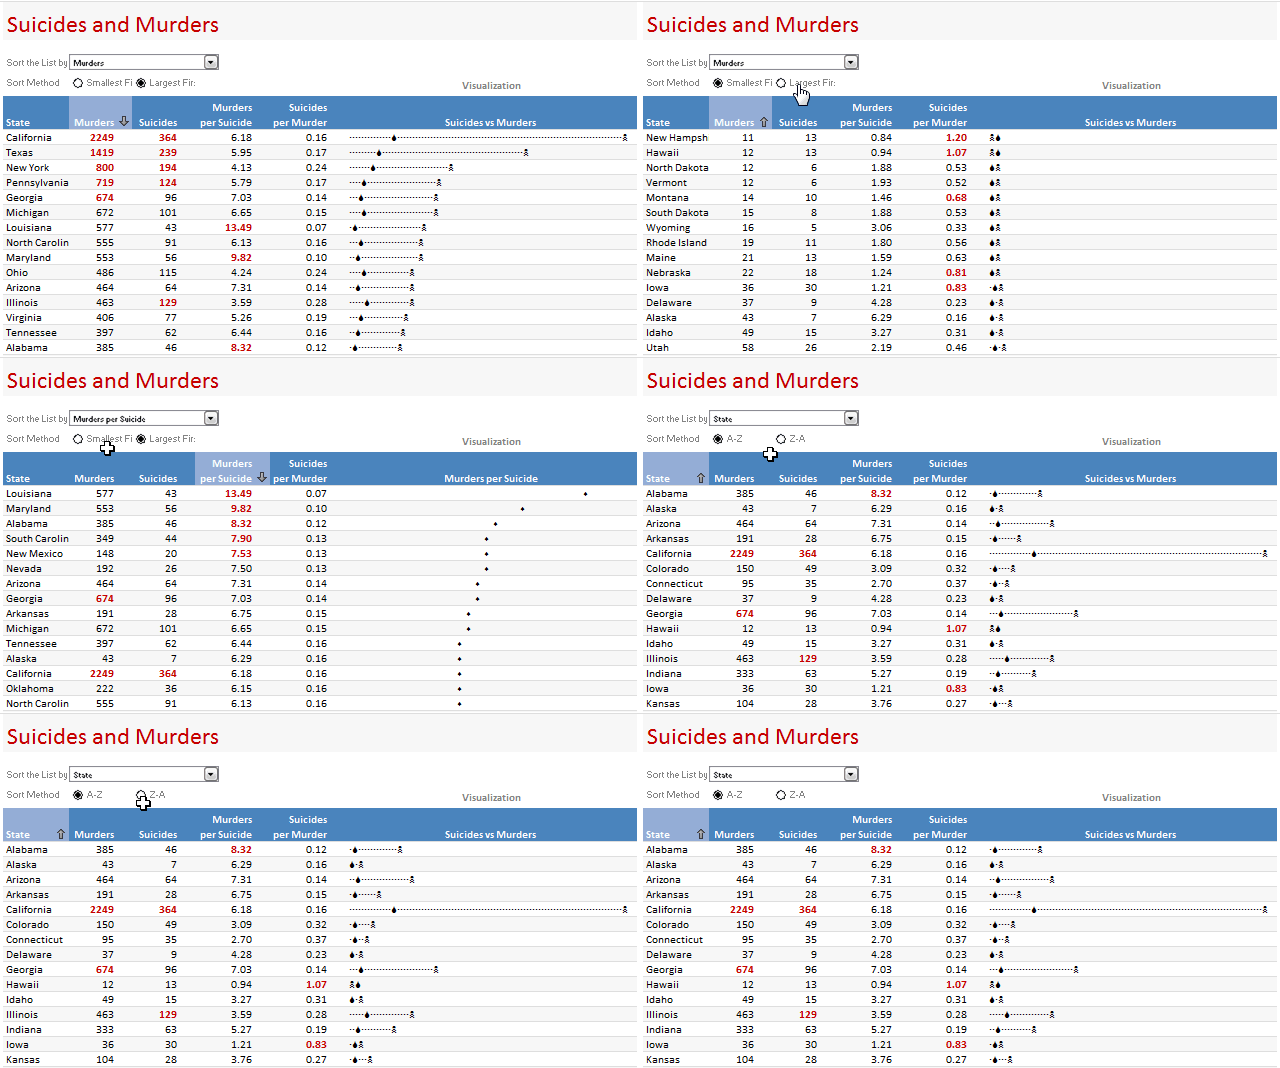
Thinking behind this chart
We see this type of data all the time. 2 or more metrics by a dimension like State, Product group, Country, Web Page or Customer. In this case, as you can guess, there is very little co-relation between murders and suicides by state. While we want to visualize them separately, we also want to keep the overall context together.
Since Jon already provided a lot of interesting options, I went with the interactive charts so that you can sort and view the data in any way you want.
How is this chart constructed?
Lets only look at the most important bits of the construction here. It is your homework to breakdown this file and understand how it works.
1. Arranging the data
The data is arranged by states in rows and murders & suicides in columns. I have added few extra columns to calculate murders per suicide and suicides per murder.

2. Sorting the data on-demand
This is the tricky part. I have used COUNTIF formula to sort the list. Learn how to sort a list of values using formulas [More on sorting values].
3. Visualizing the sorted data
I have used in-cell charts for this. Read more about in-cell dot plots and how to develop them in Excel.
4. Other nice stuff that you see in the chart
I used conditional formatting icons to highlight the column & show sort direction. Also, I used conditional formatting top 10 rule to highlight top 5 items in each column.

Download this chart & play with it
Click here to download the Suicides & Murders by US States – Interactive Excel Workbook and play with it. Examine the formulas in “suicides vs. murders” sheet to understand how the workbook is put-together.
How would you have visualized this information?
I am more interested in knowing how you would have visualized this data. Go ahead and share your views & ideas with us using comments. If you feel adventurous, go ahead and make a chart and email me at chandoo.d @ gmail.com. I will be glad to learn from you.
Go ahead and share.
More Excel Charting Tutorials
- Visualizing Survey Results with In-cell Panel Charts
- 50 Best Cities for Finding a Job – Excel Chart
- Understanding Flu Trends with an Interactive Excel Chart
- The Effect of Grammy on Sales of Music Albums – Interactive Excel Chart
- More on Conditional Formatting, In-cell Charting
Note: All the data in this charts is gathered from the sources mentioned here. Thanks to Jon for sharing the data with me.


24 Responses
Good stuff, as usual. I’ve updated my post to link here.
I’m all for ‘data is data is data’, but that’s pretty dark:) My state ranks 12th in murders but 4th in suicides!
Very cool, Chandoo. I’d love to see you use the hyperlinks trick to make this chart automatically sort by category when you hover over the category 🙂
Great stuff here. My biggest problem though is getting management to use the interactive reports. Often times I just copy and paste each scenario into Powerpoint because 9 out of 10 execs will not open a spreadsheet to play with it. It’s a bummer because these are really cool and intuitive.
Wonderful stuff chandoo!
One issue about interactive chart is that the other data goes out of sight when one makes a choice. So if you choose ‘murder’, ‘ suicides’ goes out of sight and one really cannot compare the two. While this can be fascinating it defeats the visual objective.
of curse if you are given options to view ratios, you could look at that.
Conceptually, I would keep one data set as a primary data set which would be always be visually available. The selection of the primary data set would depend on the objective of the visualization. The interactivity should allow viewers to compare against this primary data. Of course you could take it further by letting the viewers decide which primary data set to use.
Very cool chart trying to show real data, but unfortunately in a way that prevents us from drawing almost any interesting — and perhaps politically controversial — conclusions!?
Well, perhaps it shows that guns don’t kill people, people kill people. (Otherwise the states with the highest rates of gun ownership would lead in both murder and suicide rates, no?)
Play with this limited data set any way we like, and it should come back to there being no correlation between murder rates and suicide rates by state. A fact which you’ve unfortunately obscured by trying to convert from rates to total counts per states, while not including the population per state as a visible variable. The Freakonomics report was all about the surprising fact that there are about 2 suicides per murder nationally and why the distribution varies among US states, but you’ve managed to undercalculate suicides by a factor of 10 which misrepresents the main story line — at least when I look at your workbook translated into classic Excel.
Chandoo, there is no doubt your charts show impressive style. I hope this is a rare instance where you’ve missed on substance (on more than one level).
please can you make a tutorial on this chart.. it helps to look at it visually tru clicks and comprehend better for amateurs like me!
thanks
s
@SB
Did you follow Chandoo’s link to http://chandoo.org/wp/2009/06/10/dot-plots-in-cell/
very cool! I’m going to apply this to something today…
Dear chandoo plz help——- I need help on the cell M3 and M4 in the sheet “suicides vs. murders” how these cells change value without any formula in these…
@Usman
M3 & M4 are linked to the two controls on the Output worksheet
When you select a State it changes the M3 cell and shows the item No of the selection in the list: ie: Suicides is No. 3
When you select a Sort method it changes the M4 cell and shows the Smallest 1st as 1 or Largest First as 2
@ thanks Hui, but I want to no how it is done as I mean what formula is used as the cells doesn’t contain any formula still they change, how ??
@Usman
M3 & M4 are linked to the two controls on the Output worksheet
When you select a State in the control the control changes the M3 cell and shows the item No of the selection in the list: ie: Suicides is No. 3
When you select a Sort method the control changes the M4 cell and shows the Smallest 1st as 1 or Largest First as 2
The Controls are linked to those cells and the controls hence put the values into the cells without the need for a formula
Have a read of: http://chandoo.org/wp/2011/03/30/form-controls/
Thanks Hui for your help, I ll def visit the link and shall learn something new 🙂
@Hui, one more thing, there is formula that i have in my excel sheet that i wish some to kindly explain it to me, it goes like
=SUMPRODUCT((M$4:M$27=M4)*(L$4:L$27=L4)*(J$4:J$27=J4)*(D$4:D$27>D4))
I dont know where to post Q, so I am posting it here , thanks for your help
@Usman
It means count how many rows have all the conditions listed inside the Sumproduct
You should post these style questions at the Chandoo.org Forums
thanks Hui, just to confirm my understanding, if every condition is met once than anwser should be one ??? as =sumproduct( 1*1*1*1) ??
@Usman
Yes, but it is 1 for every row in rows 4 to 27 where all conditions are met
Sumproduct does two things
Firstly, it adds up each 1 where all the conditions are met
Secondly, it forces the calculation to be performed for each row in the range 4:27
@ Hui thanks
I have recently realised that one could use the REPT() function in the ways that you are describing here and have already been playing with it. However, as far as these data are concerned, I want to suggest something different.
Firstly, I think the language everyone has been using has been a bit confusing. For Alabama, for example, the murders of 385 is the total murders for the period. It seems that we started with murders then changed to murder rates but weren’t actually showing murder rates! Anyway … minor point.
My suggestion is to use a population pyramid style of graph rather than the inline graphs or the dot graphs that you and Jon Peltier have been using.
I have prepared three such graphs:
murders and suicides State by State … raw numbers
murders and suicides per 100,000 of the population
murder/suicides v suicides/murder
To keep it simple I have used the data from just 16 States but in my opinion the graphs communicate very well.
I have prepared a page in my Excel Blog to show what I have done and you can download my Excel file from there: http://excel2007master.wordpress.com/population-pyramid-graph-v-in-cell-graph/
My page finishes with possibly an even more interesting XY chart …
Duncan
Hi Chandoo,
Thanks for sharing this, I found this very interesting, but how did you display the skull and crossbone in cell.
Thank you.