

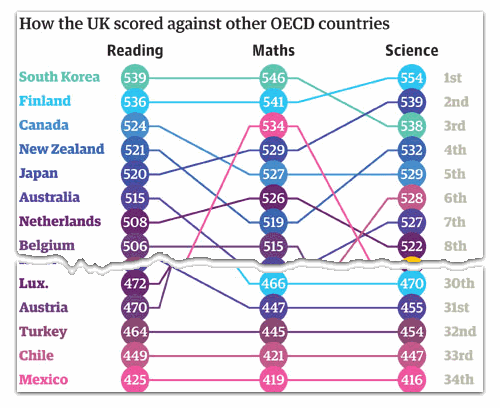
Here is a charting challenge to begin your Christmas week. Recently Guardian’s Data Blog released World Education Rankings data and a sample visualization (shown below).
Kaiser at Junk Charts took this data and suggested a few alternative visualizations [part 2]. (shown below).
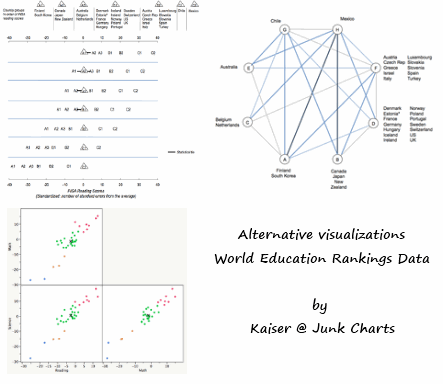
While Kaiser‘s charts are probably more insightful, they also appear complicated to my layman eye.
Naturally I wanted to give this data a charting-shot and see what comes up.
But before I show you how I cooked my chart, I want to throw a challenge to you.
Your Homework – Make a chart from World Education Rankings data
- Download the original data from here (or from here).
- Make a chart (or few charts) visualizing the data.
- Your objective is make it easy for us to understand the World Education Rankings Data
- Upload your workbooks to Skydrive or some other public file sharing site.
- Share the URLs, images etc with us thru comments.
- Bask in glory!
How I visualized World Education Rankings Data
When I looked at the original data, I wanted to explore 2 things.
- How are the scores in reading, math & science are distributed? [Distribution]
- How does one country compare with another? [Comparison]
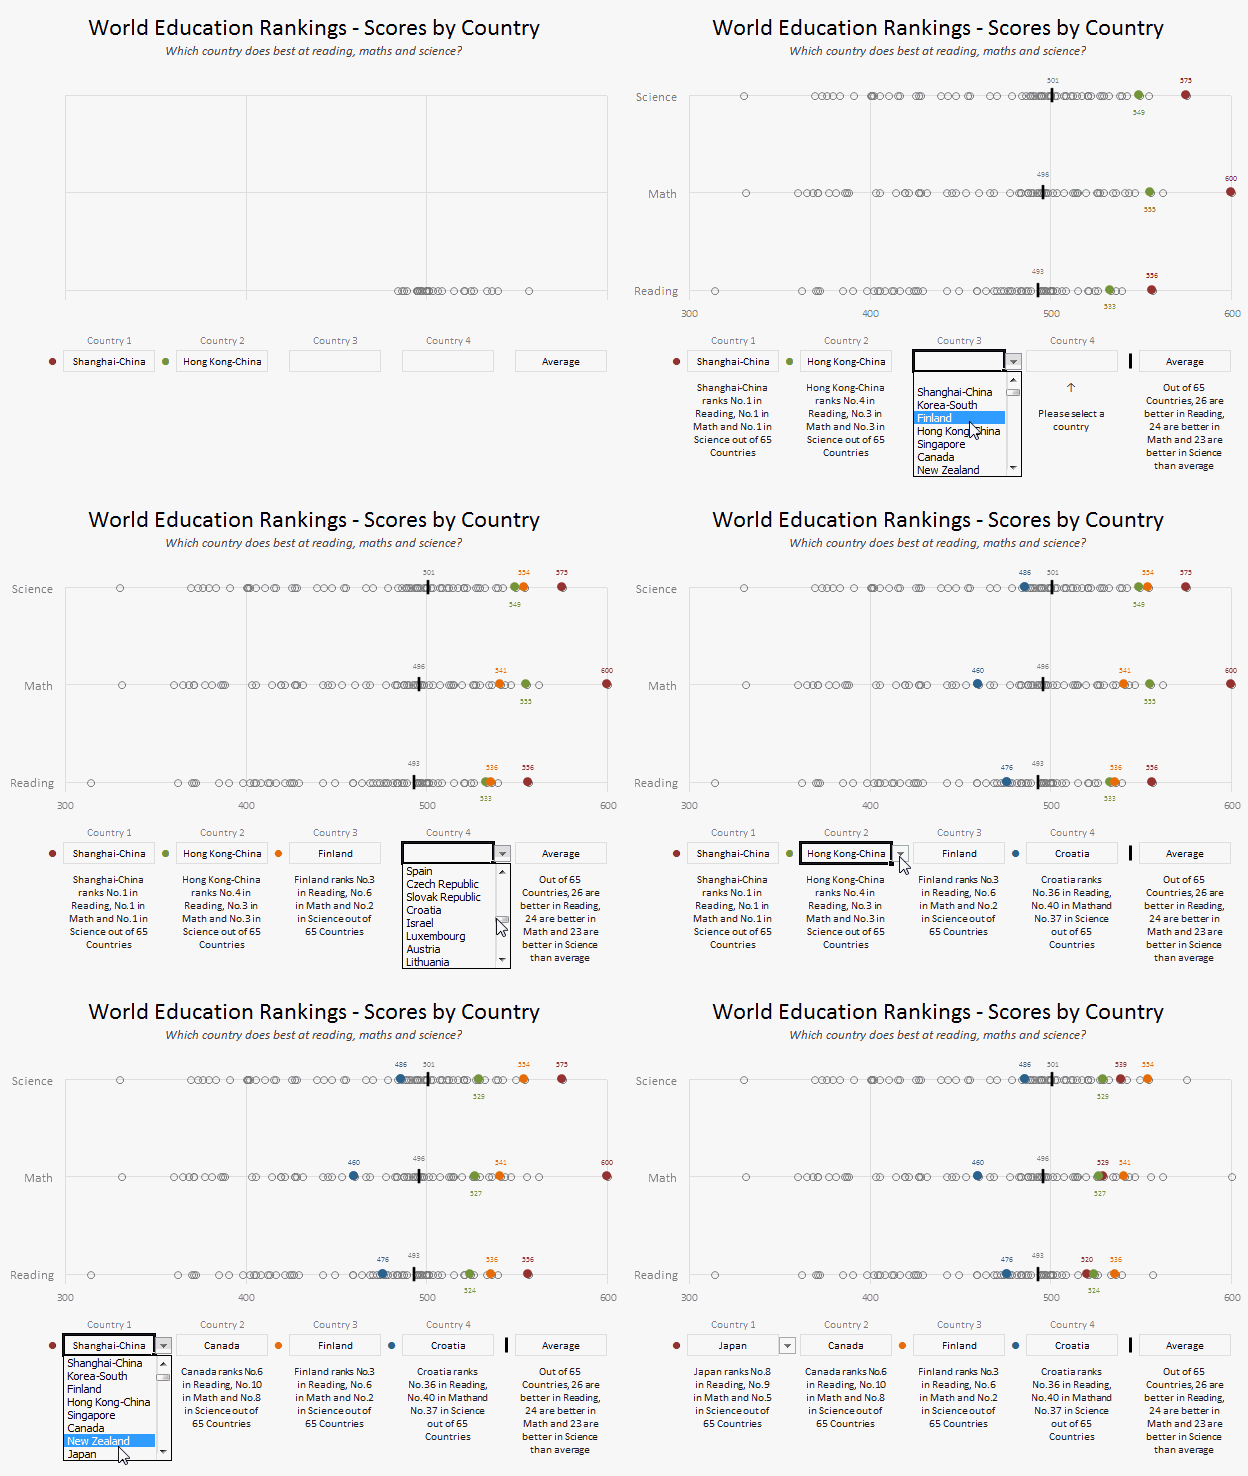
To keep it simple and compact, I made one chart that meets both these objectives.
Here is what I could come up with:
How is this chart constructed (Recipe)
- The chart is a scatter plot with scores for each area plotted with a different y value (reading = 1, maths = 2 and science = 3)
- The chart is also dynamic. Visit Excel Dynamic Charts page if you are new.
- The four selected countries and average are extra series in the chart with diff. formatting.
- The messages are constructed using RANK formula and concatenate operator &
- Other tricks used – incell dropdown boxes, text boxes with formulas, symbols, and chart formatting.
Since the process of making this chart is a bit more detailed, I made a youtube video explaining it. See it below.
Download the Excel Workbook
Click here to download the workbook. The file works best in Excel 2007 or above. Try the Excel 2003 version if you prefer.
Now your turn,
Go ahead and download the original data. Make your own visualization of World Education Rankings and post it using comments. I am waiting 🙂
Learn more Excel Magic
If the above chart feels like magic, you will be wowed by these additional resources:
- Excel Dynamic Charts – Techniques & Downloads
- Visualization Principles – Making Better Charts
- Visualization Projects – Kickass Excel Magic


24 Responses
Here is mine http://cid-e98339d969073094.office.live.com/self.aspx/.Public/WorldEduRanking.xlsx It has normal distribution charted and the dots show the country selection in the dropdown (in the table on right hand side of the chart).
Nice job, Chandoo. I really like your approach. It would be interesting if you could filter the data by demographics (I realize that this is beyond the scope of this demonstration). For example, only chart countries with median per capita income > X.
I tried, I failed.
120 bar charts from sparklines for excel. Each one is driven by a vlookup with a 3 possibility nested if for the color.
apparently it has limitation:)
I kid.
@ Chandoo : Your approach is the one one I would have gone for, very comprehensive yet readable.
@Dan I : Sparklines are not suitable for all cases… In this example you do not need to densify information therefore a single “Large” chart is the way to go.
I will however try the “barchart” approach.
Hi Chandoo, Your blog is so cute and impressive , its very intellectual and technical too. The topic(Visualize World Education Ranking Data) you have chosen was very excellent and the description is very simple and easy to understand. Simply to say you have spoon-feeded the topic. Aftr reading this topic i have no doubt to ask.
For the sake of using Sparklines at all cost :
pdf printout : http://www.box.net/shared/d0uogsi9rb
xlsx file : http://www.box.net/shared/aqtcsqrcpq
Excel 2007 addin : http://www.box.net/shared/yqf4u9evib
I still prefer Chandoo’s version.
@ Chandoo : Alphabetical sorting of countries in dopdown boxes would make the selection easier…
Ohhhh Fabrice, I’m not ripping.
I sort of knew I was committing high spreadsheet abuse when i was monkeying with it. I’ve been trying to teach myself to use more than just the ‘basics’ with SFE, so anytime I get some good junk data, I typically light it up with your extension.
Again: No beef. You addin is still the single best addin in for excel, period. end of story. Mad respect.
This is my first attempt at dynamic charts.
http://cid-6dd120bf349aaf4f.office.live.com/view.aspx/.Public/WorldEducationRanking.xlsx
Just found this site searching for information on timelines in Excel. Good information.
Chandoo, the Guardian are asking people to put their visualisations onto the Guardian’s datablog flickr page – you should really put yours there.
http://www.flickr.com/groups/1115946@N24/
@Vipul… good approach… I like the simple chart with powerful insights on normal distribution of scores.
@Tom… That was my initial thought too.. Since the demographic data is not part of the original data set, I left it out. Also, the demographic based visualization would be incomplete without data for the rest 120 odd countries.
@Fabrice.. good suggestion on sorting the country names. And good chart with Sparklines.. 🙂
@Johnny… Wow, that is good first attempt.
@Simon… I will do it sometime today. Thanks for pointing it out 🙂
Thanks Chandoo. I too missed sorting alphabetically in the validation.. Realized that after uploading the file..
That’s a good first attempt there Johnny.
@Chandoo… what is the last date to submit?
Sorry for posting so late but being new to the excel It took me lot of time. Here is my first every upload http://www.keepandshare.com/doc/view.php?id=2462699&da=y.
Inspired a lot from Chandoo’s work! but still little different.
Here’s my attempt at some fun visualization. Make sure you have a beer handy ;-).
http://www.keepandshare.com/doc/2464799/nationdarts-xlsx-december-24-2010-4-29-pm-55k
Thanks and happy xmas!
Sorry. I made some minor changes to it. download again for the latest!
http://www.keepandshare.com/doc/2464804/nationdarts-xlsx-december-24-2010-4-41-pm-53k?da=y
can you submit again
@Jordan: Please change the sharing settings in your keepandshare.com account. The link above is not allowing us to download the file.
Thank You
@Prakash: Sorry about that. I changed the share settings to public. Thanks for letting me know!
I am late to the party.
Here is my first attempt. Look forward to comment and feedback
http://datavisualisation.posterous.com/how-do-student-score-in-reading-science-and-m
What exactly would one call such a plot, as used by The Guardian?
Another example of this plot can be found here:
http://www.guardian.co.uk/news/datablog/2011/may/17/university-guide-2012-data-guardian
I’d be especially interested in being able to plot data using something like R in such a way. The best name I have been able to come up with is a profile plot, however that is slightly different in the sense that points on the graph are exactly that: points. I would like lines, which is more representative of data over time, I find.
I would appreciate any input regarding this.
Marcus
@Marcus… I am not sure either. But you can do such a chart in Excel with a bit of manipulation. Here is one I made just after seeing your comment.
You can see the chart in this workbook – http://img.chandoo.org/playground/profile-chart.xlsx
I will write a tutorial later next week explaining how to do this.
Looks like a “Bon-Bon” Chart
Lookout, Here come the haters….