

Two charting principles we hear all the time are,
- Sort your chart data in a meaningful order.
- Show only relevant information, not everything – because un-necessary information clutters the chart.
Today we will learn a dynamic charting technique that will mix these two ideas in a useful way. I call this a Top X chart.
Note: This article uses the concepts from How to make chart data ranges dynamic. I suggest reading that article first if you haven’t.
What in the name of 3d square pie is a TopX chart?
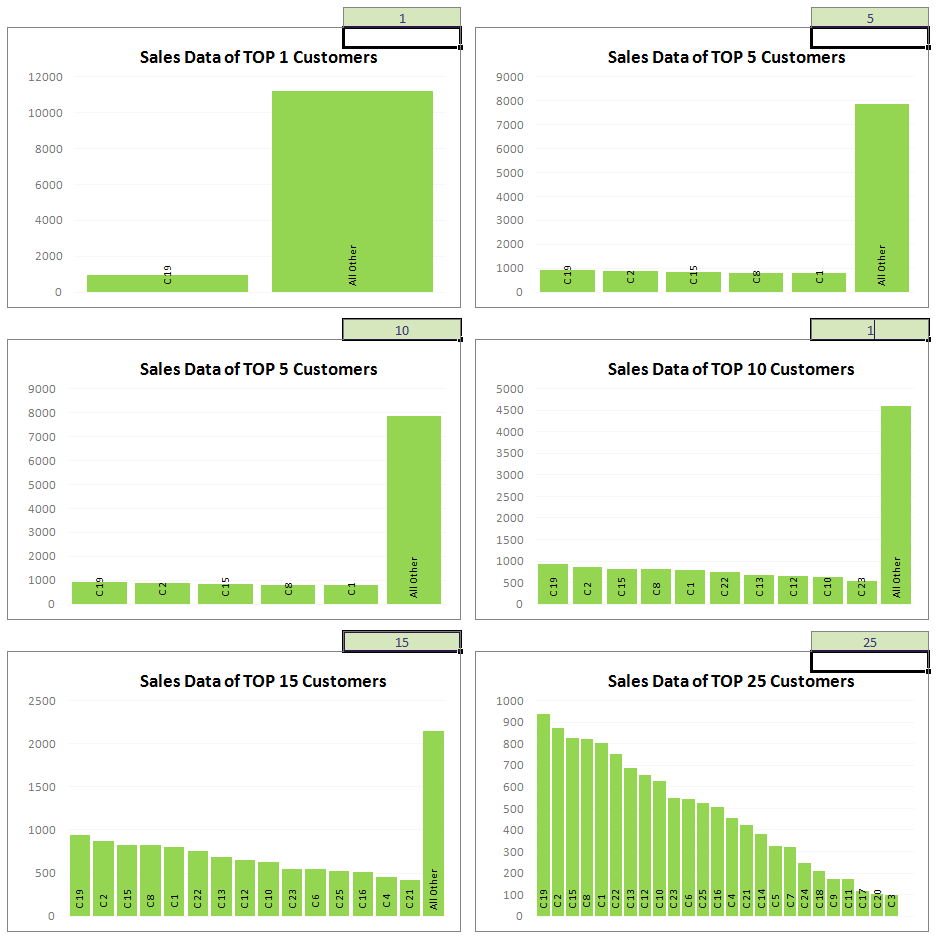
A top-x chart is an interactive (or dynamic) chart which automatically sorts the data from top to bottom and displays only TOP ‘X’ items and showing the remaining balance as the last item. Users can adjust the value of ‘X’ and chart will be re-drawn to show more (or less) values.
See this example implementation:
How to make a Top X chart using Excel – 5 Step Tutorial
1. Have your data ready
It should be in 2 columns – first column – the attribute (for eg. customer name) and second column – the value. Lets assume the data is in range A1:B10.
2. Add 3 dummy columns
We need to add 3 dummy columns to this list. (you can do away with dummy columns if the list is sorted).
- First dummy column – to make the values unique. We just take the value in column B and make it unique in Column C by adding a small incremental fraction to it. Something like =B1+10^-6*ROWS($B$1:B1) will do. [Help on ROWS formula]
- Second dummy column – to get first X sorted customer names.
- Third dummy column – to get first X sorted sales values. We use LARGE excel formula [14 more powerful excel formulas] for both these columns.
It is your home work to figure out how to write these formulas.
3. Find a cell where user can input the X
Lets call it $F$2.
4. Update the dummy column formulas
We need to update the formulas in dummy columns 2 & 3 so that we can show “all remaining customers” as well.
To Do this, you can add an IF formula that would check if the number of the customer is >X and then just show “All remaining” with the sum of remaining values. Remember, your IF formula should be smart enough to show empty values if the row number is >X+1.
At this point, the data table should look something like this for X=5

5. Finally, select Dummy column 2 and 3, make a chart
We will re-visit our tutorial on how to make charts with dynamic ranges of data. We use the same concepts to make this interactive top x chart.
So make a named range pointing to the result of an OFFSET formula. If this sounds like turkish, I suggest getting a cup of coffee and reading the charts with dynamic ranges post. Now.
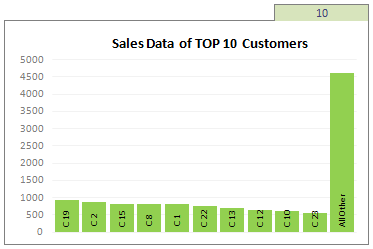 Once you have created the named range, just insert a new chart and use the named ranges as data sources. Format the chart a bit if needed and you should have a Sparkling Top X Chart, ready to fly.
Why Top X charts are cool?
- Top X charts let users play with them and find what they want. They are better than static versions.
- The show the necessary while hiding the rest.
- They show data in sorted order, which is awesome.
- You can easily build up on this concept to make them more presentable / fun. For eg. you can add a slider control and point it to cell F2.
Go ahead and download the Top X chart Template
Click here to download the topx chart template [Click here for Excel 2007 version, it is even more awesome] Play with it to learn how the formulas are working.
This is a slightly complicated chart, so beginners, you may want to jump around PHD and to get a grip on the key concepts.
What are your views on Top X Chart?
Please share your ideas and implementations suggestions using comments. I *love* to hear what you think about this.
Other Charts you can try:
Check out some of the excel dynamic charts to get inspired.


24 Responses
Completely off topic but in the screencast I noticed you have following setting in Excel set to ‘on’:
http://img263.imageshack.us/img263/2549/moveselection.gif
If you switch it off life becomes much easier when doing Excel developing because your selection stays the same after pressing Enter. That should save you a few key strokes 🙂
Why invent a new terminology? Isn’t this is a Pareto chart?
@m-b: Thanks, I will use this feature for future screencasts. It would save lot of time.
@Bill… 🙂 you are right and wrong. A Pareto chart, by definition, should also show the cumulative contribution which is absent in this chart. But this is pretty close to a pareto chart.
good day Chandoo.
i downloaded the file (http://cid-b663e096d6c08c74.skydrive.live.com/self.aspx/Public/topx%20chart%20v1.xlsx) but when i opened it, a warning appeared:
Excel cannot open the file ‘topx chart v1.xlsx’ because the file format or file extension is not valid. Verify that the file has not been corrupted and that the file extension matches the format of the file.
is there another way to download a good copy of the Top X chart?
-ted
@Ted
That is an Excel 2007/10 file, It sounds like you are using Excel 2003/XP
Hi,
I wonder what is the correct formula to make the source range variable and listen to a date range?
So I want to have a cell with a start and stop date and the formula should accordingly show the topx values for within that month.
Thanks
I can download the file
I see when you try and show percents the chart fails and shows only 0’s, any way to fix this?
This works for a one dimensional table but doesn’t really answer the question – what if I want to dynamically add a series.
If the above were a stacked column chart, with values changing through the horizontal axis, say time, how could you add additional series to ‘the stack’. Is this possible?
Thanks
Ben
@Ben
This can’t be automated unless you either:
1. Use VBA to add series
2. Predefine enough series to cover all eventualities, define formulas that have NA() as a solution when the series aren’t selected and they won’t show up in the Chart
Thanks Hui, nearly there!
The NA() method works for the series in the chart area but unfortunately not the legend which, on this chart, needs to be dynamic. Unfortunately this is a fairly busy chart so needs the Legend to hold the data. Do you have any idea how to prevent the chart from presenting legend entries for which there’s no data?
Thanks again
Ben
@Ben
On the Chart delete the legend
Then make the Plot area and Chart area have no color
Then make a legend manually using formula and cells which are behind the Chart (You can move the chart out of the way)
You can use similar formula to the series to put values in cells and Conditional Formatting for lines etc
Messy but it can be done
Alternatively to doing it behind the chart do it elsewhere and use a camera tool to place a snap shot in front of the chart
Chandoo et all.
Can this be done withing a pivot table/chart as well?
Hye,
This is such an amazing tool for my report. So dynamic, so interesting. So, I went on and on trying the rank and it came to my curiosity about some minor things. I hope you don’t mind to explain.
I noticed that you have this formula in column “Dummy”, eg
=$C21+10^-6*ROWS($B$21:B21)
which equates 10^-6. May I know what does this mean, please?
I also noticed that the ranking ignores other data when I enter more than 25 (I mean, if I enter to see Top 26 and above). Does this have to do with the 10^-6 equation? If it’s not, may I know in which part that your ranking limits is set? Or is it the default limitation of Excel?
Hopefully my questions are clear enough for you to clarify.
Thanks in advance.
DZ
@Dahlia
!0^-6 is the same as 1/10^6 or 1/million
it is then multiplied by the Number of rows and so gives a result slightly Greater than the actual value
This is used when sorting/ranking numbers so that there isn’t two numbers which are the same
So each number is unique
Thanks for the explanation, Hui.
How about the limit to Top 25 only? Do you happen to know why? Because I tested on some data that have 30 types of data. Supposedly, whenever we enter a rank in that field for it to calculates the rank, the rests will be calculated as “All Others”. However, it doesn’t put “All Others” when I put more than 25. It somehow out of the graph.
Thanks in advance.
DZ
I think I found the reason why I suddenly have limits on the ranking data. I realized that the range were ruined in the formulas in Dummy Col 2 and 3 when I pasted rows of data more than the one in the sample. So, I need to adjust the formula to count last row of data so that it is flexible for future input.
Now, it works just as it should after adjustment.
Sorry for the inconveniences.
Thank you.
DZ
Hye,
It’s me again. I have been trying to embed this ranking formulas into pivot table with the intention to let it calculate automatically when the range and data changes. Unfortunately, I really couldn’t except the “Dummy” column. So, I converted the formulas as macros. They work successfully, just that consumes inconsiderable amount of time to process even just for 20 to 30 rows of data.
Appreciate is anyone who is expert to correct or improve my coding below to allow much faster processing :-
[CODE]
Sub Rank()
Dim FPart1 As String
Dim FPart2 As String
Dim FPart3 As String
Dim LRow As Integer
Dim SRow As Integer
Application.ScreenUpdating = False
‘LRow = Range(“B1”, Range(“B1”).End(xlDown)).Rows.Count
‘With ActiveSheet
‘LRow = .Cells(.Rows.Count, “B”).End(xlUp).Row
‘End With
OldRow = Range(“E” & Rows.Count).End(xlUp).Row
‘MsgBox OldRow
LRow = Range(“B” & Rows.Count).End(xlUp).Row
SRow = Range(“A2”).Value
‘MsgBox LRow
ActiveSheet.Range(“E” & SRow & “:E” & OldRow).ClearContents
FPart1 = “=IF(XXXXX<=R2C6,INDEX(INDIRECT(""$B$""&R2C1&"":$B$""&LOOKUP(2,1/(C[-3]””””),ROW(C[-3]))),MATCH(LARGE(YYYYY,ROWS(INDIRECT(CHAR(COLUMN()+64)&””$””&R2C1&””:””&CHAR(COLUMN()+64)&ROW()))),YYYYY,0)),IF(XXXXX<=R2C6+1,""All Other"",""""))"
FPart2 = "ROWS(INDIRECT(CHAR(COLUMN()+64)&""$""&R2C1&"":""&CHAR(COLUMN()+64)&ROW()))"
FPart3 = "INDIRECT(""$D$""&R2C1&"":$D$""&LOOKUP(2,1/(C[-3]””””),ROW(C[-3])))”
Application.ReferenceStyle = xlR1C1
With ActiveSheet.Range(“E” & SRow)
.Formula = FPart1
.Replace “XXXXX”, FPart2, lookat:=xlPart
.Replace “YYYYY”, FPart3, lookat:=xlPart
End With
Application.ReferenceStyle = xlA1
Range(“E” & SRow).Select
Selection.AutoFill Destination:=Range(“E” & SRow & “:E” & LRow)
Calculate
Range(“E” & SRow & “:E” & LRow).Select
Range(“E” & SRow).Select
Application.ScreenUpdating = True
End Sub
[/CODE]
@Dahlia
Can you ask the question in the Chandoo.org Forums
http://forum.chandoo.org/
Please attach a sample file
Ok.Hui. Will do that.. TQ.
Hi, How do you use this to add in a criteria to match a certain cell, like if the word Enquiry is in a column, otherwise don’t list.
What about datasets where there is no definitive top X? For instance:
A 1
B 2
C 1
B Would be listed as the highest and if you only wanted to see the top 2 items. Excel would not be able to determine which one should be the #2 item to stay in our charts. As a result it will show all of the data listed above.