

One of the most dreaded courses during my under-graduation is Probability, Statistics & Queuing Theory. We called it PSQT. I struggled to understand the significance and concept of this course as I could barely concentrate in the class. We had a professor, who is probably a genius, but the moment he started the class, I would magically fall in to one of my after-noon naps. When I woke up, we are either in the middle of an elaborate t-test or going thru intricacies of a Markovian queue.
This was all 11 years ago. Later in life, I have embraced the world of probability & statistics. I still fear queues. May be I will get there one day. 😉
A good understanding of statistics & probability theory is necessary if you want to model complex real-life problems using Excel or similar tools. Naturally, Excel has several functions, features & supported add-ins to help you in this area.
Today, I want to share some of this with you. This article is broken down in to 3 parts.
- Learning Statistics & Probability using Excel
- Downloadable Excel Workbooks to understand
- Full blown models & simulations in Excel
#1 – Learning Statistics & Probability Concepts using Excel
Using Excel RAND functions
Excel has several powerful functions (formulas) to generate random numbers, random data. You can combine these functions to generate data that has certain parameters – like a give mean, standard deviation or follows a certain type of distribution.
Go thru Using Excel’s Random Functions for a detailed overview these techniques.
Simulating Dice Throws in Excel
One of the fundamental ways to learn about Probability is to look at dice throws. A dice has 6 faces and on each throw, any of the 6 faces turning up is equally likely. So, we say, each face has 1/6th probability of showing up. If you want to simulate this in Excel, you can use the formula RANDBETWEEN like this, =RANDBETWEEN(1,6). On each run, this formula would throw up a random number between 1 & 6 (including both).
For more, Simulating Dice Throws in Excel
Shuffling a List of Values in Excel
Understanding permutations and combinations is essential when it comes to modeling many real-world problems. Using Excel’s RAND, VLOOKUP and SMALL formulas we can generate a random permutation of a given list of values (in other words – we can shuffle the list).

To learn this read, Shuffling a list of values in Excel
Generate Frequency Distribution from Data
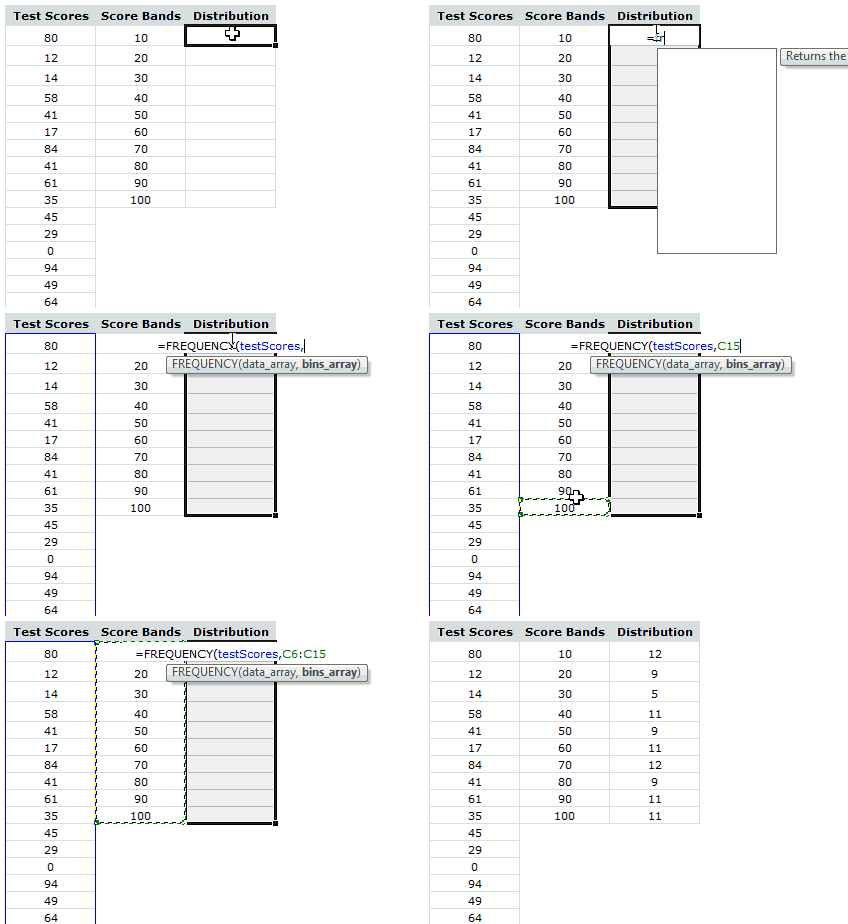
Often, when you are analyzing data, you need to understand how the data is distributed. Again, Excel has just the right function for this sort of thing. FREQUENCY(). In this simple tutorial, learn how to use Excel’s FREQUENCY formula to generate frequency distribution of given data.
Read Frequency Distributions in Excel
Trend Analysis & Forecasting using Excel
One of the most common applications of statistics is trend analysis & forecasting. Again, Excel shines with a lot of powerful formulas, built-in features and charting tools to help you understand the data & predict future based on that.
Since this is a big topic, we have covered it in 3 parts –
Part 1- Introduction to Trend Analysis & Forecasting: In this, we will learn what is trend analysis & forecasting. We will see manual forecasting technique in Excel. We will use Excel charts to depict our analysis and results.

Part 2 – Trend Analysis & Forecasting using Excel Functions
In this second part, we learn about Excel’s functions like LINEST, TREND, FORECAST, SLOPE, INTERCEPT, LOGEST and GROWTH. These powerful formulas can process lots of data and extract the trend information dynamically.

Part 3 – Trend Analysis & Forecasting using Charts & Macros
In the final part, we talk about how to use Excel chart’s trend analysis & forecasting features to estimate the trend & predict future values based on the data.

We also learn how to use Macros (VBA) to augment Excel chart’s trend-lines with useful information.
Visualizing Distribution of data with Box Plots
Box plots are an excellent way to understand the distribution of data. Unfortunately, there is no direct option to make a box plot from given data in Excel. That is where, this tutorial comes handy.

Learn how to create box plots in Excel.
#2 Downloadable Excel Workbooks
Learn Basic Statistics & Gaussian Distribution using this Excel Workbook
Glen, one of our long time readers shared this file with me. It lets you perform statistical analysis, quality control analysis, visualize Gaussian distribution based on the data you enter.
Click here to download the workbook.

Thanks Glen.
More Downloadable Workbooks
Almost all of the links in this page will take you to detailed articles on Chandoo.org, where you can also find downloadable workbook with examples. So just click thru and learn. 🙂
#3 Full blown models & simulations in Excel
A full blown model lets you learn various statistical concepts, Excel features and how to bring them all together to mimic a real-life situation.
Simulating Deal or No Deal game in Excel
In this simulation of Deal or No Deal, a popular television game, we use basic probability, permutations and Excel formulas features. You will learn how to assign random values to the suit-cases, how to use circular references, how to calculate the banker’s offer.

Simulation of Deal or No Deal game in Excel
Generating Housie / Bingo Tickets in Excel
Housie (Bingo) is a popular recreational game where the tickets contain 15 numbers between 1 to 90, arranged in 10 columns (3×10 grid). First column has numbers between 1 to 9, second column has 10 to 19 so on..
Generating a bingo ticket in Excel is a nice exercise in statistics, permutations and Excel formulas.

Learn from Bingo / Housie Tickets in Excel
Data Tables & Monte Carlo Simulations in Excel
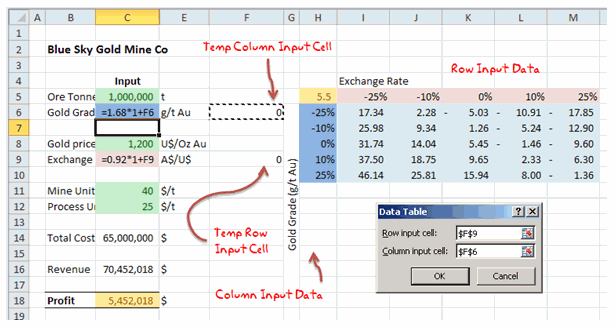
Excel has powerful features to let us do complex simulations of real world situations. One such feature is called as data table.
The Data Table allows a set of what if questions to be posed and answered simply, and is useful in sensitivity analysis, variance analysis and even Monte Carlo (Stochastic) analysis of real life model within Excel.
The case of Blue Sky Mining Company
To help you learn about data tables, Monte Carlo simulations, we have put together a fictional mining company – Blue Sky co. and analyzed its performance under various assumptions & simulations.
To learn about this, visit Data Tables & Monte-Carlo Simulations page.
Modeling & Scheduling a FIFO (First In First Out) Queue in Excel
FIFO queues are very common in life. You can see them at Airports, coffee shops, Apple stores; Except at Airports it is FIFOUYC (FIFO Unless You are Crew).
In this article, we model & schedule a FIFO queue using Excel.
More Full Blown Models & Simulations in Excel
For more examples, check out these links.
- One more example of Data Table & Linest
- Simulating 3D dancing pendulums in Excel
- Simulating Monopoly Board Game in Excel
Do you use Statistical Concepts for your work?
As a small business owner, a good portion of my work involves statistical analysis, forecasting and simulation. I run estimates for our website traffic, revenues. I run statistical tests (split tests etc.) to optimize our sales pages, website. I estimate when my kids wake up from their nap (based on past experience) and plan my work accordingly. Thankfully, for the last part, I do not use Excel 😀
What about you? Do you use statistical concepts for your work? What are the things you use and how does Excel help you in that? What are your favorite formulas, features and tips? Please share using comments.
Special thanks to Hui & Glen
Many thanks to Hui, our resident Excel ninja for writing many of the articles on statistics, simulation, forecasting & trend analysis.
Special thanks to Glen for sharing the analyze-this file with us.
Say thanks to them if you enjoyed this.


11 Responses
Chandoo, a very nice summary
Incredible!
One more great article from chandoo !!
Regards,
Saran
lostinexcel.blogspot.com
Hi Chandoo,Do you have any tutorials on creating a funnel plot in excel for meta analysis? I have a project at school and I’m at my wits end. please help. Thanks, Raquel
Hello Chandoo and Glen,
I am very new to Statistics and am trying to understand slowly.
I had got an Proabaility check query from office same like what example file you have provided here Learn Basic Statistics & Gaussian Distribution using this Excel Workbook…..
as i told you i am very new and poor in statistics formula. i have a problem in understanding how did you calculate X and F(X) values for the graph to find probability…
could you please explain X and F9X) formula to me, what it is doing why did you select this formula? for ex in file and X =$F$2-5*$F$6
F(X) = =(1/(SQRT(2*3.14159*$F$6^2)))*EXP((-1*(D48-$F$2)^2)/(2*$F$6^2))
Please please help me to understand
Iam trying to do a number density distribution using excel. I have given it a go but I think I have not done it correctly. Would it be possible to get some feed back on one set of data?
@Jayani
Can you post a set of data or post your question to the Forums:
http://chandoo.org/forum/
Thank you for replying. I have now posted it on the forum with a file attachment.
Please what formula can I use to periodic 5 numbers out of 90 numbers using excel?
Use run charts often. Checkout Data Sanity on google. He has a great way to explain variance as normal/special case with just four or five constants in a few formula. When measuring processes, this report type is essential to know if something unusual has occurred to if the process is running as designed. First reduce variance which indicates that everything being done is the same. Then target improvements be changing the process to incorporate new ideas and measure their effects.