Today lets tackle a familiar data clean-up problem using Excel – Transposing data.
That is, we want to take all rows in our data & make them columns. Something like this:

The easy solution – use Paste Special > Transpose
Long time Chandoo.org readers already know this. Excel has a built-in feature that lets you transpose data with a single click.
- Just select your original data
- Press CTRL+C to copy
- Go to an empty area and open Paste Special (CTRL+ALT+V)
- Select Transpose.
- Done!

Although this approach works, it creates a copy of your original data. So whenever original numbers change, you must waste precious key strokes & time re-doing the transpose. This is exactly the opposite of awesome.
So, lets move to formulas.
Formula Solution #1 – Using INDEX & Helper cells to transpose a table
Lets say, we have named our original data as myData.
Lets also say myData has 6 rows & 7 columns. That means, the transposed table will have 7 rows & 6 columns.
- Create a 7×6 grid in your worksheet
- About this, write numbers 1 to 6 (cells D20:I20).
- Similarly, write numbers 1 to 7 beside it (cells B23:B29).
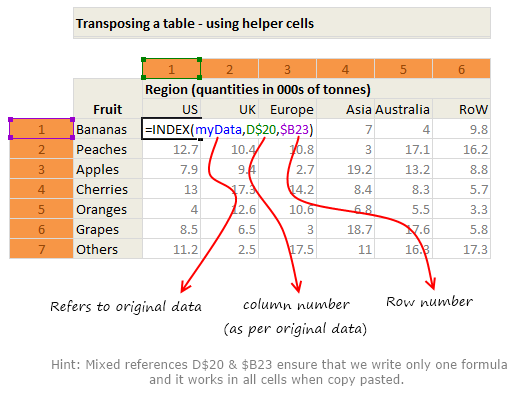
- Now use INDEX formula to transpose data like this:
- =INDEX(myData, D$20, $B23)
- Copy this formula all over and you are done!
See the illustration below to understand how this works.

Formula Solution #2 – Using INDEX formula & no helper cells
Sometimes, we cannot really use a helper column. That brings us to our next solution.
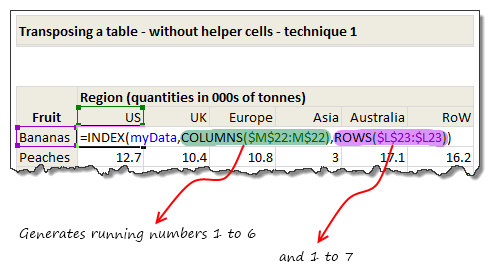
In above solution, the helper cells are giving us running numbers from 1 to 6 (and 1 to 7). We can use ROWS() and COLUMNS() formulas to generate these running numbers.
So our new formula will be
=INDEX(myData, COLUMNS($D20:D$20),ROWS($B$23:$B23))
Once you write and copy paste this formula, it will automatically supply the required numbers to INDEX formula and does the magic.
How does it work?
Well, that is for you to figure out. See this illustration to get started.

Formula Solution #3 – Using TRANSPOSE formula
Do you know there is a formula that does all of this. It is called – TRANSPOSE !!!
What is TRANSPOSE formula?
TRANSPOSE formula takes a range of values (or an array) and transposes them and returns another array.
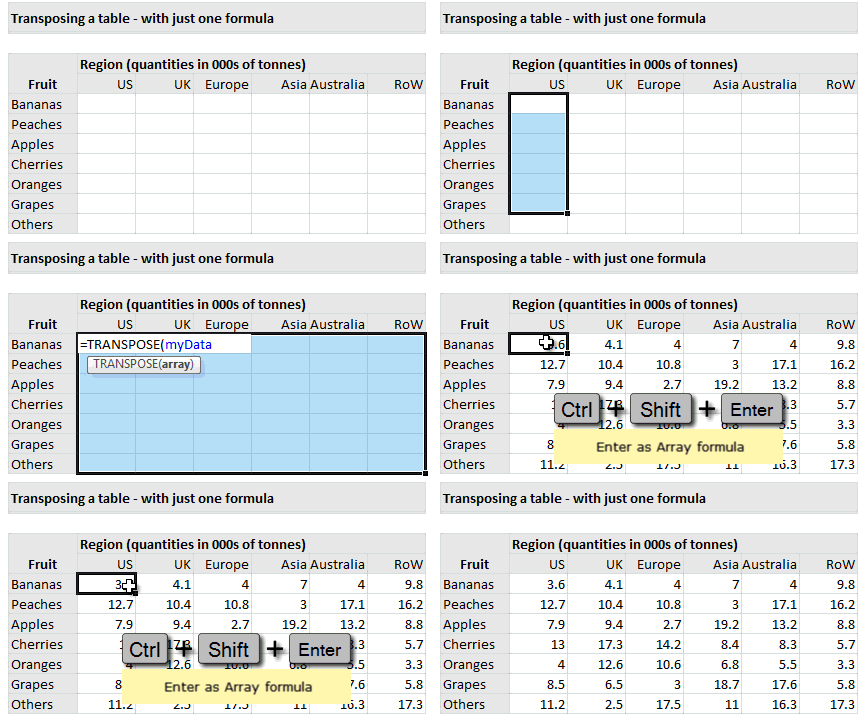
Since this formula always returns an array, we cannot use it in one cell. But we can select a range of cells & then write TRANSPOSE in them and press CTRL+SHIFT+Enter to get the values transposed.
See this demo:

Awesome, isn’t it?
Download Transpose Example Workbook & Play with it
Click here to download the workbook containing all these technique. Play with it to understand these formulas better.
How do you transpose your data?
I prefer using INDEX with ROWS & COLUMNS approach. This is very versatile & elegant. Also this approach lets me extract only a small window of large data set (by offsetting row & column numbers with something like scroll-bar position).
What about you? Which formulas do you use to transpose your data? Please share your tips & ideas using comments.
More formulas for data massaging
If you wrestle often with data & rely on coffee to get going, then you can use some help. Go thru below articles to learn more.


9 Responses to “CP044: My first dashboard was a failure!!!”
CONGRATS on the book!
Thanks for this podcast. It's great to hear about your disaster and recovery. It's a reminder that we're all human. None of this skill came easily.
Thank you Oz. I believe that we learn most by analyzing our mistakes.
Hey chandoo
this really a good lesson learned
but as I have already stated in one of my previous email that it would be more helpful for us if you could release videos of your classes for us
thanks
The article gave me motivation, especially you describing the terrible disaster that you faced but how to get back from the setbacks. Thanks for that, but with video this will be more fun.
Hi Nafi,
Thanks for your comments. Please note that this is (and will be) audio podcast. For videos, I suggest subscribing to our YouTube channel. No point listening to audio and saying its not video.
You always motivate me with respect of the tools in excel. How we can really exploit it to the fullest. Thanks very much
Thank you Amankwah... 🙂
Thank you very much, Chandoo, for your excellent lessons, I am anxious to learn so valuable tips and tricks from you, keep up the great job!
I truly appreciate the transcripts of the podcasts, because as a speaker of English as a second language, it allows me to fully understand the material. It'd be great if you can add transcripts to your online courses too, I am sure people will welcome this feature.
Dashboards for Excel has arrived in Laguna Beach, CA! Thanks!
Now I need to make time to "learn and inwardly digest" its contents as one of my high school teachers would admonish us!