

Slicers are one of my favorite feature in Excel. And here is a quick demo to show why they are my favorite.
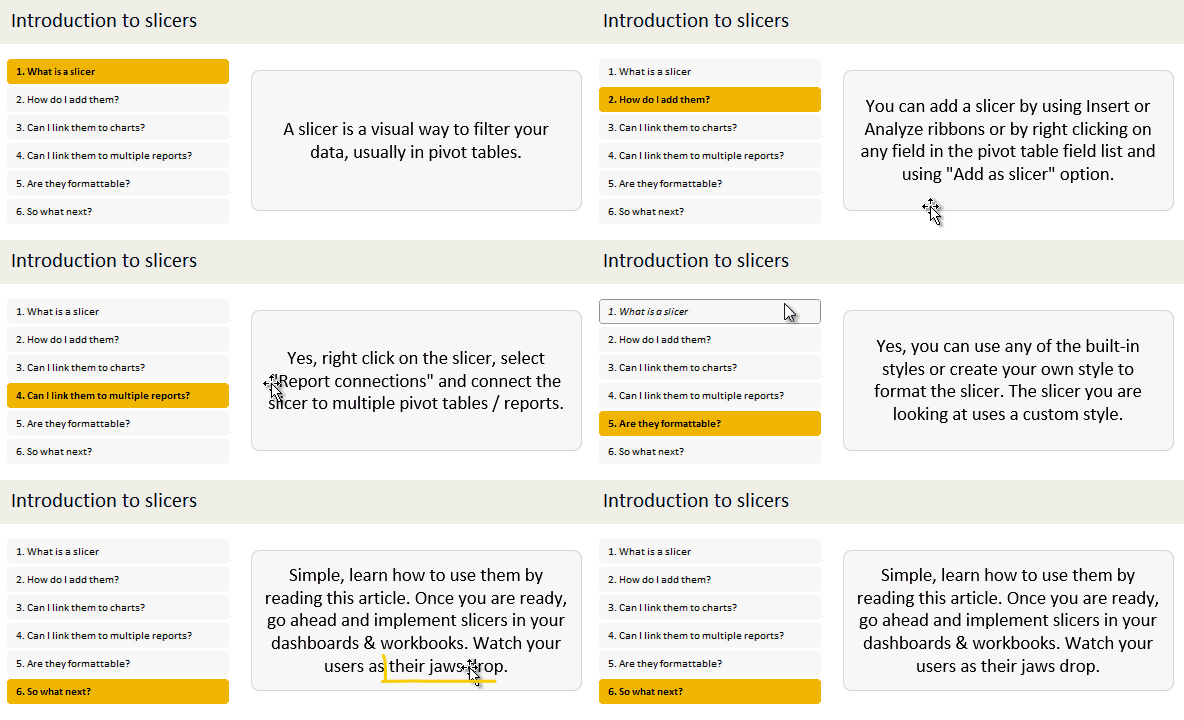
Slicers – what are they?
Slicers are visual filters. Using a slicer, you can filter your data (or pivot table, pivot chart) by clicking on the type of data you want.
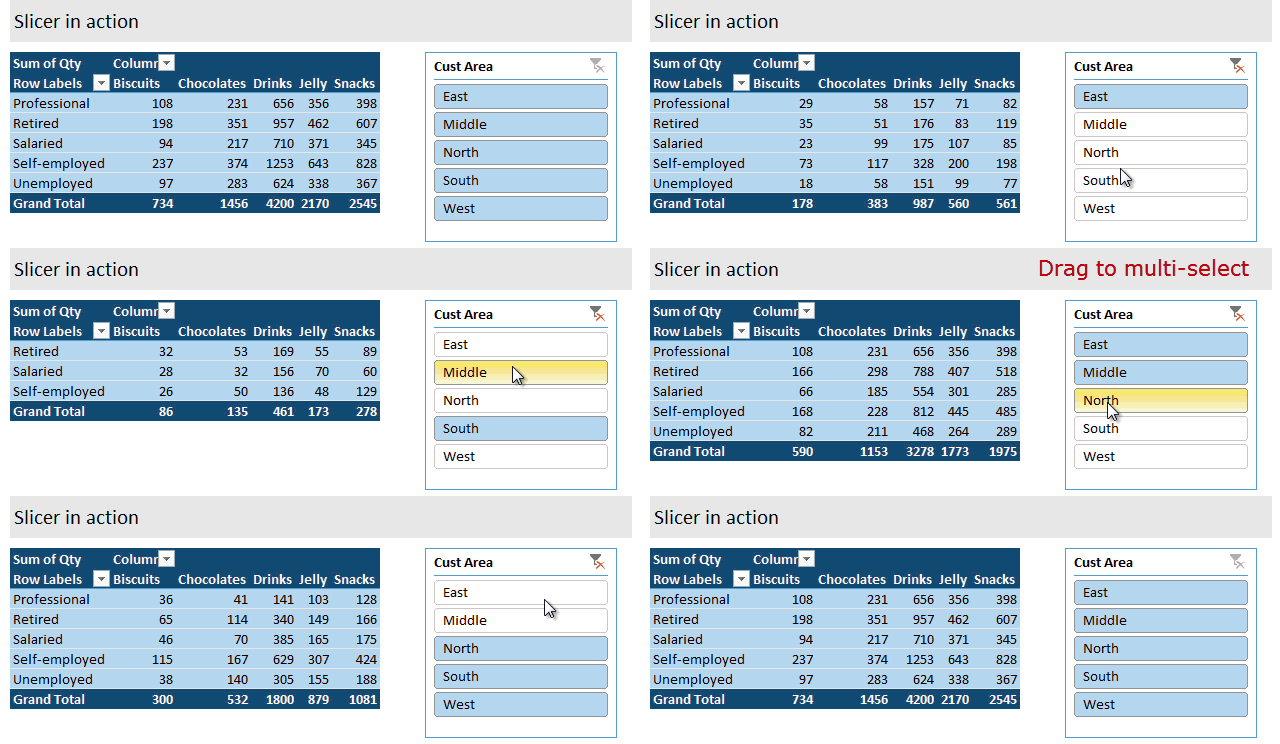
For example, let’s say you are looking at sales by customer profession in a pivot report. And you want to see how the sales are for a particular region. There are 2 options for you do drill down to an individual region level.
- Add region as report filter and filter for the region you want.
- Add a slicer on region and click on the region you want.
With a report filter (or any other filter), you will have to click several times to pick one store. With slicers, it is a matter of simple click.
See this demo:
Getting started with Slicers – Video
Here is a quick 5 minute video tutorial on Slicers. If are just getting started with this AWESOME feature, you must watch the video, NOW. See it below or head to my YouTube channel.
Download Slicer Examples Workbook
This post is very long and has many examples. Please click here to download slicer examples demo workbook. It contains all the examples shown in this post and a fun surprise too.
How to insert a slicer?
Note: Slicers are available only in Excel 2010 and above.
Adding a slicer in Excel 2010:
In Excel 2010, you can add a slicer only to pivot tables. To insert a slicer, go to either,
- Insert ribbon and click on Insert Slicer
- or Options ribbon (PivotTable Tools) and click on Insert Slicer
Adding a slicer in Excel 2013 / 2016 / 2019 / 365:
In Excel 2013 and above, you can add a slicer to either pivot tables or regular tables.
Adding slicers to regular tables:
When you add a slicer to regular Excel tables, they just act like auto-filters and filter your table data. To add a slicer to regular table, use Insert ribbon > Insert Slicer button.
Adding slicers to Pivot tables:
To add a slicer, you can do either of these things:
- Right click on pivot table field you want and choose “add as slicer”

- Use either analyze or insert ribbon to add the slicer.

Single vs. Multi-selection in Slicers
You can select a single item or multiple items in slicers. To multi-select,
- If the items you want are together, just drag from first item to last.
- If the items you want are not together, hold CTRL key and click on one at a time.
- You can also click on the “checkbox” icon in slicer header to multi-select items in slicers.
Creating interactive charts with slicers
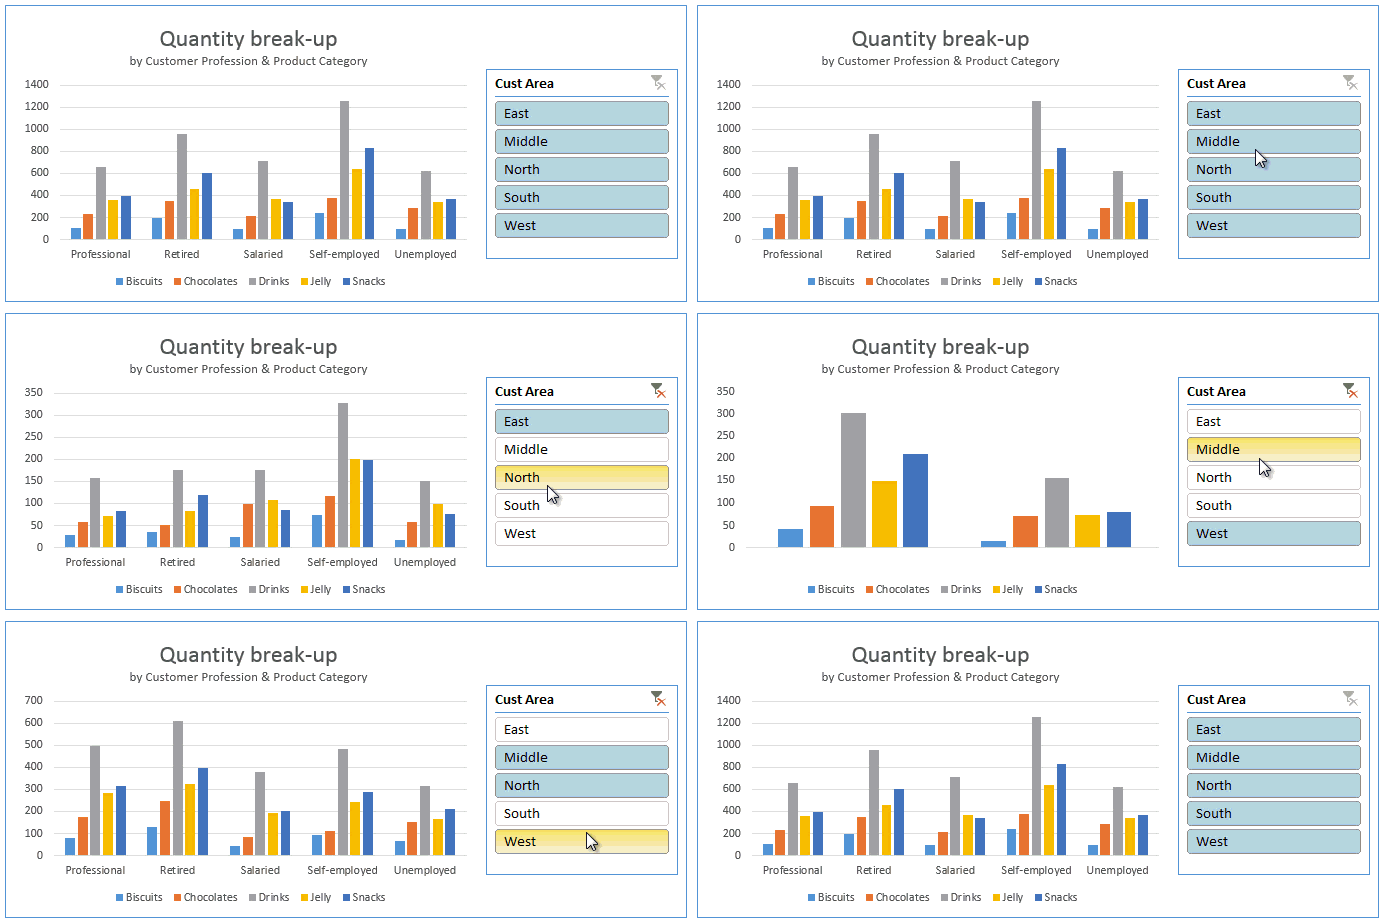
Since slicers talk to Pivot tables, you can use them to create cool interactive charts in Excel. The basic process is like this:
- Set up a pivot table that gives you the data for your chart.
- Add slicer for interaction on any field (say slicer on customer’s region)
- Create a pivot chart (or even regular chart) from the pivot table data.
- Move slicer next to the chart and format everything to your taste.
- And your interactive chart is ready!
Demo of interactive chart using slicer:
Here is a quick demo.
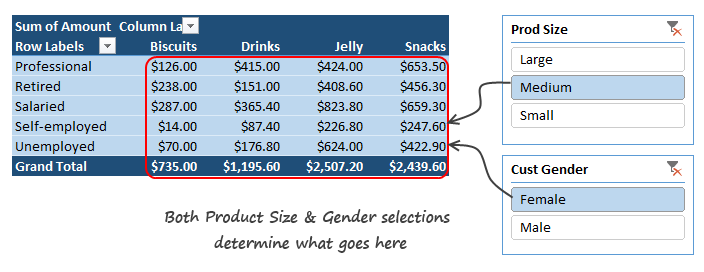
Linking multiple slicers to same Pivot report
You can add any number of slicers to a pivot report. When you add multiple slicers, each of them plays a role in telling the pivot table what sub-set of data to use for calculating the numbers.
Linking one slicer to multiple pivot tables
You can also link a single slicer to any number of pivot reports. This allows us to build very powerful, cross-filtered & interactive reports using Excel.
To connect multiple pivot tables to single slicer, follow these steps.
- Optional: Give names to each of the pivot tables. To name the pivot tables, click anywhere in the pivot, go to Analyze ribbon and use the pivot table name field on top-left to give it a name.
- If you don’t name your pivot tables, Excel will give them default names like PivotTable73. This can be confusing once you have more than a few pivot tables.
- Right click on the slicer and go to Report Connections (in Excel 2010, this is called as PivotTable connections).

- Check all the pivot tables you want. Click ok.

Now both pivot tables will respond to the slicer. See this demo:
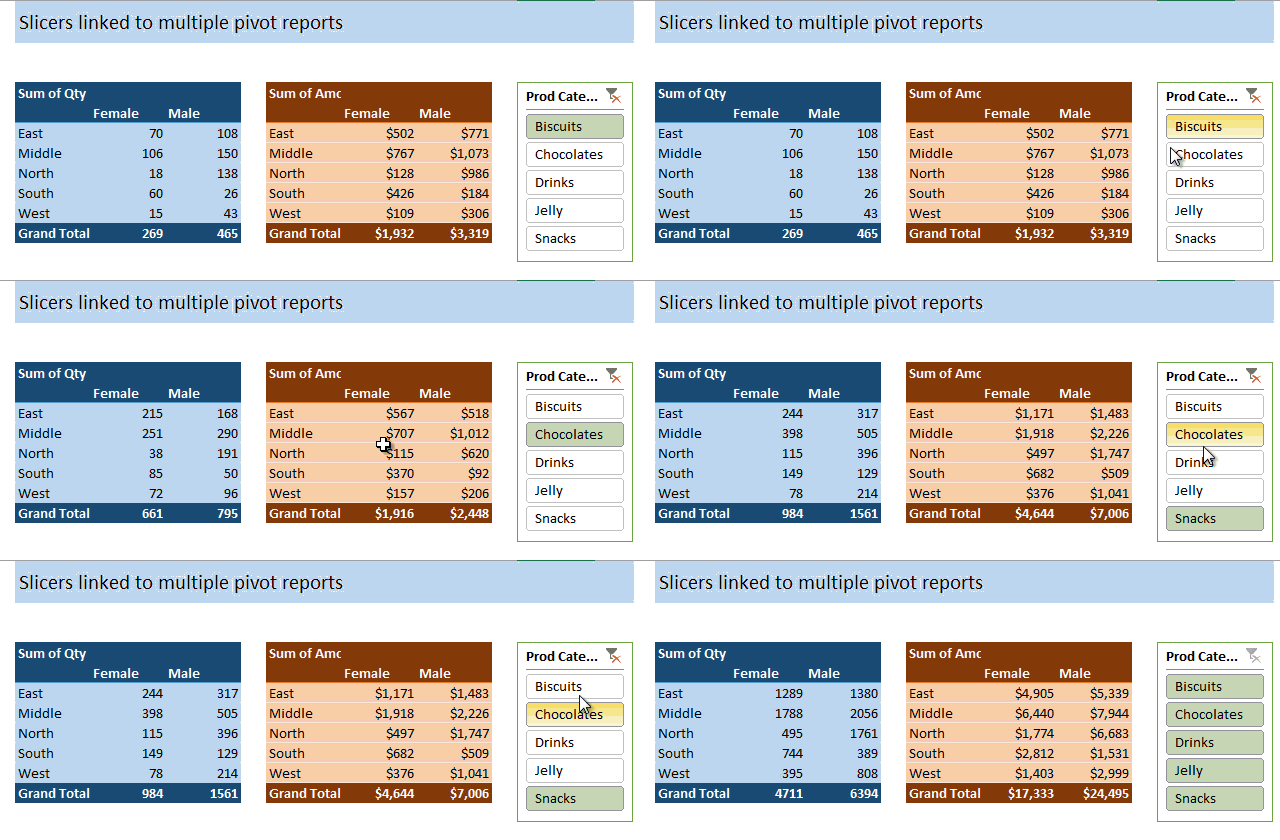
Linking slicers to more than one chart
You can use the same approach to link one slicer to more than one chart (pivot chart or regular one).
See this demo:
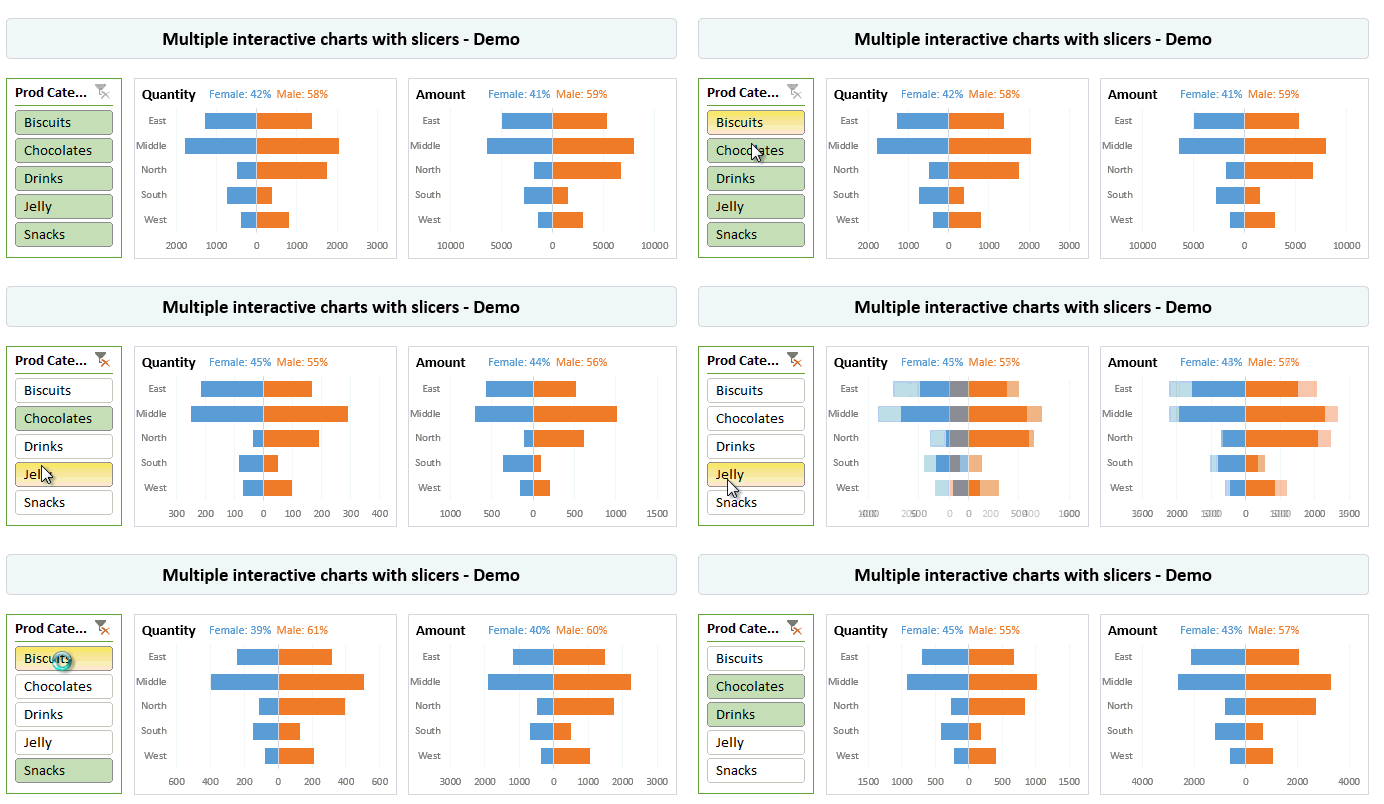
You can examine this chart in detail in the Slicer Examples workbook.
Capturing slicer selection using formulas
While slicers are amazing & fun, often you may want to use them outside pivot table framework. For example, you may want to use slicers to add interactivity to your charts or use them in your dashboard.
When you want to do something like that, you essentially want the slicers to talk to your formulas. To do this, we can use 2 approaches.
- Dummy (or harvester) pivot table route
- CUBE formulas route
Dummy pivot table route
This is the easiest way to capture slicer selection into a cell. Using a dummy pivot table, we can find out which items are selected in slicers and use them for some other purpose, like below:
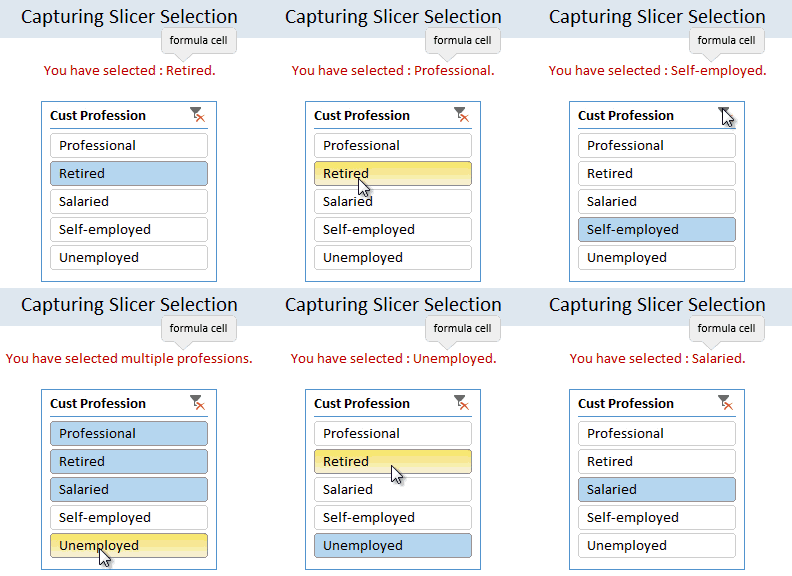
The process is like this:
- Let’s say you want to know which profession is picked up in the slicer (so that you can use it in some formulas or charts).
- Create another pivot table.
- Add the profession field to row labels area.
- Link the slicer to this new pivot table as well (using report connections feature of slicer)
- Now when you click on the slicer, both original pivot and this new dummy pivot change.
- Access row labels like regular cells in your formulas to find out which slicer item is selected.
See this illustration to understand how to set up the formulas:
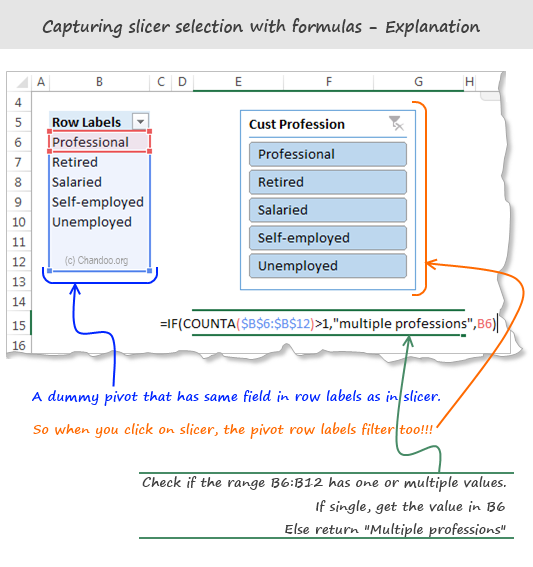
CUBE Formula approach:
This is relevant only if your slicers are hooked up to a data model thru something like Power Pivot, SAS Cubes or ThisWorkbookModel in Excel 2013 or above.
To find out slicer selection, we need to use CUBERANKEDMEMBER() Excel formula like this:
=CUBERANKEDMEMBER(“ThisWorkbookDataModel”, Name_of_the_slicer , item_number)
Let’s say you have a slicer on Area field, and its named Slicer_Area (you can check this name from Slicer properties)
To get the first item selected in the slicer, you can use CUBERANKEDMEMBER formule like this:
=CUBERANKEDMEMBER(“ThisWorkbookDataModel”, Slicer_Area, 1)
This will return the first item selected on slicer. If there is no selection (ie you have cleared the filter on slicer), the Excel will return “All”.
Bonus tip: You can use =CUBESETCOUNT(Slicer_Area) to count the number of items selected in slicer.
Bonus tip#2: By combining CUBESETCOUNT and CUBERANKEDMEMBER formulas, you can extract all the items selected in the slicer easily.
Please download Cube Formula Slicer Selection example workbook to learn more about this approach.
Note: this file works only in Excel 2013 or above.
Formatting slicers
Slicers are fully customizable. You can change their look, settings and colors easily using the slicer tools options ribbon.
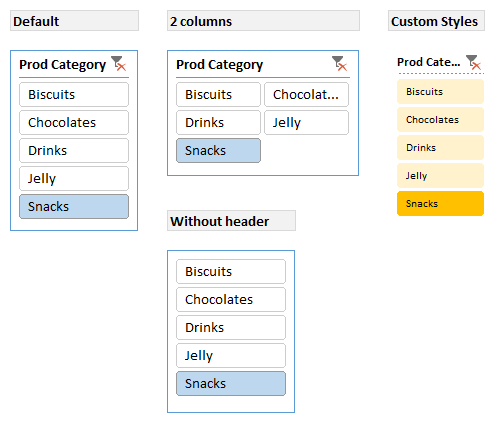
Here is a quick FAQ on slicer formatting:
Q. I have too many items in slicer. How to deal with this problem?
Simple. See if you can set up your slicer in multiple columns. You can also adjust the height and width of slicer buttons to suit your requirements. If your slicer is still too big, you can adjust the font size of slicer by creating a new style.
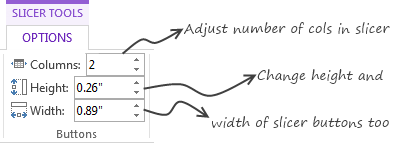
Q. I don’t like the blue color of slicer. What do I do?
You can switch to another color scheme. Just go to Slicer Tools Options ribbon and pick a style you want.
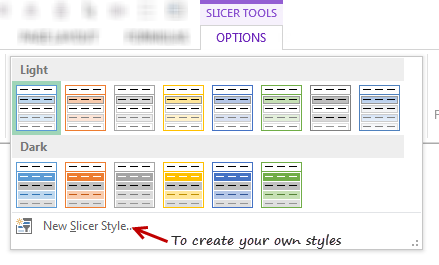
Pro tip: You can create your own style to customize all aspects of a slicer.
Q. I don’t like the title on slicer. Can I get it rid of it?
Yes you can. Right click on the slicer and go to “Slicer Settings”. Uncheck display header option to remove the header & clear filter button.
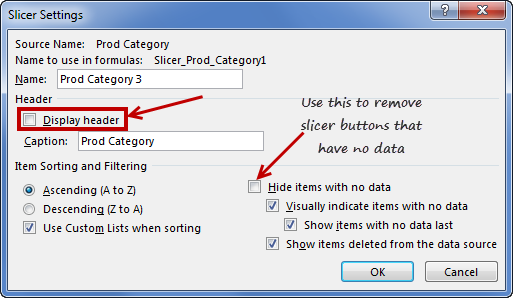
Q. My slicer keeps showing old products (or categories etc.) that are no longer part of data after refresh. What do I do?
Simple. Right click on the slicer and choose “Slicer settings”. Check Hide items with no data option.
Q. I want to make my slicers look good. But I don’t know where to start…
Here is an inspiration for you.
Slicers vs. Report Filters
In a way slicers are like report filters, but way better. (Related: Introduction to Pivot Table Report Filters)
There are few key differences between both.
- Report filters are tied to single pivot tables. Slicers can be linked to any number of pivots.
- Report filters are clumsy to work with. Slicers are very easy to use.
- Report filters may not work very well in a touch screen environment. Slicers are great for touch screen UIs.
- Report filters take up one cell per filter. Slicers take up more space on the worksheet UI.
- Report filters can be automated with simple VBA. Slicers require a bit more code to automate.
- You can access report filter values using simple cell references. Slicer values can be extracted using either dummy pivot tables or CUBE formulas, both of which require extra effort.
Slicers vs. Timelines:
If you have a date field in your data, you can also insert a “timeline”. this is a special type of slicer, that works only with date values.
Here is a quick demo of Timeline slicer.

You can also customize the look & feel of Excel Timelines.
The download workbook has an example of timelines.
Slicers & Compatibility
Slicers are compatible with Excel 2010 & above versions of Excel. You can also use Slicers with Excel Online.
If you create a workbook in Excel 2010 (or above) with slicers and email it to a friend using Excel 2007, they will see an empty box where slicer should be.
Slicers work on desktop & web versions of Excel in the same way.
Download Slicer Examples Workbook
Please click here to download slicer examples demo workbook. It contains all the examples shown in this post and a fun surprise too.
Also download the Cube formulas approach for slicer selection extraction workbook to learn that technique.
Additional Resources to learn about Slicers
If you like slicers and want to learn creative ways to use them in your work, check out below examples:
- Create a fully dynamic dashboard using Pivot Tables & slicers
- Use slicer as scenario selection mechanism
- Slicers + charts for awesome user experience – case study & one more
- Related: Introduction to Excel Relationships & Data Model
- Related: Introduction to Excel Pivot Tables
- Related: Introduction to Excel Report Filters
- Related: Advanced Pivot Table Tips & Tricks
Do you use Slicers? What are your favorite tips about slicers?
As mentioned earlier, slicers are one of my favorite features of Excel. I use them liberally in my dashboards, charts & workbooks.
What about you? Do you use slicers? When do you use them? What are your favorite tips when it comes to using slicers? Please share in the comments area.


42 Responses to “Prevent Duplicate Data Entry using Cell Validations”
Hi Chandoo, I need you help in the following problem.
I'm trying to get a direccion from a found result. With this dirreccion I will want the before cell value. For example, If result of a find is 38 localized in cell $C$2, I need to get previus value (cell $B$2 ), maybe Andrés.
Do you know some way to do that?
Thank you for you help.
Hi Chandoo
Thanks for this. One thing though: In my pre-2007 version of Excel, the COUNTIF function doesn't recognise a semicolon (;), but requires a comma.
Is the semicolon an Excel 2007 thing?
Jair... I am not sure I understand what you want. what do you mean by Dirreccion?
@Lincoln: I am sorry, often I forget that I am using European version of excel where the delimiter is ; instead of ,. I have corrected the formula now.
Thanks for this nice tip, i used to do a find all after filling every new items which was cumbersome.
Do you know a way to extend this validation search to other tabs/sheets ?
Thanks for you attention. I'm trying to get of value continue from a found value. Let me show a example:
Name Years
John 35
Maria 28
Teresa 32
If I search the max years, the result is 35, but I need that result to be John. Do you know how I can do it?
@Subbu.. you can easily extend the validation to other sheets by pasting the data validations. See the latest article here: http://chandoo.org/wp/2009/10/28/copy-data-validations/
@Jair.. you can use the large() or small() formulas to do this. for eg. =index(A1:A3,large(B1:B3,1)) will get you the name of the person with highest "years". More help here: http://chandoo.org/excel-formulas/large.html
Hi, I don't know if I'm using bad the formula or its performance is diferent for my Office version. Large() formula return the value in the cell, in my example 35. The index() formula use a range, row and column. I'm using the large() as number of row, and it is bad because into the range don't have row 35. This is my perception. What do you think?
Hi, I going to prove, with this solution by JLD http://jldexcelsp.blogspot.com/2008/07/extraer-direccion-de-celda-en-matriz.html
Hello,
I am trying to attempt data validation in Excel Mobile, but the DV tool isnt available. I want to prevent duplicates is all, any advice on acheiving this in Excel Mobile? Thanks..
@Jair... my french aint that good. it starts at "merci" and ends at "beau coup".
Anyhow, you need to merge the large with vlookup to do this. I am not sure if you have solved the problem. Otherwise let me know with details and I can write the formula in comments.
@Chad... I have never used excel mobile, so I have no idea. May be they have not implemented data validations in excel mobile.
Any excel mobile users out there?
Hi Chandoo, the proposed solution by JlD is interesting. He created a macro to get values when the matrix is not one dimensional, how on my problem. This fuction for me.
I would like to share you my work, how can I upload?
@Jair.. sorry for such a delayed reply.. you can upload the files to skydrive and link them here. Or you can email them to me at chandoo.d @ gmail.com and I will upload them somewhere. But it could take forever if you email files to me as I am a bit lazy.
[...] Day 31: Advanced Data Validation Tricks in Excel – Part 2 [...]
Hi,
Can you help me in Microstrategy?
Br,
Moin
really wonderful article. I feel it is implementing Primary Key concept into spreadsheets.
Hi article on data validation. Excel is a very versatile platform to work with and we use it for all kinds of data tabulation. In fact this must have been the most rudimentary data management tools I must have worked with and knowing such tips only adds functuionality to our user experience. Great article. looking forawrd to read more.
Hi Chandoo,
Thanks for such a nice idea.
I tried copy paste the data into the validated area, but the pop-up msg (warning msg) doesn't came. Is it something that we need to update the data manually each time,.
Do we have any option where we can bulk upload the number and it throws a warning message that the data already exits and do we want to continue with this ?
Please do reply me.
Thank you.
Regards,
Vasanth.
It was really useful chandoo...thanks a lot...
Tried this in excel 2010 and it did not work?
Could the newer excel have changed that much?
@Leo
It works fine in Excel 2010
The formula used above =COUNTIF($B$4:$B$11,B4)<=1
only applies to the range B4:B11
Did you adjust the range to your data?
This page helped me accurately to find solution of my question. thanx
we want to prevent duplicate entries in three columns combined, using data validation, i.e. say, column A has first name and Column B has middle name, Column C has last name. the first name can be duplicate, middle name can be duplicate, last name can be duplicate, but not all three at the same time.
I want to prevent duplicate entries in three columns combine, using data validation, i.e. say, column A has first name and Column B has middle name, Column C has last name. the first name can be duplicate, middle name can be duplicate, last name can be duplicate, but not all three at the same time.
Hi, I've tried above validation method to prevent duplicate value from entering into the cells. It's work, when user key in the data into the selected range. However, it's not working when user copy-&-paste the info into the same range.
Please advice. Thanks.
Hi Chandoo,
Does it work in Excel 2007?
Please Reply
thanks chandoo........
it does not work when data is copy pasted...any solution for this??
hi i m shaloo and i want to know in excel if i write duplicate no.then it says or show about we are write duplicate no.
Hi Chandoo
I've tried using this with a Named Range, which is actually a column in a Table as DV wont accept a table reference, and it wont work.
Also tried using Offset to specify the Named Range, but that wont work either.
Is it possible to use Named Ranges with DV?
Thanks
Kris
I have tried the above formula on a table column. The Error box does not pop up, there is only the small ! next to the cell with the duplicate. The column I am working with is formulas that produce a date. Is the reason it doesn't work that the cells contain formulas rather than data?
The formula works but only if I enter data in cell above it. So for example, if I have "123" in B11 it does not allow me to enter "123" in B10, B9, B8, etc. But I can still enter "123" in B12. Please help! 🙂
Great tip.. thanks a lot
I have 21 years of experience working as data entry assistant. I constantly read several blogs to keep myself up-to-date with the advances in data entry profession. I really enjoyed this blog post. From my several years of experience, I agree with you 100% when you say, “ We all know that data validation is a very useful feature in Excel. You can use data validation to create a drop-down list in a cell and limit the values user can enter. ”
Keep blogging. I will come here again.
--data entry assistant
Hi,
This is really very helpful.
Thank you
how can i assign two validation on a single cell
one is for list validation (means the data should be from that range)
second i want to prevent them from repetition
how can i do this ?
P7 to P506 have GR# which are for list
i want to prevent C column to not to repeat and should be from the P column
@Junaid
Can you please post the question in the Chandoo.org Forums
http://forum.chandoo.org/
You have to register to be able to post questions
Please attach a file so that a specific answer can be delivered.
i made an account but there is no option available to post questions ??
where can i ??
@Jubaid
Goto http://forum.chandoo.org/
Goto Ask an Excel Question
Post New thread
Type your question
Attach a file
Please attach a file so that a specific answer can be delivered.
friend can any one tell me the formula
exname location qty
gaurav 1 1
rofan 2 5
sandeep 3 6
gaurav 4 3
rofan 5 4
sandeep 6 8
gaurav 7 9
If this is a data.
if i want a formula by which if i type gaurav then all the location and qty should be shown in a new page.
i had 5,00,000 sku so if i punch one name i can get the entire details
@Gaurav
Can you please post the question at the Chandoo.org Forums
http://forum.chandoo.org/
Please attach a sample file for a quicker more targeted response
IF(ISERROR(INDEX($B$3:$C$9,SMALL(IF($B$3:$B$9=$B$12,ROW($B$3:$B$9)-ROW($C$2)),ROW(A1:C1)),2)),"",INDEX($B$3:$C$9,SMALL(IF($B$3:$B$9=$B$12,ROW($B$3:$B$9)-ROW($C$2)),ROW(A1:C1)),2))
please explain
YOUR COUNTIF FORMULA IS REALLY HELPFUL AND WORKS. I TRIED SEVERAL SITES BUT THEIR FORMULA DOES NOT WORK. ONLY YOU HAVE GIVEN A RIGHT FORMULA!
THANK YOU!!!!!