

Finally, I got some time to sit down and do what I love most – write a blog post to make you awesome in Excel. After a whirlwind trip to Sydney, I am back in India to spend few days with my kids & wife before rushing to Australia to run 2nd leg of my training programs (in Perth, Melbourne & Brisbane). I did 2 sessions in Sydney – one for KPMG and other for public and both went very well. We got lots of positive feedback and people really loved it. I am saving the details for another post, but today lets talk about Interactive Sales Chart using Excel.
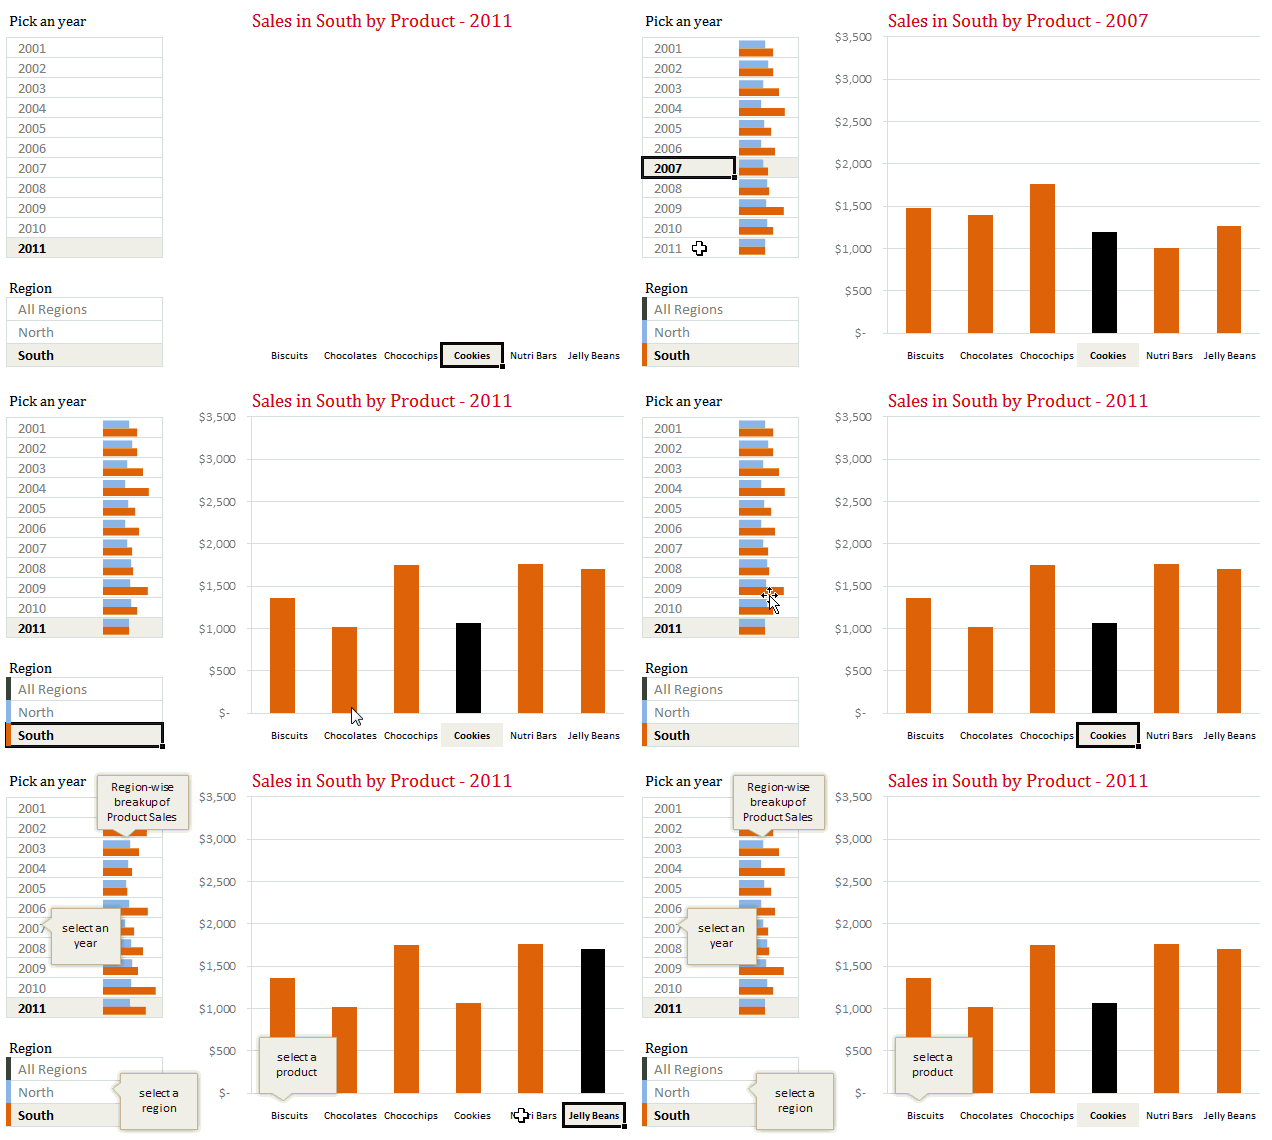
Take a look at the Interactive Sales Chart
First, take a look at interactive sales chart. Today, you will learn how to build this using Excel.
Inspiration for this chart
Before we learn how you can create such a chart, let me tell where the inspiration came from. Yesterday, Persol, a forum member asked, How to make an info-radar chart, where he mentioned the below chart from Good.is
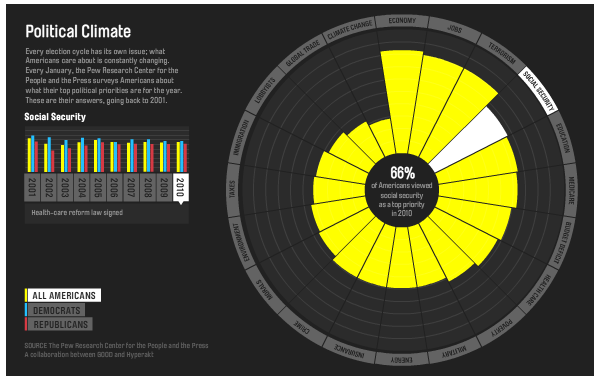
[Click here to play with this chart]
While I took inspiration from the above chart, I replaced the radar chart with a regular column chart (as column charts are easier to read) and modified the data to a sales data set.
How to create interactive sales chart in Excel?
First, take a look at the data
The sales data for this chart looked like this:
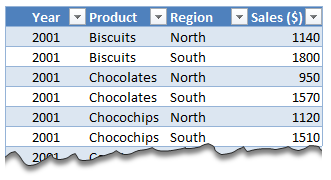
I have set up this data in an Excel Table called as tblSales so that it is easier to write formulas.
The formulas
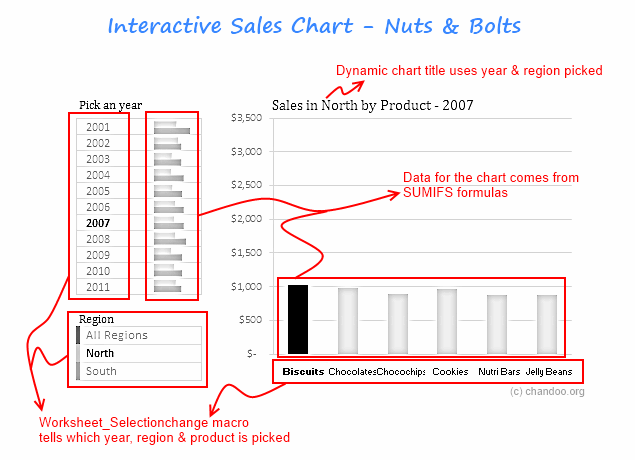
To calculate various values in the chart, we use ample doses of SUMIFS formula.
The Interactivity
When you click on any year, region or product name, we run worksheet_seletionchange event. This tells our calculation engine which year, region & product are chosen. Then the formulas would (re)calculate the data for charts. This updates the charts & conditional formats.
[Related: Show on-demand details in Excel using VBA]
Here is how the interactive chart works:
How to create interactive charts like this – Video
Since the actual mechanics of this are quite elaborate, I made a short video (15 min) explaining how various parts of this chart work. Please watch it below.
[You can watch the video on our Youtube channel too]
Download Interactive Sales Chart Workbook
Click here to download the workbook & play with it. Examine the macros & formulas to learn more.
How do you like this chart?
I really liked Good.is chart and wanted to see how much of it we can do in Excel. It was a fun exercise. I have noticed that such charts excite people (decision makers too) and make your reports fun.
What about you? How do you like the interactive sales chart? What additions / modifications would you do to it? Please share your thoughts using comments.
Create Interactive Charts using Excel
Interactive charts are one my favorite visualizations. They let users play with the chart & decide what they want. So, naturally I write about them every now and then. Please go thru these examples if you want to learn various interactive charting techniques in Excel.
- Show top x values in a chart interactively
- Interactive dashboard using hyperlinks
- Suicides vs. Murders – Interactive Excel Chart
- Create a quick dynamic chart in Excel
- Interactive charts that leave your boss drooling
- More on Interactive Charts
I also recommend enrolling in our Excel + VBA Class if you want to learn these techniques and create stunning reports & charts. Click here to learn more about our Excel + VBA training program.


95 Responses
Great chart Chandoo,
It would be nice to make a additional selection where you can chose what kind of chart the data will be viewed in. Bars, Lines etc.
Peter
Thank you. I am glad you like this.
We discussed something like that a while ago. See this: http://chandoo.org/wp/2011/03/16/analytical-charts-tutorial/
Chandoo,
Thnak you for the link. Will look into it.
Outstanding!
Damn I want to do this so bad! But Excel 2003 doesn’t seem to work with this.
Andrew,
I use Excel 2003 too. All you need to do is replace the SUMIFS formulas in sheet Calculation with formulas with SUMPRODUCT. I’m sure Chandoo explained it somewhere.
Excel 2003 doesn’t support SUMIFS. But in my opinion SUMPRODUCT is even better.
It takes some time to rewrite the formulas but as a result all the interactivity will work.
Lubos
thats really awesome & simple thanks for good working and good ideas.
Thank Persol & Chandoo,
Awesome chart.
My critique would include a lack of comparison year to year – the graph is showing many years, but lacks the ability to visualise/ measure the change. Quite static in many repects.
I know they are showing the level of interest in issues realtive to each other, but with so many years history I think they could have added more value by allowing the graph to not only show actual yearly values – but perhaps to see variance between two particular years, or the variance between the three party categories in a particular year.
Lovely visualisation and interactivity, value add potential for analysis if I were to make suggestion for improvement.
Cheers – and see you in Bris Vegas (Brisbane)
I agree. We can take the same data and visualize it differently so the focus will be on yearly trends. Would you like to give it a try and share the workbook with all of us?
Awesome – as usual – and I have adopted many of the techniques from this blog – but strangely (and I am showing my ignorance a bit here) but I can follow understand and implement the techniques in the example however I have no idea how to “switch off” the area outside A1:M25 – how is this done ? ie. I cannot select cell P12 – why not ? It doesn’t even show P as a column heading ?!! What am I missing ?
It has something to do w/ the scroll area. If you open VBA, select the worksheet “Interactive Sales Chart” on the side and change the Scroll Area to A1:Z500 (for example) it will open up other rows/columns. It was blank to begin with and returns blank after you hit enter.
Actually, It was the Property “StandardWidth” being set to 0 (which apparently sizes the sheet to end with the last used column). Setting that to 8.43 (or whatever the other sheets are set to) exposes additional columns Setting it back to 0 returns it to the Original behavior. This is a cool new “tip” for me to know!
Thank you. It is really simple once you know it.
Even easier than what I was thinking!
Nice tip.
Awesome stuff. Was trying to figure out how he did that, expected it to be harder.
Doh !! Lol 🙂
Thanks Chandoo
Nice Chart! I guess I can use it at work.
This is really a great post, i love it so much, it can definitely can be used at work. The most important thing i learn from your post is always open to new ideas. Thank you so much.
Thanks for the great post. One thing I do not understand. How do you get the link between the region-wise breakup graph in the Calculations and the graphic on the chart?
Thanks,
Linda
It is called a picture link. See here for a tutorial on same. http://chandoo.org/wp/2010/10/19/how-to-use-picture-links/
Thank you, works beautifully
Hi Chandoo
This is great stuff and I have already started copying it for my work. Just one question please. How do we change Bar color (in bar chart) when we select a product along x – axis?
you will need to create 2 rows of the same chosen data set. Say you have picked 2011 and a set of data would show up. you want to duplicate one more set.
First set: the bars not click would become zero. So only the chosen bar would stand out and give it a color.
Second set: the bars not click would show their figures. But the bar chosen would become zero. So you give the bars another set of color.
when you create the graph you will need to specify both data line. One with only the bar of you choice showing black, in this example. And the bars not chosen would become orange/red.
hope this help.
Great. thanks a lot Fred. I’m gonna try it now.
i’m using excel 2007, the camera function is not working… i.e the inline charts are not showing in the interactive chart…
what should i do?
one other thing, how to select hidden columns to unhide it if i use ctrl+end?
Hi Chandoo
Nice post, Really loved it and curious to know what next to come. I just noticed one thing that I can’t able to see your last month articles like u posted the articles in month of April and march. When I click on page 2, I found very old articles that u posted it in month of Feb. However, it should come the April’s and march month article. Can you fix this problem as I need an article which is written on VBA.
Thanks in advance.
Sorry for the above post. Now I can see your previous post. I don’t know why earlier i was not to see the post. Thanx
Hi Chandoo,
I really liked your work. I wanted to make one for my school, but I couldn’t get it right.
Can you help me make it for me, please. Here is my file
http://www.4shared.com/file/191HytlH/My_School_data.html
Chandoo I have another scenario to deal with. Just like we click in the rows to pick a particular year, can we select multiple entries? Actually I need to put certain products along this axis and my objective is to produce results for one product as well as selecting multiple products (the way it works and looks like in your worksheet).
Thanks for making our life easier 🙂
I love this blog and can’t get enough of every aspect of it. You are a fabulously talented writer and manage to make everything so relatable. You are so good at this in fact, that sometimes while reading I feel like our hearts and minds become one and basically I feel as if I am reading my own thoughts.
Chandoo, this is great. I use this technique already.
However I could learn somenting new AGAIN. This little feature SHOW/HIDE HELP is a great idea how to get rid of the information which is firstly important to know but later redundant.
Thanks for the idea, I will use that in my dashboards.
Lubos
Very impressive, both in terms of the output and how it’s put together.
My only comment would be to include an additional line of code that re-calculates the calculations sheet, for those of us that have calculation set to manual by default.
Chandoo,
Firstly, impressive, love your work.
I have added more regions, but how do I move the “Products” down 4 rows and make the chart bigger on the Interactive chart page. Also, the show hide help doesn’t work for me.
Lionel
Love this chart!
How would I add more products? is this easy to do?
How do i get my bars started at the same place.. if i select all regions my bars start at one place and if i select north the graph starts at a different place on the X axis and if i select south it gets started at a different place on the X axis.. this is creating problem for me to overlap the two charts .. please advice
Hi Chandoo,
Awesome tutorial. Never though one could learn it so fast.
Hi Chandoo,
Greate charts !!!
Hi,
Can We Create Political Climate chart in excel….. I tried lot but not able to get success in this chart…..
Would u please sugget about the same….
Hi,
Can We Create Political Climate chart in excel….. I tried lot but not able to get success in this chart…..
Would u please sugget about the same….
@Chintan Parmar
Can you post a link to an example
Hi,
I love your charts. How can I do this chart with more than 1 chart value. On your chart there’s only sales for the products, but what if I want sales and revenue numbers on the same chart? Also can I just delete the region part of the chart? I just want it to have the products and year with sales and revenue data.?
Hi Frank (or others), I have the same question; I’d like to include more data on the same chart, I don’t seen an answer here, did you work it out perhaps? If so, would you share what you did please?
Thanks!
Hi,
Something wrong with the video?
Can you please solve this….
This is a super chart, and I would really like to work something like this out for data I’m collecting for my PhD, however, as in my reply to Frank’s post above, I would not only to like to visualise one variable at a time; so to use the example given in this video I would like to visualise sales as well as other variables like demand and stock of each of the products simultaneously on the chart; could someone help me in doing that please?
Also, I would prefer to have a line graph instead of bars…?
Any help would be much appreciated. Many thanks!
Thanks a ton Chandoo. Interactive chart looks simple but awesome. I am more convinced to join your class
Keep posting
Great work Chandoo!
I am really thrilled to see your work, I am learning new things which i could not believe i can do with the spreadsheet!
This interactive dashboard looks really fabulous, I will get my hands on it. A big thanks and keep up the good work!
Hi chandoo,
A very good tutorial and very helpful video made by you. Thank you for sharing all this. I will be working on demand analysis, using the logic you have explained for Interactive chart. Hope I am able excute it the same way you have done it, or else I will be back with my mails flooding in your inbox 🙂
Have a great day ahead.
Nishant
Awesome…The Interactive Sales Chart
Thanks Chandoo for sharing this…
Dear Chandoo, First of all i would like to thank you for creating such a wonderfull forum on excel. I was having very basic knowledge of Excel, but by following ur blog i have become excel master in my Office. Now i teach excel to my Assistants who are supposed to make reports.
I am having query related to this interactive sales chart. In Calculations sheet please let me know about =valueproductpicked, valueregionpicked. Is it macro or sum new formula. also how it is connected to Interactive sales chart file where “pick an year” “region and “product are selected.
Hi Chandoo,
I would like to thank you for creating such a wonderful chart by effectively using the simple functions in excel.I have a question on the data labels.When data label is added in the chart and we choose a “yea”r and then if we choose a “region” #N/A’s appear and data labels disappear.Any thoughts around that.
Hi Chandoo,
I am also puzzled like Santhosh about how to make the data labels work. Can you shed your wisdom please?
Thanks very much, Kylee.
Dear Chandoo,
This Video is not working and giving some error. Can you Upload it again.
Thanks,
Hi Akhilesh, Can you try again. It is working alright for me.
I think there was some problem with Firefox. It was working fine in Chrome.
Thanks.
Great site, Great article, but I am coming unstuck as I build my formula.
=SUMIFS(tblOverview[Jan],tblOverview[Business],valGroup,tblOverview[Category],valHardware)
Works a treat (Wow, so impressed) but adding a new condition
=SUMIFS(tblOverview[Jan],tblOverview[Business],valGroup,tblOverview[Category],valHardware,o28,valGroup) falls over with a #Value error.
Putting o28=valGroup in a different cell gets the result TRUE.
If I click [Show calculation steps] the formula appears to resolve (with the ranges and values being returned as I would expect) and it says “the next evaluation will result in an error” which, I guess, is the sumifs part.
Help! 🙂
Thank you Paul. Please note that all data columns must be of same size fo SUMIFS to work. In your case, 028 is a single cell, and SUMIFS cannot evaluate the condition o28=valGroup when rest of the conditions are looking in a range.
Thanks Chandoo, ValGroup is also a single cell (from your article how to click on a chart axis to change the chart data). I did try replacing o28 with 025:o33 but received the same error so that threw me off the scent a bit. I’ll keep playing with it as this is a powerful formula you have introduced to me.
Please do not make further replies to this post ~ my logic is flawed and the result would be stupid 🙂 (Does not stop the concept being brilliant, Thanks again).
Hi Chandoo,
Absolutely love the design and simplicity of this graph. Half spent half of today getting my head around it to make it work for my data. Fifth attempte = sucess 🙂
One question, how could we add budgeted sales for the applicable year to show as a bullet point style graph superimposed over the actual sales bar graph?
Thanks so much, Kylee.
Hi Chandoo,
you have a lovely website and system of learning. But i was stuying this sheet and got frustrated while constructing a dashboard on my own. How can i use the same effect or use drop-down lists, to this situation:
Its for my Balanced Scorecard sheet, so i have a number of indicators and its values. The vary by year, perspective and indicator. So i wanted to select: In the finance perspective, the wallet share indicator, of the 2012 year. So it would select the values (Jan, Fev, Mar…) and mount a graphic.
Hi chandoo,
How to change format cell when it’s clicked.
Hi Chandoo,
first thank you for this example but..i am trying to build this with different table names etc ..would like to know the TRUE result next to the year on sheet with calculation..what is the aim of that?
Thank you,
I
Hi
This is really splendid work – simple but very powerful. I am adopting this to present a few results using this concept. The modifications are
1.instead of presenting just one series I am presenting 2 series -clustered bar graphs
2. it is comparing certain distributions region wise (instead of year wise).
Now, all is well until I prepare the overlapping graphs. There instead of all the null values being hidden I get an expanding graph with gaps. By the end of the process the graph display becomes miniscule. Any workaround? – what am I missing?
I used the technique expressed here and derived the results I wanted. Thanks for the education and the entertainment you provide here.
I still want to raise a query here being that based on the SUMIFS which generates the chart data (excluding the #NAs) as per different values picked up the graphs draw but their colour schemes etc. have to be painfully corrected to ensure consistency across. Is there a way to ensure we do it once for all the combinations?
I tried copy-pasting formats across but that does not work in Excel 2007.
Regards,
Sandeep
Hi Sandeep,
Can you please help me in making exactly this kind of a chart with my data. I am trying to replace it with my data but the chart area isnt big enough.
Thank you
Kartika
Hello, I am using excel 2007, the file downloaded looks does not works on it. Not sure if you could have 2007 version? That would be great! Thanks.
Its like you read my thoughts! You seem to grasp so much approximately this, like you wrote the e book in it or something.
I feel that you just can do with some p.c. to power the message home a bit, however
instead of that, that is excellent blog.
An excellent read. I will certainly be back.
please correct me if im wrong but, it would it not be easier if u used a pivot table instead of the sumif?
UPS, forgot the question, the part i was unsure of was the macro that runs when you click on a year a product or a region..
Hello Chandoo,
Thank you for the example, it’s very useful for me.
But I want to know how to build a Marco that display what you select? for example you select year 2001, then it shows in the calculation sheet.
Thank you in advance
Ray
Hi Chandoo, GREAT graph and great site!!!! I have a question on the data labels. When data label is added in the chart and we select a “year” and then if we choose a “region” #N/A’s appear and data labels disappear. Any thoughts on this? Thanks and hugs from Argentina.
Love the video and chart you make it seem simple, but it’s the thought, how can I do it in Excel that’s the real take away. Don’t let anyone say it can’t be done.
Love this Dashboard…
I have a issue…When I add a hyperlink to other Sheet, the Error’1004′: The item with the specifed name wasn’t found.
How can I fix it?
Please and Thanks
Hello Kay;
I have the same problem, did you find a solution to your problem?
By the way Chandoo, thanks for the great site and great tips…
Thanks,
Hello Again;
Within minutes I found the right phrase to put into google “Application.Intersect hyperlink error 1004” to give me the correct results; and found out changing ActiveCell to Target does the trick. I can share the link if linking to some other site is ok.
Hi Chandoo.
Excellente dashboard but I have a problem. I´m using Excel for Mac 2011 and it gives me an error with the macro (error 424). It seems to be something related to “ActiveCell.Value” but I don´t know how to fix it. Could you help me?
Hello, I did the dashboard and I understood everything except the vba code, could you explain it to me in simple words, the steps that you did? in case you dont remember, specialy the application.intersect I searched for it but still dont understands
Thank you so much you are super helpful and kind with us excel noobs 🙂
Private Sub Worksheet_SelectionChange(ByVal Target As Range)
If Not Application.Intersect(ActiveCell, [plistyear]) Is Nothing Then
[valyearp] = ActiveCell.Value
ElseIf Not Application.Intersect(ActiveCell, [plistReg]) Is Nothing Then
[valregp] = ActiveCell.Value
ElseIf Not Application.Intersect(ActiveCell, [plistProd]) Is Nothing Then
[valprodp] = ActiveCell.Value
End If
End Sub
Hi Everyone,
I was trying to find a Budget Gap analysis template or Dashboard, is there anything here in this website, Thank you so much! 🙂
Chandoo thank you for sharing. This is a killer interactive chart! I am working on adapting the model to support my product offering. We retire products and introduce new products. Given this situation, the number of products displayed would differ from year to year. Can suggest a solution to dynamically display the products for a given year?
hI CHANDOO…HOW ARE YOU ABLE TO GET THE VALUES IN D4 AND D5 IN CLACULATION SHEET BASED ON THE SELECTION MADE IN THE CHART? CAN YOU EXPLAIN THAT PART?
Hi Chandoo,
First of all I want to thank you for enlighten me with all nuts and bolts of excel as I am following you from last couple of years. Though this is my first comment on your website.
This particular article is great as always and I have learned a lot from this as well. However just want to add one point that it would be great to create this interactive chart without the use of macro as many people including me don’t possess technical skills to write down the same. I try by myself to modify the same and pleased to share that it can be done without macro as well and I am sure you know this better than me.
Once again thank you so much for such a lovely blog.
I love the ways you organized the chart and using color. Thank you a lot, wish you more success
Very useful and interactive charts Chandoo.. Amidst the Powerpoint presentation, you have proved even the more vague excel sheets also could be in a presentable format. I just tried to have a look into your sales chart, however the macro does not run due to missing objects. Could you please check
This design is spectacular! You obviously know how to keep a reader
amused. Between your wit and your videos, I was almost moved to start my own blog (well,
almost…HaHa!) Fantastic job. I really enjoyed what you had to say,
and more than that, how you presented it.
Too cool!
Im using Excel 2016 on a mac and the selection of years, products or regions gives me a 424 error… object required.
Seems that the mac version doesn’t like:
[valYearPicked] = Active.cell.Value
Not sure it’s picking up on where to get the[valYearPicked] data from…
any suggestions?
Sorry that was a typo… it’s how you have it in yours
[valYearPicked] = ActiveCell.Value
nevermind – figured it out. With Excel 2016 on a mac you have to specify the object:
sheets(“calculations”).[valYearPicked] = activecell.value
I tried the link supplied to download the Excel example spreadsheet but it indicated the site could not be reached. I would really have liked to see this spreadsheet as I find it very fascinating on how the coding and processes would be performed.
Hi Chip
Can you please try again. I just checked and it works.