 Bullet graphs provide an effective way to dashboard target vs. actual performance data, the bread and butter of corporate analytics.
Howmuchever effective they are, the sad truth is there is no one easy way to do them in excel. I have prepared a short tutorial that can make you a dashboard ninja without writing extensive formulas or installing unknown add-ins. So get out your shinobigatana and join me in a fresh excel sheet arena.
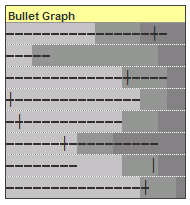
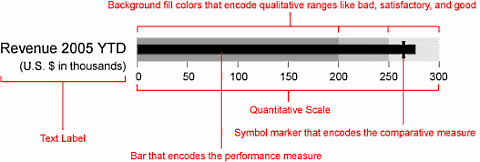
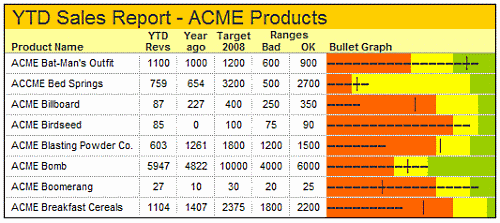
Before we create our first bullet graph, let us spend a few moments understanding these graphs. Stephen Few proposed bullet graphs as way to provide crisp view of “target vs. actual performance” numbers. Shown below is a sample bullet graph and how you would read it.
Read up more on this at PTS blog and on a Gauge chart that actually works.
Let us create your first bullet graph
Click here to download bullet-graph template excel sheet so that you can see while reading
Our technique of involves conditional formatting and simple formulas applied to a cell grid. Just follow these 4 easy steps:
Step 1: Prepare your data for charting
 Since we are going to plot bullet graphs on a cell grid, we first need to normalize our data. I have chosen to plot each bullet graph on 20 cells in a row as shown in the raw grid shown to the right:
Assuming we have fictitious sales data like this:

You can normalize YTD sales figures using a simple formula like this : ROUND(YTD-sales/target*20,0)
Now that we have our data steaming hot, lets brew the graphs
Step 2: Lets make the raw grid formatted based on data
Now we will take the raw 20 cell grid in each row and conditionally format these cells so that we have background of the bullet graph drawn on them.
For eg. If the normalized sales data for Bad range is 7 and for OK Range is 15 then,
We will highlight first 7 cells lighter shade of gray, next 8 cells gray and last 5 cells with darker shade of gray.
I have shown the conditional formatting applied to these cells below:
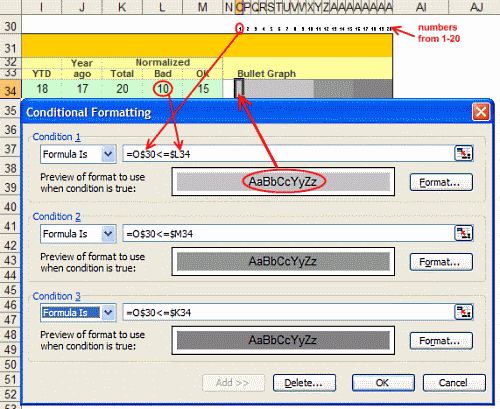
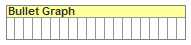
When we are done, a sample row looks like this:

We have our cell grids ready now, lets shoot some bullets. 🙂
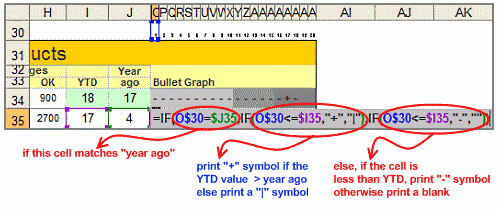
Step 3: Plot bullets on our graph canvas
Our final step involves print a bullet symbol (either – or + or | ) in each cell depending on one of the following conditions:
1. If the cell position (1,2,3 … 20) is equal to Year ago value and cell position is less than YTD value print a + symbol
2. If the cell position is equal to Year ago value and cell position is more than YTD value print a | symbol
3. If the cell position is less than YTD value print a –
4. Else print a blank
See the formula below:
Download the excel template for bullet graphs to understand this formula better
Step 4: Show off your bullet graphs, awe your boss or colleagues, bask in your Ninja glory
Unfortunately, I cannot tell you how to do this. I can only teach you to be a Ninja, but you have to be one to charm people with your tactics. 🙂
Shown below is another variation you can try. Also, you can experiment with the symbols printed (instead of + – | you can try other ASCII characters, for more download the excel sheet containing bullet graph templates)
Also try: Partition charts, Incell Graphs and much more.