
Last week we learned how to answer questions like, “How many tiles in a room?” using Excel. We learned about CONVERT function and fraction number format settings in Excel.
But why stop at calculation? We can even model a room full of tiles, thanks to Excel’s grid nature.
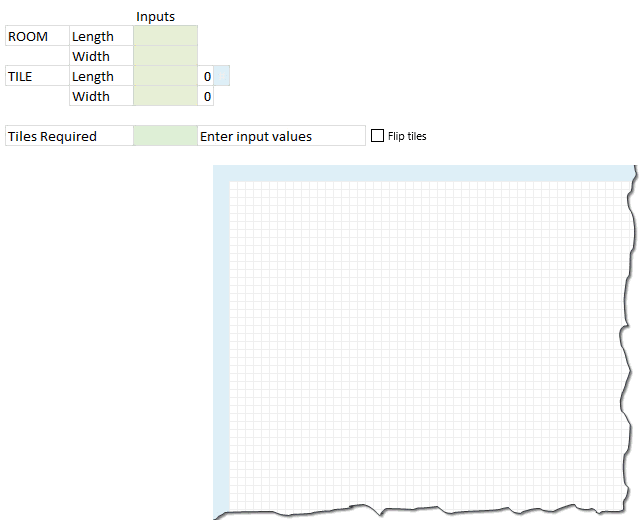
So today, we will learn how to create a room layout like this using Excel:
If you like the demo, read on to learn.
Step 1: Set up input cells
 To model tiles in a room, we need 4 inputs. Lets call them by below names.
- room.length
- room.width
- tile.length
- tile.width
Step 2: Calculate number of tiles required
The basic formula for calculating total tiles required is this:
=ROUNDUP((room.length*room.width)/(tile.length*tile.width), 0)
But this formula yields in an unrealistic solution as we do not want to have fractional tiles everywhere. So, a better way to calculate this is,
=ROUNDUP(room.length / tile.length,0) * ROUNDUP(room.width / tile.width,0)
Although this formula is technically correct, you may save a few tiles if you rotate the them.
That is,
ROUNDUP(room.length / tile.width,0) * ROUNDUP(room.width / tile.length,0) can be smaller than ROUNDUP(room.length / tile.length,0) * ROUNDUP(room.width / tile.width,0) in some cases, as shown in above demo.
So we need a way to flip tile dimensions if that saves us a few bucks. That is done by,
Step 3: Flipping tile dimensions with a switch
Insert a check box and link to a blank cell, say F6.
[Related: How to use a check box in Excel]
Now, using F6 value (either TRUE or FALSE), flip the values of tile.length & tile.width using IF() formula.
Step 4: Create a 100×100 grid
Although you can model the floor plan of entire Buckingham palace in Excel, lets restrict ourselves to rooms of size 100×100.
Select 101 columns and resize them small enough so you can see all of them in a single screen, like 10 pixels wide.
Select 101 rows and adjust their height so that you can see as many of them as possible in a single screen (10 pixels tall should do).
Type running numbers in first column & row. The final grid looks this this:

Step 5: Modeling the room layout using conditional formatting
So we have a big 100×100 grid where we need to draw
- Outer boundary for the room as per room.length & room.width
- Inner tile boundaries as per tile.length & tile.width
Set up conditional formatting rules for room boundary
There are 4 rules required.
- Draw vertical left border if the topmost row = 1
- Draw vertical right border if the topmost row = room.length
- Draw horizontal top border if the left-most column = 1
- Draw horizontal bottom border if the left-most column = room.width
Below, see one of the rules.

You can find other conditional formatting rules in the downloadable workbook.
Step 6: Modeling Tiles using conditional formatting
While we need 4 rules for the room boundary, we just need 2 rules for tile boundaries.
- Draw vertical right border if the topmost row value is divisible by tile.length
- Draw horizontal bottom border if the left-most column value is divisible by tile.width
We do not need rules for vertical left border or horizontal top border because they will be drawn by previous tile.
See one of the rules below:

That’s all. Our room model is ready. Go ahead and see how it looks when tile it.
Download Example Workbook
Click here to download room tiles model workbook and play with it. Examine the conditional formatting rules to understand it better.
Do you apply Conditional Formatting in such creative ways?
I personally think conditional formatting is as good as honey, mangoes or dark chocolate. I love to use a dollop of it in all my Excel recipes.
What about you? Do you use conditional formatting for anything out-of-box 😉 like this? Please share your tips using comments.
Want more? Check out these conditional formatting examples
If you want more on conditional formatting you are in luck. Check out,
- Gantt chart using Excel conditional formatting
- Baby feeding schedule using conditional formatting
- Todo list using Excel conditional formatting
- Making data entry forms awesome with conditional formatting
- Searching data using conditional formatting
- Market segmentation charts with conditional formatting
- More examples on conditional formatting


16 Responses
Great and very innovative post (as always)! One of my favorite ways to use conditional formatting is to make columns appear blank when they are not being used. For example, if I am doing quarterly analysis I may have a quarter-to-date (QTD) column. But when I am at the end of a quarter (Mar, Jun, Sep, Dec), I have no need for a QTD column in my monthly report. That is where I use conditional formatting to white-out my text, borders, fills, etc… so no QTD column appears in my report.
Nice post chandoo.
@Chris Macro can you send me your dummy file with conditional formatting. aparvez007@gmail.com
Regards,
pAvi
Hey pAvi,
I actually just finished up a blog post on this QTD technique. I also have an example workbook you can download towards the bottom of the post. Here’s the link: http://www.thespreadsheetguru.com/blog/2014/4/28/hiding-a-to-date-column-when-reporting-month-or-quarter-end-results
I have a excel sheet with 20000 data and this data have blanks cell or some have one row gap and some have 2 row gap, 3 row gap. So i want to make blank row gap in equally like one row gap after each data withou loosing data. can any one suggest me fastest way to do this.
@Shashi
If you are after a single Row between data grouops then the following code will work like a charm
Dim LR As Integer
LR = Cells(Rows.Count, “A”).End(xlUp).Row
For i = LR To 2 Step -1
If Cells(i, 1) = “” And Cells(i – 1, 1) = “” Then _
Rows(i).Delete Shift:=xlUp
Next i
End Sub
Thanks for your reply Ian. I did not get it actually can you explain it step by step.
@Shashi
Copy the above code
open your model
Goto VBA – Alt F11
Double click the worksheet you want to modify
Paste it into a code module in the worksheet you are using
Put the cursor anywhere in the code
Run it with F5
If this doesn’t help please upload or email me your file
Dear Chandoo,
its amazing if any video available pls share
I used conditional formatting (as well as a few other techniques) to create an American Flag for a posting on Reddit last Independence Day:
http://i.imgur.com/p7zch1I.gif
I basically used the conditional format to get rid of alternating stars to create a 50 star grid, via ISODD(ROW()+Column()) and then the standard alternating row conditional format MOD(ROW(),2) for the stripes.
great..I learned alot from this
Dear sir
can u send me basic formulas(tips) in my mail
Can we design a tile model for a circular layout?
Amazing sample!
I trying to fit tile of 22×30 into an area 80x120cm.
I should obtain 13 tiles:
30+30+30+30 – first raw
30+30+30+30 – second raw
22+22+22+22+22 – third raw
Is there a way to obtain this with Excel.
Thanks
Hi, great post for the Excel part. For the tiling part, can do better. Tiling calculation starts from the centerpoint of the room. We then have to axes. If the length of the ax /the length of the tile (round up) is even then we put an equal number of tiles on each side of the ax. If the number is uneven we put a tile half on one side and half on the other side. Doing so you will never have a tile touching the wall, cut smaller than half a tile. This is more beautiful and when a room is not completely square your small cut tile won’t disappear. When nothing is square, put the tiles diagonally. I now you can do it. ????
.
Hi All,
I have been recommending this spreadsheet to a lot of people. But recently on a decking and laminated flooring project.
I was wondering if Chandoo has set out a challenge for creating similar spreadsheet, but it will work out how to stagger your wooden planks layout?
If would be great to know where I could find this, if it’s already available.
Thanks!
Joel Chan