
Last week we learned how to create dynamic hyperlinks in Excel. Today, I want to show you something even cooler. An interactive dashboard based on hyperlinks, like this:

Isn’t it impressive?
Well, to create something like this, you don’t need a degree in advanced cryogenics. You just need a bunch of data, a chart, a one line macro code and some pixie dust (go easy on pixie dust).
5 Step Tutorial to Create Interactive Dashboard using Hyperlinks
Step1: Setup your data
It is no wonder that any good chart or dashboard exercise must begin with data setup. So, the first thing we need to do is, to set up our data.
If you observe carefully, you will realize that we just have one chart and we are changing the chart’s source data based on which option user selected.
So, assuming you have 4 series of data – sales, expenses, profits & number of customers, we will add fifth series. This will always show data for the series that user selected. Like this,
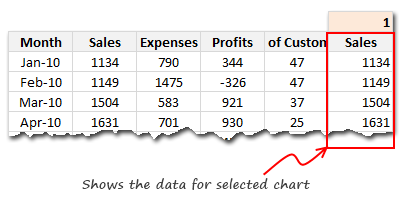
Lets call the series name in fifth column as “valSelOption“. Lets assume that we will use some sort of magic to change the series name.
Note: Using this series name, we can fetch the position of the series out of 4 with MATCH formula. Once you know the position, You can fetch corresponding values using INDEX() formula.
Step 2: Create a chart from the series 5
This is very simple. Just create a chart from the data in 5th column as above. You can format this as you want.
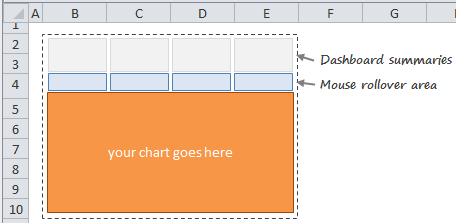
Step 3: Create the dashboard area
This is a bit tricky, but easy too. Just set up 4 column area (since we have 4 charts) such that you can place your chart and mouse-over cells for selection. like this,
Step 4: Create Roll-over effect
Now comes the magical part. We need a simple macro or UDF to change the series based on where user pointed the mouse.
But how to activate that UDF on mouse rollover?
This is where we can use Hyperlinks.
Do you know that you can use a UDF as source for hyperlink.
Just like we can write =HYPERLINK(“http://chandoo.org/”,”Click here”)
we can also write =HYPERLINK(myFunction(),”Click here”)
And Excel would run your function when user clicks on the link.
But, there is more to it.
Excel would also run the function, when you place your mouse on the link. No need to click!
But, seasoned VBA programmers would know that Functions are not allowed to change values in other cells or format them. Well, that restriction does not apply if you use a function from Hyperlink!!!
So, we would write a one line function – highlightSeries(seriesName as Range) and put this code in there.
Public Function highlightSeries(seriesName As Range)
Range(“valSelOption”) = seriesName.Value
End Function
This function would take the series name as a variable and assigns it to named range valSelOption. As the valSelOption changes, so does the data for our chart and then we get new chart.
Now, we just write this hyperlink formula in all the 4 cells, like this:
(Assuming the series names in B3:E3)
=IFERROR(HYPERLINK(highlightSeries(B3)),"6")
Why this formula works?
- While using a UDF inside HYPERLINK() works the trick, Excel would also throw up a #VALUE! error. To fix it, we use the IFERROR()
- The number 6 is the down-arrow symbol in webdings font
- So, change the cell’s font to webdings!
Now, drag this formula sideways to fill in all 4 cells.
Note: Word-wrap the hyperlink cells so that the link works when you hover anywhere on the cell, not just the down-arrow symbol.
Step 5: Add Conditional Formatting to highlight selected series’ name etc.
This is optional, but just as awesome. Once you add conditional formatting, the dashboard feels slick and interactive.
That is all. Your interactive dashboard is ready.
Download the Example Workbook
Click here to download the interactive dashboard workbook and play with it. Examine the technique, formulas and UDF code to see how it is weaved together.
Special Thanks to Jordan:
Many thanks to Jordan, who blogged about this technique on his OptionExplicit VBA blog. He reviewed my file and gave me few suggestions too. He made an interactive snake application using this technique. You can download that file from here.
How do you like this technique?
I like the possibilities of this technique. However, it is also a bit tricky to explain. So I will use it with caution. (Also, I am not sure if this would slow down Excel, but in my experience it did not)
What about you? Do you like this idea? Are you going to experiment with it? Please tell me how you are planning to use it thru comments.
More techniques for Dashboard Makers & Analysts
If you work with Dashboards or data analysis, then you are at the right place. We have a wealth of information, tutorials, examples & ideas for you. Please check out a few below:


122 Responses to “10 Excel Keyboard Shortcuts I can’t live without!”
Nice,
Mine would be Ctrl + R (to fill right) and Ctrl + D (to fill down). I just love making good formulae which can be used all over the table.
Mine are (not in this order): Ctrl+S (save), Ctrl+W (close active workbook), Ctrl+PageDown/PageUp (navigate to the next/previous worksheet), F4 (toggle references), Ctrl+A/X/C/V (select all/cut/copy/paste), F9 (calculate).
I use ctrl+shift+1 for convert value to number format
I'd add ctrl+shift+arrows to select tables and F9 to see what part of my larger than normal formula went wrong. Plus the standard ctrl+c, ctrl+x and ctrl+v.
Some of those mentioned already (eg CTRL + PageUp / PageDown to flick between tabs) but shift + f2 to add a comment and CTRL + 8 / CTRL + 9 to hide a row or column or CTRL + SHIFT + 8 or 9 to unhide. Oh and CTRL + SHIFT + $ to comvert a value to currency
I use the excel quick access toolbar, and use the corresponding alt+1-9 for my most used short cuts. So on there I currently have filter, paste values, pivot table, excel options, paste formulas which are my most used shortcuts.
But apart from that f5 (go to function for blank, constants formulas).
well I'm going to tell you I Use
Alt+1 = paste values
Alt+2 = paste formula
Alt+3 = paste formats
how?
Excel 2007 - you can add items to the quick access toolbar and then when you press ALT it assigns them all a number/letter. it's just a case of finding the right commands.
Excellent... made me look for them and when i did get them i just went crazy... hahahahahaha... thanks a lot stephen....
Most of Chandoos and
Ctrl Pg Up/Down - move to next active page
Alt F11 - open VBA Editor window
Ctrl F6 - Scroll between open workbooks
Ctrl ~ - Show/Hide Formulas
For Tip #4 I always use CTRL+ALT+V, I find it easier on the fingertips.
4. ALT+ES – Paste Special > Values
I have created a macro for the functions that I use most:
Ctrl + shift + L to hightlight cell
Ctrl + shift + M to unhighlight cell
Ctrl + shift + O to paste formula
Ctrl + shift + T to past format
Ctrl + shift + E to format as accounting
Ctrl + shift + I to use % format. and these excel. and many of the other tips mentioned.
how did you make these macros? Thanks!
Hi Daniel
Simple - just record a macro of the action you want then when you save there'll be an 'assign shortcut' option for you. You can also change them after if you find it's not that convenient or you forget it too easily.
Cheers
Using 2007 version:
Crtl-tab to toggle in and out of excel with another workbook or applicaiton (word, ppt, outlook, etc). I prefer this over Crtl-F6 because i only need to use my left thumb and index finger instead of 2 hands for Crtl-F6. To me, the keys Crtl-F6 is too far away from one another, even if I don't have to worry about toggling to other applications like crtl-tab.
Crtl-Pg Up and Crtl-Pg Down: too many worksheets to do QC work after each project/update.
Shift+End+arrow key or Crtl+Shift+arrow key: depends on if i want the whole column/row/area.
F4 for ease of formula control.
Crtl+F to find/replace text, numbers, formula checking, etc.
I have all paste special on the access tool bar instead. there are too many situations to use.
Crtl+~ to see all cells with formulae.
F2: not only edit the formula but to hi-light and understand where others cells are linked to this cell, if any.
I use
Ctrl + spacebar to select entire column,
Shift + spacebar to select entire row
Shift + Ctrl + spacebar to select all datas in the worksheet
Ctrl + 0 to hide a column
Ctrl + Shift + 9 to unhide a column
Ctrl + 2 to bold
Guys - you can't live without Ctrl + Z - just as you can't live life without an eraser.
Sorry to burst your bubble, but you can't actually erase your past in real life.
Here are a couple that haven't been mentioned yet (I think)...
ALT + = (Autosum)
CTRL+A (Select data/all)
CTRL+Space (Select column)
SHIFT+Space (Select row)
CTRL+SHIFT+F3 (Create Names)
CTRL+5 (Strikethrough)
ALT+ENTER (Mutliple rows in cell)
I've noticed that the unhide column shortcut (CTRL+SHIFT+0) stopped working when I updated to Windows 7...anyone know why (or a workaround)?
Try Ctrl + ~
All time best CTRL+SHIFT+Down arrow to select contiguous cells ( along a column)
ALT+N+V+T to insert pivot table
ALT+E+A+A to clear all ( very handy!!!)
ALT+F1 to insert default chart in current sheet
arrow key to toggle between chart elements
In addition to the obvious Control + C/X/V (Copy, Cut, and Paste), I use ALT + = to insert AutoSum. This is realy handy.
Definitely Shift or Cltr + Space Bar, then Ctrl + or - to add/delete a row/column.
1. Ctrl + Page Up/Down - jump to previous/next worksheet
2. Ctrl + Home - jump to the top of the worksheet
3. Ctrl + F3 - displays the Name manager
4. Ctrl + 1 - format
5. Ctrl + ; - paste today's date
6. Ctrl + W - close active workbook
7. Shift + F11 - adds new worksheet
8. Shift + F3 - insert formula
9. Ctrl + 9 - hides selected row
10. Ctrl + 0 - hides selected column
Btw thanks a lot for "CTRL+SHIFT+L – Turn on/ off filters", I have to learn that. 🙂
Mine have to be:
Ctrl + Shift + + to insert a new row/column/cell
F9 to run formulas. Great for testing parts for a formula
Ctrl + D to repeat the cell above
Yeah man, control+d
Thumbs Up for this shortcut, specially when you work with a lot of data base, just create your formulas and Bualaa. Bless people.
Ctrl + z = Undo is one I use a lot
Didn't see these--
Being right-handed, using thumb and forefinger...:-)
Cntrl + Insert for Copy
Cntrl + Delete for Cut
Whenever I'd go to new company, had standing invitation: if anyone knew more ways to "copy" than I, I'd buy lunch... this was always the winning #7"...:-)
How many ways y'all know...?? Im ready to buy lunch...:-)
yep--#2 is good--- but I use Alt + D+F+F which only takes one hand and leaves right hand for coffee...:-)
and, since I discovered "MS Flag key + M" to close all open windows and put u at Desktop...I use it multiple times a day...
F12 - Save As...
Yes agreed with CTRL - Z, but hey don't forget his brother CTRL - Y [Redo] 🙂
Ctrl+Alt+V for Paste Special
Alt DFF for Filtering
Alt ASD for Sorting in decending order and Alt ASA for Sorting in ascending order
Ctrl PageDown/PageUp for navigation over sheets
etc.
Can someone put all these shortcut keys in photoshop and share the link so that we can put it as a wall paper.
Hi,
very useful post!
Mine are:
Shift-End- - selecting used fields
F4
CTRL-S
Thanks for the inspiration - I love the cheat-sheet wallpaper idea.
P.S.: Where's your flattr-button?
Thomas
Mine will be
F11 - Create a chart
Alt + D + F +F - To turn on/ off the auto filter
Really good post, lots of useful stuff here!
One of my most used not mentioned already (i dont believe!):
ALT + SHIFT + F1 - add new sheet to workbook
@Arun, All
For a comprehensive list of Keyboard Shortcuts please also refer here:
http://blogs.office.com/b/microsoft-excel/archive/2011/07/19/cant-remember-all-those-excel-keyboard-shortcuts-now-you-dont-have-to.aspx
1 of my best short cut is to Check which cells/worksheets are referenced/used in formula
-> Ctrl + [
Works only on the cells which has formula. it Jumps directly the dependent cells
& Ctrl + ] works for those cells which will be used in formula (Dependents)
Thank you so much for showing me what this Ctrl Function does, i used it by accident and have struggled to figure it out. Now I'll use it all the time!!
To freeze and unfreeze panes
ALT+W+F+F
A couple of my favourites I haven't seen mentioned:
ALT E+S for paste special, use all the time for copying formats, values formulas, etc.
ALT E+I+S useful for creating values in a series
SHIFT ALT right arrow to group, ALT D+G+H to hide group ALT D+G+S to show group.
ALT+TAB to navigate between open windows.
@Steven, thanks for the tip on using the quick access toolbar. I just rearranged mine.
In addition to many of the shortcuts listed above I use F4 to repeat an action and CTRL+N to open a new workbook
@Les Goins
I tried Crtl+Del but it only delete. it is not cut if we can't paste it back somewhere else, right?
...:-) Sorry, Fred (And, all others...)
should be "SHIFT + Delete key" to "Cut"... THEN, just hit Enter, or Cntrl V to Paste
CTRL# to format dates!!
Hi All,
My fav or top are
1 alt+dff for auto filter
2 alt + es, followed by, v, c, w, etc for paste special
3 Ctrl + navigational keys to move around in workbook
4 ctrl + space select entire column
5 shift + space select entire row
the list will just go on... in a nut shell all short cut Handled by left hand and right hand for the mouse + defnitely coffe 🙂
@Chris, glad i inspired.
a couple more favourites of mine:
Alt & ; = select visible (really useful when working with autofilter)
Ctrl&PgUp/PgDn = move left/right on a sheet (useful when you have a lot of columns)
Ctrl&Tab (or Ctrl&Shift&Tab)= switch between workbooks (& the other way back)
Alt&Tab (or Alt&&Shift&Tab) = switch between applications (& the other way back).... however, if you note that it always takes you to the last used application first, then press & release both repeated will flick you back and forth between 2 applications or 2 workbooks without having to press the shift. I use this if I have to complete journals, where I have to take data from Excel and post into our accounting package.... with Ctrl&C/Ctrl&V.
I use the following short cuts often
1) Alt D,F,F - AutoFilter
2) Ctrl+space - Select entire column
3) Shirt+Space - Select entire row
4) F12 - Save As
5) Alt + F,C - Close workbook
6) Alt + F,X - Close Excel application
7) Ctrl + 1 - Format Cell
8) Context menu key (next to win key) + S - Paste special
9) F4 - Repeat the last action
10) Ctrl + PageUp, PageDown - To browse through worksheets
Everyday shortcuts for me:
CTRL + C Copy
CTRL + X Cut
CTRL + V Paste
CTRL + D Copy from above
CTRL + Z Undo
F4 Repeat (or scroll through referencing)
F2 Edit cell
CTRL Page Up/Page Dwn Move to next/previous worksheet
CTRL + * Select current region
CTRL + Home Go to top left cell
CTRL + ; insert date - I use a lot but I like to have the keystrokes the way I want so I make tiny macros for my faves and give them my own key combos.
CTRL SHIFT + V = Paste Values is much easier than the built in for me because it's a natural follow-on for CTRL + C.
I use "CTRL+[ " This takes you to the source of your formula and I use it every day.
The "CTRL+[" Is fantastic. Thanks for Sharing.
@Andy & Gaylen, All
Don't forget about Ctrl+]
which follows a cell to it's next dependants
Both of Ctrl+[ and Ctrl+] can be used iteratively to move up/down the dependancy tree
Great ... thanks everyone for the tips.
BTW - it's interesting how good it is for us all to be human filters. Instead of a bamboozling blur of what you could possibly use, it's: here - you'll probably like this one ... I do.
@andy and hui
I'd not come across the CTRL + [ or ] before so thanks! I can't imagine how useful they'd have been over my career so far. Great tip
really helpful
My list is bit more..
Ctrl+page up/down to move between tabs
right click+p+s for paste special values (i use most of the times keyboard right click..since it is very near to fingers)
alt+d+f+f and again alt+d+f+f to remove all the filters and add filters again
ctrl+tab to move between open workbooks
ofcourse F2 very commonly
Shift+F11 very frequently to add new worksheet/tab
alt+o+h+r and alt+o+c+a are my best shorcut keys to rename tab and auto fit the cells
(ctrl+c/x/z/v/b/u/i/S..like everyone)
Regards,
Saran
lostinexcel.blogspot.com
Since I use Conditional formatting very often i always use ALT+O+D
Just thought of another
for wrap and unwrap, ctrl+w and ctrl+q+w (quit wrap)
because I do it a lot and it's too fiddly to do through menus.
Hi use ALT+DFS on a daily basis- incase you have filtered a sheet against 5-7 filters and you want to remove all filters then this is the easiest.
Ctrl + Alt + V ----> paste special
Ctrl + F6 = navigate between differetn Excel files.
Ctrl + PgUp/PgDn = navigate between sheets
Ctrl + Home/End
Ctrl + Arrows
Shift + lots of keys...
ALT + ; - to copy visible cells only. I have to use it quite often and a lot of them you have already mentioned :).
thank you for sharing.
Ctrl+shift+L for Autofilter and remove the filters
My Favourites (which I use all the time):
Ctrl + 1 - cell formats
Ctrl + D - copy values Down
Ctrl + R - copy values Right
Alt + DFF - toggle filters on / off
Alt + WFF - toggle freeze pane on / off
Alt + HVF - Paste Special; Formulas
Alt + HVV - Paste Special; Values
Ctrl + C then Alt + HVV - removes formulas (especially handy when selecting whole sheet)
Alt + ADFROT - Advanced Filter to get Unique values for a column, to new location
Alt + DPF - insert quick Pivot Table
Hello everyone.
I'm going to admit that I don't use keyboard shortcuts beyond Copy and Paste.
Why not? Every software and OS has their own keyboard shortcuts and I have a fear of them overlapping.
One keyboard shortcut might do something cool in Excel but in my music composition software that shortcut might mute the drum track. In my video editing software is might the the shortcut for opening the effects menu.
Shortcuts are really cool but I've gone 15 years working Excel, writing VBA code, and making a living without memorizing keyboard shortcuts. Only recently have I been willing to admit that.
@Oz
Your missing out on huge increases in efficiency
Most of the normal shortcuts are similar throughout all applications
Ctrl C, V X - Copy, paste Cut
Ctrl O - Open
Ctrl S - Save
Ctrl P - Print
and several other of a similar nature
Hiu,
I see what you're saying but still disagree. The efficiency that I'm missing out on is small. This isn't like I've declared refusal to use pivot tables.
Shortcuts were screwing me up when I switched from Excel on my PC and Excel on my Mac. CTRL C, CTRL V are useful and universal. I do use those.
The only thing I can see is that I'd be in trouble if I joined one of those Excel tournaments.
One mildly humorous reaction: when you mention CTRL P for printing, I never just straight print. The printer manufacturers have things set up where you can't set a printer to default to printing in draft mode. So, I always manually go to the print menus and adjust the settings to draft mode.
Any way ... the bottom line is that I don't work in an environment where shortcuts will make or break me.
I use one program that has Ctrl C and Ctrl V for inbuilt shortcuts and it drives me nuts because I use them all the time. The Shift+Ins is the one I need to use in that program.
Another Excel one I use often is Ctrl+' to copy the data from the cell above. Several others that have already been listed.
My new laptop has the "F" buttons combined with other buttons. To save space on the keyboard I guess. Whenever I'm at home and hit F2 to edit it toggles my wi-fi on and off. Grrr. I have to hold the function key then hit F2 to activate the F2 function.
So glad I found this page. Paste values only is the shortcut I was looking for. Found it. 🙂 Thank you.
lots of people at my office use a background program to assign keyboard shortcuts. Drives me crazy because they use existing keyboard shortcuts like ctrl-a to shoot off a macro, then they don't know how to select all. Makes training them on excel a lot more difficult.
A good background program to assign keyboard shortcuts will allow them to be application specific so that ^a does not interfere with select all in excel. A misused background program could easily result in the situation described above.
Highlight a row or column and use...
Ctrl + + and Ctrl + - to insert or delete rows or columns
Thanks Rob - I've got double rows of toolbars all round with hundreds of buttons, so even finding my faves like insert delete row can be hard. That'll be really handy.
Does anyone know how to use the ALT-key (or any other key) to access the buttons on the Quick Access Toolbar (QAT) numberd with more then 2 digits?
Just type the numbers/letters shown.
If it says 09 just press 0 and then 9 (of course after pressing ALT to see the shortcuts assigned to QAT)
The less-common (but already mentioned here) shortcuts I use the most are:
Ctrl-1 (cell format)
Ctrl-Home/End (beginning/end)
Ctrl-Shift-Home/End (select from here to beginning/end)
Ctrl-PgUp/PgDn (move between worksheets)
Ctrl-` (show formulae)
Very helpful! Thanks!
A couple of my time-saver favorites:
F2 to edit a cell (helpful if I just need to delete the last character and don't want to retype the whole thing)
Shift-F2 to add or edit a comment (then Esc Esc to get back out of it)
Also a big fan of the Ctrl-K hyperlink one that others have mentioned!
Been reading these tips for a year and a half, and always something useful.
I use a lot of comments so Shift-F2 is helpful. Thanks.
For F2 - edit cell there is an option to 'Directly edit in cell' which I always have on. Just double click. Not only that, but the cursor will be just where you double click, so you can start middle, end, wherever you need, without another click. 🙂
I just hate to use the mouse, so I avoid double-clicking at all costs! 🙂
Fair enough. I change my mind regularly about that. It's a mood thing ...or if I'm eating over the KB. Bad! hehe.
CTRL + SHIFT + & (TO CREATE OUTLINE BORDER)
I've read several excellent stuff here. Definitely price bookmarking for revisiting. I surprise how much effort you put to make this kind of magnificent informative site.
I often use F2 followed by F9 to convert a formula in a cell to its value. It's the keyboard equivalent to copying the cell, and using Edit > Paste Special > Values on the same cell, but much quicker.
Application? I use this a lot if I have to manually separate items on a receipt into different categories, but I still have to take sales tax into account. I'll enter certain items from the receipt into the cell, and include a quick formula to get the sales tax for just those items. When I'm done, I strip out the formula just to be on the safe side, leaving the value of the cell.
Thanks Craig, unfortunately when I tried this I found another app has hijacked my F9 - what does it normally do by itself? I will have to try to wrestle it back from the app.
BTW I use paste vals so much I made a macro so I could use ctl-sh-v. The reason this is so handy is because of course I've always done ctl-v immediately before so it's really like one quick action, with the bonus that the paste val doesn't have to be in the same cell (I mean you don't have to lose your formula) Easily my most constantly used macro. If you want to give it a try ...
Sub PasteValues()
'' Keyboard Shortcut: Ctrl+Shift+V
'
'ActiveCell.Select
'Selection.PasteSpecial Paste:=xlValues, Operation:=xlNone, SkipBlanks:= _
'False, Transpose:=False
ActiveCell.PasteSpecial Paste:=xlValues
End Sub
does it work on a range. I tried selecting a range and then F2+F9. It changes from formula to value in just first cell.
Is there a keyboard shortcut for filtering a value after adding the filters to a data?
It might be a bit clumsy, but just use the keyboard to navigate to the filtered cell and hit Alt + Down to bring up the filtered options.
Mine
CTRL+* ( it will slecte all the work area)
[…] Our friend Chandoo, excel dashboard guru over at chandoo.org has provided us with the 10 Excel Keyboard Shortcuts You Can’t Live Without. […]
Other than CTRL C, CTRL V the only other shortcut that I can't live without: CTRL+SHIFT when moving a block of data and wanting it inserted.
After highlighting the cells that you want to move, select CTRL+SHIFT and the cursor turns into a line that you position to the place where you want the data inserted. It's pretty cool.
1. Ctrl+Enter accepts your input and leaves the cursor in the same cell. Saves you from having to go back up to continue work on that cell e.g. copy....
2. Select a range of cells which have the same formula or content; edit the active cell only; now press Ctrl+Enter to populate the entire range with the corrected formula/content!
3. In the middle of a formula, if you have navigated away from the active cell (e.g. to select a large range) such that it is no longer visible, you can press Ctrl+Bckspace to jump back to the active cell whilst remaining in edit mode
Am using as
Ctrl+5 for strikethrough in the content of the cell.
hi..
can any one tell me what is shortcut for copy and paste all the table as it is..i knw ctrl+c and ctl=v; bt this shortcut not paste document as it is..
[…] the most popular posts from earlier this semester. Re-posted from February 14, 2013 Website: http://chandoo.org/wp/2011/08/08/must-have-excel-keyboard-shortcuts/ Especially useful when analyzing data, making charts and formatting workbooks. Business and […]
[…] Website: http://chandoo.org/wp/2011/08/08/must-have-excel-keyboard-shortcuts/ […]
[…] Website: http://chandoo.org/wp/2011/08/08/must-have-excel-keyboard-shortcuts/ […]
The two I use all the time are:
Ctrl + (Control and Plus sign on numeric keypad) = Insert row or column
Ctrl - (Control and Minus sign on numeric keypad) = Delete row or column
Shortcut #4 is one of my favorites, but there's an important note speficially regarding Paste Special Values - you need to hit V after alt + ES. I know you have a link to that detial amongst other options within Paste Special (all of which I use all the time and LOVE), but if you're specifically noting Paste Special Values, it should read alt + ESV.
Thanks for all your info!
[…] some time getting fully on board with shortcuts. As an added resource, do check out Chandoo’s post on 10 must-have […]
Great discussions!
I have a question for No. 8 CTRL + K for Hyperlinks.
Is there any way you can add a Hyperlink and KEEP the existing formatting of the text in the cell?
I would assume it might be a setting somewhere where you can define the Hyperlink Design - but that would just be another single format I think - I want it to be un-formatted if anything so it picks up the current cell format. Any ideas please? Thanks everyone!
Hi Chandoo,
I do regularly read emails received by you. I use above mentioned 10 shortcuts in daily workflow. In addition to this I use following shortcuts:
Filter Ctrl+shift+L and open filter column alt+down arrow key.
Visible cells Alt+:
Format Painter Copy then go to the cell which you want format right click key+S+T
It's an amazing article designed for all the internet viewers; they will take
advantage from it I am sure.
Amazing article,
The only thing i didnt know is ctrl+shift+l for filters and I use them alot,
so thanks!
And my contribution is:
alt+h+9 > remove decimal place
alt+h+0 > add decimal place.
Very useful when using ctrl+shift+1 for number formatting and immediately hitting alt+h+9 twice to remove decimal places.
Cheers
I am using AutoFilter and I have a large picklist of values available to me. I want to select about the first 50% of the items. Is there any shortcut to grab them? (i.e. Select 1st item, hold shift, select last item --which does NOT work).
Thanks!
how can i "clear format" from a part of selection in excel by keyboard.
i need keyboard shortcut to clear format of any cell.
reply me
ashish gupta
email: ashish99b@gmail.com
Hii...Ashish....
Clear format :-Alt+H+C+S.....
[…] http://chandoo.org/wp/2011/08/08/must-have-excel-keyboard-shortcuts […]
Hiii...
Previous is wrong ...
Clear Format:-ALT+H+L+C+S
I think 7 should be "CTRL+F3 – Show Names"
cool, thanks bro!
Chandoo, Greetings! Nice tips. Like it & use ful. To make it credible and professional, please publish without spelling, grammatical mistakes, if you may. Thank you.
Sri: The spelling and grammar are pretty accurate, if you're referring to the original article. If there is a specific spot that you feel is unclear due to grammar issues, you'll want to provide more details on what is confusing you versus just saying "please publish without spelling, grammatical mistakes".
Chandoo doesn't have control over the grammar or spelling in users' responses such as yours, of course; if that's what you're addressing, you should address your comment to the user who posted the item which you feel has poor grammar. (You would generally only do so, though, if it's that you need something clarified because of the grammar issue.)
I'd like to note that your post isn't actually the best in terms of spelling and grammar. For example, you capitalized "greetings" even though it's in the middle of a sentence, and you put an unnecessary space in "useful". If you're particularly bothered by poor grammar, you'll want to proofread your own posts a little more carefully! 😉
This is awesome, totally on nerd overload. Here's my fav:
Go to - special - blanks
Then Ctrl, up arrow, =, enter
This fills in all the blanks!
Thanks fellow geeks for all the sweet tips
Guys,
CTRL+SHIFT+1 always give us number format with 2 decimals. Is there any Excel shortcut that could give us number format with 0 decimal, other than making our own macro?
Thanks
I have commented on this just few comments above. That's how I handle it.
alt+h+9 > remove decimal place.
alt+h+0 > add decimal place.
But that's two steps instead of one.
1) press SHIFT+CTRL+1, and then
2) ALT+H+9 or 0.....
not too convenient.
Seems to me, the only way is to make the macro
try Alt + H + K
these shortcut keys are really helpful in smart work & fast work
Wonderful tips, I have made my own list.
Another good one is CTRL+F10, toggles maximise/restore window in workspace. (So you can find the scrollbars, and switch books by clicking another one)
I use CTRL-Z to repeat the last command. Handy for inserting multiple rows or columns.
[…] Here are some great Excel shortcuts copied from http://chandoo.org/wp/2011/08/08/must-have-excel-keyboard-shortcuts […]
I use filters to do an ad-hoc analysis of my data. So, Once I set a couple of filters.
Ctrl ; to enter today's date
Ctrl ' to enter the same data as above
Ctrl home to go to the top