

 Today, let’s travel in time. Pack your photon ray guns, extra underwear, buckle your seat belts and open Excel!
Of course, we are not going to travel in time. (Come to think of it, we are going to travel in time. By the time you finish reading this, you would have traveled a few minutes)
We are going to learn how to travel in time when using Excel. In simple terms, you are going to learn how to move forward or backward in time using Excel formulas.
So are you ready to hit the warp speed? Let’s beam up our Excel time machine.
Tip 0 – Date & Time are an illusion
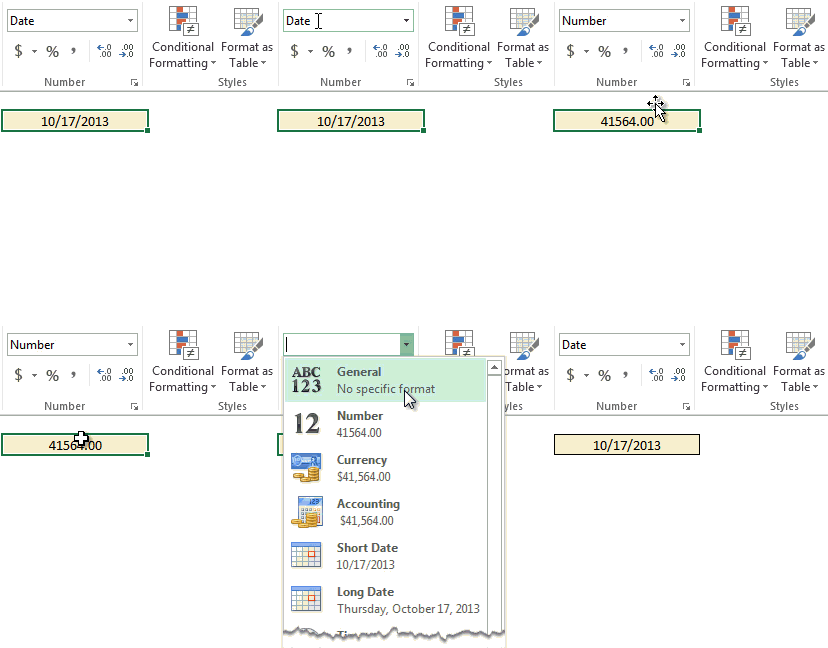
Most important tip for Excel time travelers is to understand that Excel dates & times are just numbers. So when you see a date like 17-October-2013 in a cell, you can safely assume that it is a number disguised to look like 17th of October, 2013. To see the number behind this, just select the cell and format it as number (from Home ribbon).
Now that you understood this concept, let’s jump in to the 42 tips. All these tips assume a date or time value is in the cell A1.
Staying at present:
- To have latest star date in a cell, just press CTRL+; (of course, in Excel world, star date is nothing but whatever date your computer shows)
- To have current time in a cell, just press CTRL+:
- Of course, we time travelers are lazy. So pressing CTRL+; every day or CTRL+: every second is not cool. That is why you can use =TODAY() in a cell to get today’s date. It will automatically change when you re-open the file tomorrow.
- Likewise, use =NOW() to get current date & time in a cell. Remember, although time changes every second, you will not see the cell updated unless the formula is somehow re-calculated. This is done by,
- Pressing F9
- Saving / re-opening the file
- Making any changes to any cell (like typing a value, changing a value)
- Editing the formula cell and pressing Enter
- To check if today is after or before the date in cell A1, you can use =TODAY() > A1. This will be TRUE if A1 has a past date and FALSE if A1 has a future date.
- To know how many days are there between TODAY and the date in A1, use =TODAY() – A1. This will be a negative number if A1 is a future date. To see just the number of days (without negative sign), you can use =ABS(TODAY()-A1)
- To know how many hours are left between the time in A1 and current time, use =(NOW()-A1)*24.
- While the above formula works, it shows hours and fraction. To just see hours and minutes left, you can use =TEXT((NOW()-A1), “[hh]:mm”). Note: This formula works only when A1 < NOW().
- To know how many weeks are left between TODAY() date and a future date in A1, use =(TODAY() –
A1)/7 - To know how many months are left between TODAY() and date in A1, use = DATEDIF(TODAY(), A1, “m”).
Related: How to use DATEDIF function. - To know which month is running, use =MONTH(TODAY())
- To see the month name instead of number, use =TEXT(TODAY(), “MMMM”). This shows the month’s name in your Excel language.
- To know which year is running, use =YEAR(TODAY())
- To see the last 2 digits of the year, you can use =RIGHT(YEAR(TODAY()), 2)
- To find the day of week for TODAY, use =WEEKDAY(TODAY()). This will give a number (1 to 7, 1 for Sunday, 7 for Saturday).
- To see the weekday name instead of number, use =TEXT(TODAY(), “DDDD”).
- To see today’s date alone, use =DAY(TODAY())
- To know if the present year is a leap year or not, see this.
Going back in time
- To go back by 6 days from the date in A1, use =A1-6
- To go back to last Friday use =A1-WEEKDAY(A1, 16). This works in Excel 2010, 2013. If your time machine is old (ie you have Excel 2003 or earlier versions), you can use =A1-CHOOSE(WEEKDAY(A1), 2,3,4,5,6,7,1)
- To go back by 5 weeks, use =A1-5*7
- To go back to start of the month, use =DATE(YEAR(A1), MONTH(A1),1)
- To go back to end of previous month, use = DATE(YEAR(A1), MONTH(A1),1) – 1
- Or use =EOMONTH(A1,-1)
- To go back by 2 months, use =EDATE(A1, -2)
- To go back by 27 working days, use =WORKDAY(A1, -27). This assumes, Monday to Friday as working days.
- To go back by 27 working days, assuming you follow Monday to Friday work week and a set of extra holidays, use =WORKDAY(A1, -27, LIST_OF_HOLIDAYS)
- To go back by 7 quarters, use =EDATE(A1, -7 * 3)
- To go back to the start of the year, =DATE(YEAR(A1), 1,1)
- To go back to same date last year, = DATE(YEAR(A1)-1, MONTH(A1), DAY(A1))
- To go back a decade, =DATE(YEAR(A1)-10, MONTH(A1), DAY(A1))
Going forward in time
We, time travelers are smart people. Once you know that turning the knob backwards takes you to past, you know how to go to future. So I am giving very few examples for going forward in time.
- To go to the 17th working day from date A1, assuming you use Sunday to Thursday workweek, use =WORKDAY.INTL(A1,17,7). This formula works in Excel 2010 or above.
- To go to next hour, use=A1+1/24
- To go to next day morning 9AM, use =INT(A1+1) + 9/24
- To go to 18th of next month, use =DATE(YEAR(A1), MONTH(A1)+1, 18)
- To go to end of the current quarter for date in A1, use =DATE(YEAR(A1), CHOOSE(MONTH(A1), 4,4,4,7,7,7,10,10,10,13,13,13),1)-1
- To go to a future date that is 4 years, 6 months, 7 days away from A1, use =DATE(YEAR(A1)+4, MONTH(A1)+6, DAY(A1)+7)
Finding the amount of time traveled
- To know how many days are between 2 dates (in A1 & A2), use =A1-A2
- To know how many working days are between 2 dates, use =NETWORKDAYS(A1, A2) (remember: A1 should be less than A2).
Fixes for common time travel hiccups
- If you see ###### instead of a date in a cell, try making the column wider. If you still see ######, that means the date value is not understandable by Excel (negative numbers, dates prior to 1st of January 1900 etc.)
- Often when pasting date values in to Excel, you notice that they are not treated as dates. Use these techniques to fix.
- If you pass in-correct values or use wrong parameters, your date formulas show an error like #NUM or #VALUE. Read this to understand how to fix such errors.
Quiz time for time travelers
I see that you safely made it here. I hope you had a good journey. Let me see how good your time traveling is. Answer these questions:
- Write a formula to take date in A1 to next month’s first Monday.
- Given a date in A1, find out the closest Christmas date to it.
Building your own time machine? Check out these tips too
If you work with date & time values often, then learning about them certainly pays off. Read below articles to one up your time travel awesomeness.
- Using Date & Time in Excel
- How to calculate common holiday dates in Excel?
- How to calculate payroll dates?
- How to sort a bunch of birth dates by birthday?
- Check if two dates are in same month
Good luck time traveling. I will see you again in future 🙂
PS: Make sure you attempt the challenges and post your answers in comments.


73 Responses
I’m confused by some of the tips above:
#7: Subtracting dates/times gives an answer in days, so shouldn’t we multiply by 24, not divide? (should be =(NOW()-A1)*24)
#8: If we’re formatting the result as a time in hrs & minutes, it isn’t necessary to do the (incorrect) calculation to hours first (should be =TEXT((NOW()-A1), “[hh]:mm”)
I’m still working through the list, so will post again if I spot anything else.
@Rob… Thanks for your comment. I have fixed #7. #8 is correct. Test it in Excel to see how it works.
I still don’t agree on #8.
With my A1 as 17/10/13 9:00, and the current time from =NOW() being 17/10/13 12:06:
=TEXT((NOW()-A1)/24,”[hh]:mm”)
gives 00:07 (incorrect)
=TEXT((NOW()-A1), “[hh]:mm”)
gives 03:06 (correct)
You are right. I had the correct version of formula =TEXT((NOW()-A1), “[hh]:mm”) in my testing workbook. But the post had the wrong one. Fixed it too. Thank you so much for correcting me 🙂
Here are my formulae
A formula to take date in A1 to next month’s first Monday.
=EOMONTH(A1,0)+IF(WEEKDAY(EOMONTH(A1,0)+1)=2,1,IF(WEEKDAY(EOMONTH(A1,0)+1)>2,(8-WEEKDAY(EOMONTH(A1,0)+1))+2,2))
Given a date in A1, find out the closest Christmas date to it.
=IF(MONTH(A1)<=6,(EOMONTH(A1,-MONTH(A1))-6),(EOMONTH(A1,11-MONTH(A1))+25))
With regard to your challenges, my solution for the date of the next month’s first Monday is:
=EOMONTH(A1,0)+7-WEEKDAY(EOMONTH(A1,0),3)
I’m still struggling with the xmas one. I’ve got something that works but is hideously (and embarassingly) long, so I’m not prepared to post it!
Rob, try using an =IF() statement on A1 and use some variation of YEAR() within it.
Chandoo – what program did you use to make the GIF image?
@Rich, Camtesia Studio will record the video and the same can be save as .GIF extension
I was trying to come up with a way to avoid repeating the two DATE() functions, but all my efforts just made the formula longer than having the repeat. Here’s what I settled on:
=IF(DATE(YEAR(A1),12,25)-A1>A1-DATE(YEAR(A1)-1,12,25),DATE(YEAR(A1)-1,12,25),DATE(YEAR(A1),12,25))
I’m not sure what the required response was for dates like 25-Jun-2012, where the difference would be 183 days in both directions, but this formula just gives the one in the same year.
What tool (application) do you use to post the Excel animations?
@Les,
Chandoo and I both use Camtasia Studio for animated screen captures
Refer: http://chandoo.org/wp/about/what-we-use/
Chandoo trainee who has been enjoying learning from the sidelines but thought I would try one of these challenges. Might not be the most elegant or short but I think it works.
=IF(WEEKDAY(DATE(YEAR(A3),MONTH(A3)+1,1),3)=0,DATE(YEAR(A3),MONTH(A3)+1,1),DATE(YEAR(A3),MONTH(A3)+1,1)+7-WEEKDAY(DATE(YEAR(A3),MONTH(A3)+1,1),3))
Thanks to all for a great location to learn and try out new things as I become amazing at excel
Hello to all. My name is Samuel Cruz from Matomoros, Mexico.
I am relatively new in Chandoo Site and I had seen many interesting things. Like you all, I want to become awesome in excel.
Because of my work, I have to deal with dates in Excel (and Yes, I do some time traveling), and after some time of testing and failures a wrote a formula (kind of long but useful) that returns to me the difference between dates in Years, Months and Days (No metter if the date is greater than or lower than today’s date).
Write in A1 the date you want investigate.
In B1 write the following formula:
=IF(A1=””,””,IF(A1<=TODAY(),TEXT(TODAY()-A1,"YYYY")-1900&" Years "&MONTH(TODAY()-A1)-1&" Months "&DAY(TODAY()-A1)&" Days",TEXT(A1-TODAY(),"YYYY")-1900&" Year(s) "&MONTH(A1-TODAY())-1&" Month(s) "&DAY(A1-TODAY())&" Day(s)"))
This formula allows me to know how many Years, Months and Days had passed or remain from today's date.
I hope this little contribution to time travelers make them all happy. The most important is to share our knowledge in pro of many and I will be happy that someone out there will find a solution for his/her issue.
Best regards to all and please have a great day.
(Saludos cordiales a todos y que tengan un gran día).
Anyone else getting an error trying to use this formula?
Bob, Go in and replace the “”.
Next Month First Monday – =EOMONTH(A1,0)+CHOOSE(WEEKDAY(EOMONTH(A1,0)),1,7,6,5,4,3,2)
Christmas
=IF(A1-DATE(YEAR(A1),12,25)<0,DATE(YEAR(A1),12,31)-6,DATE(YEAR(A1),12,31)-6+365)
For the Christmas formula I got this: =DATE(IF((DATE(YEAR(A1),12,25)-A1)>182,YEAR(A1)-1,YEAR(A1)), 12, 25)
Here is a little modified version of your formula:
=DATE(YEAR(A1)-(DATE(YEAR(A1),12,25)-A1>182)*1, 12, 25)
#15. To find the day of week for TODAY, use =WEEKDAY(TODAY()). This will give a number (1 to 7, 1 for Sunday, 7 for Saturday).
if we use =weekday(today(),2) it shows the exact day starting from 1 for Monday and 7 for Sunday…
Please correct if i am wrong
Great article!! Very handy and useful.
Please write more article like this, putting all similar tips together.
Thanks Chandoo!
First Monday next month…
=DATE(YEAR(A1),MONTH(A1)+1,1)+7-WEEKDAY(DATE(YEAR(A1),MONTH(A1)+1,1),2)+1
For the Christmas one…
=IF(ABS(DATE(YEAR(A1),12,25)-A1)>ABS(DATE(YEAR(A1)-1,12,25)-A1),DATE(YEAR(A1)-1,12,25),DATE(YEAR(A1),12,25))
btw, I think DATEDIF is a very helpful but less known Function to calculate the difference of date.
Dear MF,
your first monday next month formula gives wrong answer if 1st day of next month itself is Monday e.g if the input is any day in Aug 2014, the result by your formula is 08-Sept-2014, however the right answer would be 01-Sept-2013.
Consider this small alteration/correction to your formula:
=IF((WEEKDAY(DATE(YEAR(A1),MONTH(A1)+1,1),2))=1,DATE(YEAR(A1),MONTH(A1)+1,1),(DATE(YEAR(A1),MONTH(A1)+1,1)+7-(WEEKDAY(DATE(YEAR(A1),MONTH(A1)+1,1),2))+1))
Regards
Hi Krishna,
You are right. I overlooked that. Thanks for pointing it out! 🙂
Very informative post. Thank you.
My answers for quiz are:
Next Christmas:
=IF(DATE(YEAR(A1),12,25)-A1>(A1-DATE(YEAR(A1)-1,12,25)),DATE(YEAR(A1)-1,12,25),DATE(YEAR(A1),12,25))
First Monday next month:
=IF((WEEKDAY(DATE(YEAR(A1),MONTH(A1)+1,1),2))=1,DATE(YEAR(A1),MONTH(A1)+1,1),(DATE(YEAR(A1),MONTH(A1)+1,1)+7-(WEEKDAY(DATE(YEAR(A1),MONTH(A1)+1,1),2))+1))
Here is my Christmas solution 😀
=DATE(YEAR(A1)-(A1-DATE(YEAR(A1),1,1)+7<DATE(YEAR(A1),12,31)-A1-7)*1,12,25)
Dear Sir,
You are great and your efforts are also appreciable. and now i have so many hopes with you and i am sure that you will take a prompt action on my request.
my request is, i am too busy person i have a lot of work to do on daily basis and an other side i am hungry to learn MS Excel , but due to lake of time i cant give me concentrate to Excel and i am sure that you can make it easy for me. my request is kindly sent me all the formulas along with brief detail on a sequence of sheet. i hope its will be help full for me. i am waiting for your reply. Take care GOD bless you and your whole team.
Dear Sir,
You are great and your efforts are also appreciable. and now i have so many hopes with you and i am sure that you will take a prompt action on my request.
my request is, i am too busy person i have a lot of work to do on daily basis and an other side i am hungry to learn MS Excel , but due to lake of time i cant give me concentrate to Excel and i am sure that you can make it easy for me. my request is kindly sent me all the formulas along with brief detail on a sequence of sheet. i hope its will be help full for me. i am waiting for your reply. Take care GOD bless you and your whole team.
For Next christmas
=IF(OR(DAY(A1)<25,MONTH(A1)<12),DATE(YEAR(A1),12,25),DATE(YEAR(A1)+1,12,25))
For first monday next month another way around
surely not elegant but still works
=IF(WEEKDAY(EOMONTH(A1,0)+1)<=2,B1,(B1+9-WEEKDAY(EOMONTH(A1,0)+1)))
working on xmas will post once done.
for nearest xmas
=IF((DATE(YEAR(A1),12,25)-A1)<183,DATE(YEAR(A1),12,25),DATE(YEAR(A1)-1,12,25))
I need to get Surnames form given data-
raj kumar singh (34567)
harish Chandra prajapati (45890)
Please count those Names which has surname “Kumar” in end.
What would be the formula-
Raj Kapoor
Vikash Kumar
Hari Singh
Rakesh Kumar
Didn’t tried Data > Split text to column
???
First Monday Next Month one (Monday is the first day)
=EOMONTH(A1;0)+(8-WEEKDAY(EOMONTH(A1;0);2))
sorry if I’am late, but this is my Xmas formula it’s all about the 25/06/AAAA Date…
=IF(A1>DATE(YEAR(A1);6;25);DATE(YEAR(A1);12;25);DATE(YEAR(A1)-1;12;25))
For First Monday :
=EOMONTH(A1,0)+CHOOSE(WEEKDAY(EOMONTH(A1,0)),2,1,6,5,4,3,2)
For the nearest Christmas : I have gone step wise .
Step 1 : – ascertain whether the same is a leap year or not and compute the cut off date accordingly by adding either 183/182 days. The formula for the same is :
IF(MOD(YEAR(A1),4)=0,DATE(YEAR(A1),1,1)+183,DATE(YEAR(A1),1,1)+182). Once we compute the cut-off date which is July 2. Then we compare the date in cell A1 with July 2 and compute the nearest Christmas day accordingly.
=IF(A30>=B28,DATE(YEAR(A30),12,25),DATE(YEAR(A30)-1,12,25))
> dates prior to 1st of January 1900
Funny, but its in fact “0th of January 1900”.
You can enter “1/1/1900” into A1, and have “=A1-1” successfully calculated in another cell.
But after that (like “=A1-2” and so on) would be already “########”
Great and very useful to know….Would request you to email me a list of useful formulas and functions.
Thanks in advance!
Rahul
On #35 does anyone know how to go to the last day of the next month instead of the 18th? The formula does not seem to work after 29 or 30 days. Thanks!
35. To go to 18th of next month, use =DATE(YEAR(A1), MONTH(A1)+1, 18)
@Hmjjbe
Last day of this month =Eomonth(A1,0)
Last day of next month =Eomonth(A1,1)
Last day of last month =Eomonth(A1,-1)
I typed
Last day of this month =Eomonth(A1,0)
Last day of next month =Eomonth(A1,1)
Last day of last month =Eomonth(A1,-1)
Result
A1 B1 C1 D1
4/21/2016 42490 42521 42460
Is this right?
In regards to No 22.
First day of this month =DATE(YEAR(A1), MONTH(A1),1)
I prefer =Eomonth(A1,-1)+1
In regards No 14.
To see the last 2 digits of the year, you can use =RIGHT(YEAR(TODAY()), 2)
or simply use a Custom Number Format of YY
or via a formula =Text(A1,”YY”)
My version of close Christmas date, though not tested regressive –
DATE(ROUND(MONTH(A1)/12,0)+YEAR(A1),12,25)
I have a column of date/time in GMT (UTC)
I want to display in Pacific time (-7 hrs daylight savings) Is there an easy formula that will change both the time and the date if if the fallback time goes into the previous date?
I’m having a hard time converting the date in my excel workbook.
I was given the dates for an entire year as 10111, representing January 1, 2011, and so on.
How can I get excel to give me the date in 1/01/11 format in a different cell?
I am having a hard time trying to figure out something. How do you compute 12/3/13 then I need the date of the following thursday.
@Meliza
Try: =A1+8-WEEKDAY(A1+3)
what i do? if i need the no of day when i put the date
exmpel, 13/3/2014 = 74
@Mirza
If in your example the 13/3/2014 should have returned 72 instead of 74
The answer is :
=DATE(2014,3,13)-DATE(2014,1,1)+1
or
=DAYS360(“1/1/2014″,”13/3/2014”)
I am using microsoft 2010 excel and I want to use a formula to work 6 weeks from 26/06/14 – please can you kindly help.
Thank you
Ray
Thank you so much for your great tips. I have just used the instructions to calculate a past date for a column of cells that had to display the 6 week prior date. Much appreciated
hi,
i have two excel sheets
one sheet is total mtd data and one sheet is areas data
ineed today out of 100 areas 10 areas completed survey
after that next day ineed the that 10 areas any peopole called in survey after 7 days
please provide the any formula
Hi team we required help on calculating the time in a working hours need to be calculated in 24 hours 8:00AM to 8:00PM timing need to calculate in a 7 days or 1, 1/2, days etc we need to calculate only working days, please suggest.
@Sanjeev
Can you ask the question in the forums
http://chandoo.org/forum/
Please include a sample file?
Hi Sanjeev,
Please share more details, the answer would depend on what kind of data, you have in your sheet
Could you please suggest me a formula by which I can find the last Friday of previous month.
Below formulas are to find last Friday of current month:
=DATE(YEAR(H10),MONTH(H10)+1,1)-WEEKDAY(DATE(YEAR(H10),MONTH(H10)+1,1)-6)
=EOMONTH(H10,0)+1-WEEKDAY(EOMONTH(H10,0)+1-6)
=EOMONTH(H10,0)-MOD(WEEKDAY(EOMONTH(H10,0))+1,7)
You can try this to calculate the date of the last friday in the previous month, note that EOMONTH can have negative or positive numbers:
=EOMONTH(H10,-1)+1-WEEKDAY(EOMONTH(H10,-1)+1-6)
Please find the answer below –
=EOMONTH(TODAY(),I2)+IF(WEEKDAY(EOMONTH(TODAY(),-1))>5,6-WEEKDAY(EOMONTH(TODAY(),-1)),-1-WEEKDAY(EOMONTH(TODAY(),-1)))
Hi. Please help me figure this one out. If A1=year and A2=week number and A3=weekday, what formula do I type into B1 to get the date? I haven’t found anything allowing finding a date using the week number as part of the ‘known’ data. Thanks.
@Nerd345
Have a look at:
http://www.rondebruin.nl/win/s8/win001.htm
or
http://www.extendoffice.com/documents/excel/1684-excel-convert-week-number-to-date.html
I have a spreadsheet that has a date column and a time column. The time has to advance every 10 seconds and the date must change at the 24 hour mark. For example – I start on 03/13/2015 the date advances a cell for every 10 seconds (Column B has the time starting at 00:00). So 10 seconds after the 24 hour mark the date should advance to 03/14/2014 and the time should start over at 00:00:00
PLEASE help me since I cannot seem to find a solution that is consistent!
Can this be done….if i enter a time in column A, column B then adds 45 mins =a3 +TIMEVALUE(“00:45:00”) can an IF statement be created to notify users that the time is current?
So if they enter 9:00 in A3 at 9:45 I need an error message or a popup, like ‘ARE YOU SURE?’
Hi, Do you have any tips for calculating “overtime” on an employee time sheets?
Calculating the total number of hours worked is easy but I struggle to calculate which hours should be paid at “overtime rates” without really really over complicating it.
For example:
If an employee gets paid $1 hour an hour, and any hours worked between 18:00 to 06:00 are paid at double, what would get get if he worked from 15:00 to 03:00?
Finish – Start = Total Hours Worked
15:00 – 03:00 = 12 hours
A = Hours worked between 06:00 and 18:00
B = Hours worked between 18:00 and 06:00
(A x $1) + (B x $2) = $X
(3 x $1) + (9 x $2) = $21
Any tips you have for finding A & B would be awesome?
Excel Date Ti e Tips
#38. To know how many days are between 2 dates (in A1 & A2), use =A1-A2
I prefer =A2-A1 when A1=start date and A2=end date (A1 should be less than A2, like #39.)
In fact formula =A2-A1 calculates the difference between two dates.
To calculate duration use another important formula=A2-A1+1.
#39. To know how many working days are between 2 dates, use =NETWORKDAYS(A1, A2) (remember: A1 should be less than A2).
NETWORKDAYS() calculates duration.
EXAMPLE:
If A1 is 4/25/16(monday) and A2 is 4/29/16(friday)
then:
=A2-A1 is 4
=A2-A1+1 is 5
=NETWORKDAYS(A1, A2) is 5
Hi,
I’m using formula “=B-A” to get the value of C.
The formula to obtain the total in column C is : =SUM(D1:D5)
However, the total is not SUM correctly & notice column C3 is the problem. When I remove it, the Total is correct. Any clues what is in column C3 that is causing this problem ?
I’m using MS Office 2013. appreciate any response. thanks…ed
A B C
15:04 15:10 0:06
15:10 15:13 0:03
15:13 15:45 0:32
15:47 15:48 0:01
15:56 15:56 0:00
Dear Chandoo,
Please note that I have been working in Excel file contains two times of our teammates who claims overtime an each calendar month
My excel file as like this :-
ROW 1 Days of Month
ROW 2 Date of Month
Cell -1 [Time IN], cell -2 [Time OUT] no break in our factory and anything after Eight hours assume as overtime as standard in all across.
Appreciate if you could help me in providing the best an Exclusive Excel formula to calculate each day overtime excluding staff eight hours regular duty and Friday consider as full day overtime.
Kindly help me at the earliest convenience.
awaiting for your expertise………….
Best Regards / Ikram Siddiqui
I want to calculate future date using a fraction, eg; 1/3 of Oct/30/2017.
Please give me a hint.