

Today, lets learn OFFSET formula.
What is OFFSET and why bother using it?
OFFSET formula gives us reference to a range, from a given starting point with given height and width in cells.
OFFSET formula syntax
OFFSET formula looks like this:
=OFFSET(starting point, rows to move, columns to move, height, width)
- Starting point: This is a cell or range from which you want to offset
- Rows & columns to move: How many rows & columns you want to move the starting point. Both of these can be positive, negative or zero. More on this below.
- Height & width: This is the size of range you want to return. For ex. 4,3 would give you a range with 4 cells tall & 3 cells wide.
And yes, All the arguments to OFFSET can be references to other cells. That means, you can write =OFFSET(A1,D1,D2,D3,D4) which will refer to a range
- Starting from A1
- Offset by D1 rows & D2 columns
- having the size of D3 rows & D4 columns
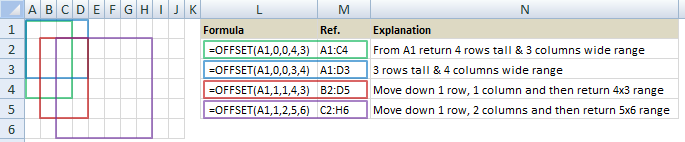
See below examples to understand the formula better.
OFFSET formula examples
Why use OFFSET?
Why not write a reference like A1:C4 directly?
Here are a few reasons why,
- Dynamic ranges: Reference like A1:C4 always refers to the range A1:C4. ie it is static. But sometimes, we want our ranges to be dynamic. This is required because our data is changing (every month new row is added, every time we launch a product new column is added etc.)
- We don’t know the exact address: Sometimes, we don’t know what our ranges actual address is. Rather, we just know it is starting from a certain cell etc. In such situations OFFSET is useful.
Understand OFFSET formula – Interactive Workbook
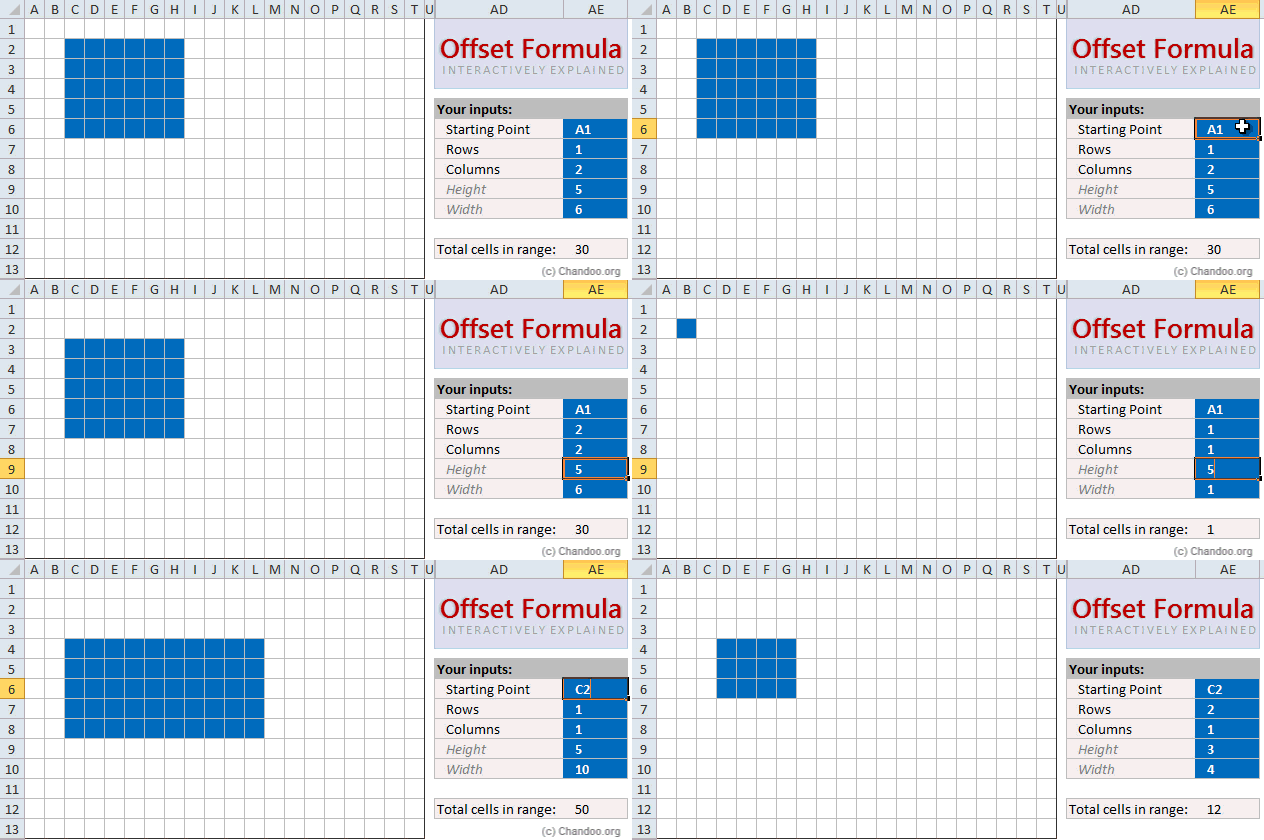
Since OFFSET formula is somewhat tricky to get, I created an interactive workbook so that you can understand how it works. When you input all the 5 parameters, the workbook highlights the range that your OFFSET will give. After playing with it for a few minutes, you will understand the formula better.

Practical use for OFFSET – Average of latest week
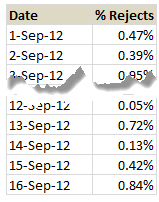
Lets say we monitor quality of a plant producing purple puppets. One of the KPIs we monitor is % of rejected puppets. We have been tracking the % of rejects by day in a spreadsheet that looks like this:
So how do we calculate average of latest week?
Assuming the values are in range C3:C18, we can write =AVERAGE(C12:C18)
BUT, WE NEED TO CHANGE THIS FORMULA EVERYDAY!!!
Even puppets would find that boring.
By using the OFFSET awesome sauce, we can write the AVERAGE formula once and forget about it.
=AVERAGE(OFFSET(C3,COUNTA(C3:C300)-7,0,7,1))
Lets break-apart this formula and understand
- To calculate latest week’s average, we need to go all the to the last data point and then get 7 rows from it and average those values.
- This is where COUNTA(C3:C300) – 7 comes in to picture. It counts how many values are there in column C and then subtracts 7 from it.
- The OFFSET would then starting point from C3 to latest week’s starting point.
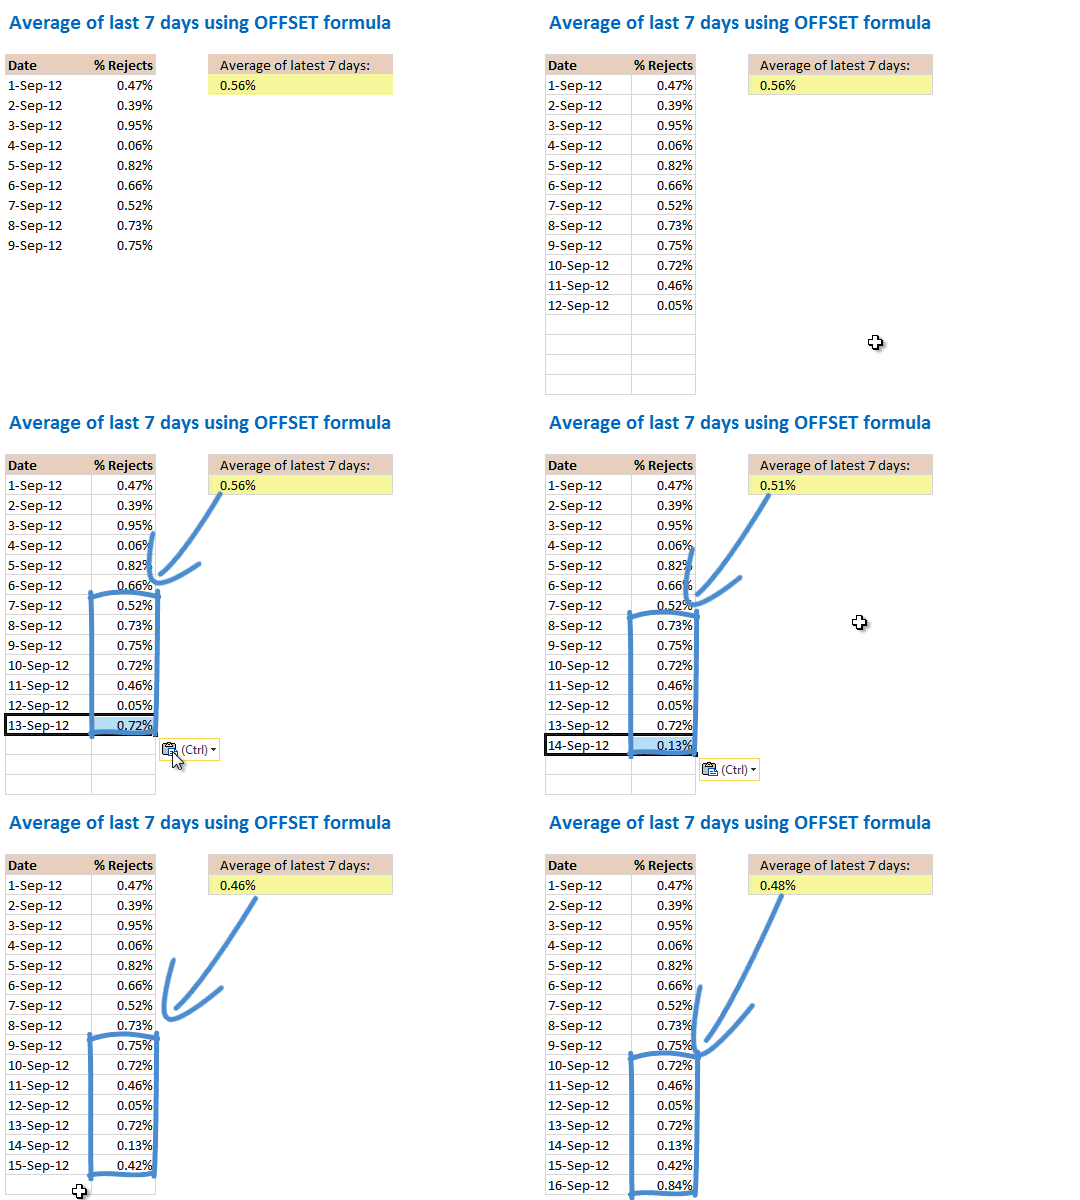
- To know how this formula works, watch below demo.
OFFSET limitations
While offset formula can return with a dynamic range when you beckon, it does have few limitations:
- OFFSET formula is volatile: In plain English it means, whenever there is any change in your workbook, OFFSET formula is recalculated, thus keeping Excel busy a tiny bit longer. This is not an issue if you use OFFSET formula in a small workbook. But when you use lots of OFFSET formulas in large workbooks, you will end up cursing Excel as it takes too much time to recalculate.
- OFFSET formulas are tricky to debug: Because the references are dynamic, debugging a workbook with lots of OFFSETs can get tricky quickly.
Alternatives to OFFSET formula
There 2 fine alternatives to OFFSET formula.
- Use Excel Tables: Since Excel 2007, we can create tables from structured data and write formulas, create charts that refer to dynamic ranges with ease. Click here to know more about tables.
- Use INDEX formula: Although not exactly same as OFFSET, INDEX formula can also be used to generate dynamic range references. Plus, INDEX is a non-volatile formula, so it wont keep Excel busy unnecessarily. Know more about INDEX formula.
Do you use OFFSET formula?
For most of my dynamic range needs, I rely on tables or INDEX formula. I use OFFSET formula when I have to calculate values like average of latest week. In such cases OFFSET is an elegant solution.
What about you? Do you use OFFSET formula? In which situations do you use it? Please share your tips & examples with us using comments.
Know More about OFFSET
Check out below examples to understand OFFSET formula better:
- Calculations: Sum of values between 2 dates | Moving averages | Average of closest numbers| More…
- Modeling: Calculate IRR of dynamic ranges | Manage scenario analysis
- Charting & Dashboards: Dynamic range charts | Top x chart | Analyzing large datasets | KPI dashboards
- Validations & Pivots: Dynamic Data Validation | Dependent Drop downs | De-duplicate & Sort data
- And many more uses of OFFSET


28 Responses to “Pimp your comment boxes [because it is Friday]”
This borders on Excel soft-cell...er, soft-core...porn. My favorite kind.
Wow, that is pimp-TASTIC! I have a question, as a VBA n00b: additional comment boxes stay plain unless I "run" the macro. Is there a way to change all comments, going-forward?
hi Chandoo, well, I like the macro approach. For those who don't like it, there is another way: just add the "draw" toolbar to the shapes toolbar (via Custom etc), click on "edit comment", click on the auto-shape and then choose "draw" drop-down, --> modify auto-shape --> then you even can have a heart or a banner (I like the horizontal banner in in purple :-)) . in excel 2007, you have to add this custom menu that you choose via Excel Options --> Custom --> it is called "change/ modify auto-shape"!!!
best,
@Chandoo. Great Post 🙂
@Tim : the way the macro is coded, it must be run very time.
@Community: If someone has an idea to perform it when opening an existing excel, it should be nice.
@Community: if someone has some code to revamp the commentboxes on all sheets, please share it. 🙂
@Microsoft Excel-progammers: some pimpoptions for the commentboxes should be great.
Cheerio
Tom
For the auto run, please add the codes in workbook:
Private Sub Workbook_SheetActivate(ByVal Sh As Object)
Call Comments_Tom
End Sub
Wow, that was a lot of fun... Thanks Tom!
@Jeff... Now, 5000 people know about your favorite porn... 😛
@Tim ... you can write an event to handle the new comments. I wouldnt recommend it as it is really painful. another option is to use the macro suggested by Yukikomi. It will update comments everytime you activate the sheet.
@laguerriere: very cool 🙂
@Chandoo ... Thanks! This is good stuff. I combined your tip with a tip from Mark O'Brien, then assigned it to a button on Excel 2010's Quick Access Toolbar, to format comments AS I add them. I also like how Mark's code saves me the trouble of backspacing my name out of new comments:
Sub AppendToExistingComment()
'Source: Mark O'Brien at http://www.mrexcel.com/forum/showthread.php?t=57296
Dim oRange As Range
Dim oComment As Comment
Dim sText As String
'Use object variable to hold range.
Set oRange = ActiveCell
'Use object variable for comment
Set oComment = oRange.Comment
'text to be added to the comment box
sText = InputBox("Type text to be added:", "APPEND TO COMMENT TEXT")
If Len(sText) = 0 Then End
'If Active Cell has a comment then append new text to the end of the comment text
If Not oComment Is Nothing Then
sText = oComment.Text & vbNewLine & sText
oRange.Comment.Delete
End If
'Add a comment with the contents of sText
oRange.AddComment sText
DoEvents
Comments_Tom
End Sub
Thank you very much for the code, it seems to be working for the most part; I am having a problem however. Once the routine makes the corrections to the comment, the comment becomes invisible. By invisible, I mean that when I highlight my mouse over it, nothing appears. However, when I right click the cell and click 'edit comment' then the comment becomes visible and I enter edit mode. Upon clicking out of the comment, it simply vanishes again. I've tried to fix this problem by adding a .shape.visible = msoTrue but then every comment is always visible. o_O please advise...
Thank you,
Nick
@Nick- That is because the font color of the comment is white and when you select the color of selection is also white hence you can not see anything. Try to change the color code in the routine to something else. would work
Thanks for that! The code works perfectly!
[...] look at Format Excel Comment Boxes using VBA Macros | Chandoo.org - Learn Microsoft Excel Online [...]
@ Chandoo - code works great and the comments look super cool. But I have ran into a small issue. In the comments, I am inserting pictures. When I run the macro, for all comments which already have pictures; pictures are deleted. Pls help me retain the pics in comments.
[…] posted some code one of his readers submitted, it "pimps" your comment boxes from those boring black-text-on-yellow rectangles to something more professional and eye-pleasing. […]
love in it
Hi Tom,
This looks really excellent. I am however relatively new to macros / VBA codes so having copy pasted your code in the Developer mode of an Excel file, what are the next steps to use them? Can you please help? Just to recap, I opened a blank Excel workbook, clicked on Developer, copy pasted the comments code and saved the file to the desktop.
Now how do I go about using it to add comments to an existing file? My apologies for asking a question which may be basic to you great geniuses, but I am not there yet and aspire to get there.
Many thanks for helping me with next steps that I need to take so that I can now use the code.
Best Wishes
Deepak Dave, CMA, MBA, PMP
Senior Management Consultant
Dear Dave,
The best thing to do is to copy the macro in the personal.xls(x) file. The personal excel file will always be launched when you open excel so you can use it with every excelworkbook.
Read all about it on the page of Microsoft.
https://support.office.com/en-us/article/Copy-your-macros-to-a-Personal-Macro-Workbook-aa439b90-f836-4381-97f0-6e4c3f5ee566
Once you have the macro in the personal, you can 'call' the macro by the keyboardcombination 'alt+f8' and klik on the macroname.
Hope this clarifies the 'how to'. Good luck with your first steps in the wonderfull world of macro's.
Tom
Hi Tom,
Many thanks. I will try that out. Learning is fun and learning this stuff is even more amazing.
Best Wishes
Deepak Dave
There is a line 'Dim LArea As Long' which does not appear to be used. Have I missed something?
Dear Gary,
Correct the 'Dim LArea As Long' is indeed not relevant and can be deleted.
Tom
Excellent hack!
For some reason when I opened my file after using LibreOffice Calc, all comment boxes had changed to some arrow shape.
So this macro helped me from manually changing more than 5000 comments in a worksheet, or having to install some Excel extension.
I used it with the following attributes to get back old style comments:
It helped me from manually changing more than 5000 comments in a worksheet, or having to install some Excel extension.
.Shape.AutoShapeType = msoShapeRectangle
.Shape.TextFrame.Characters.Font.Name = "Calibri"
.Shape.TextFrame.Characters.Font.Size = 10
.Shape.TextFrame.AutoMargins = True
.Shape.TextFrame.AutoSize = True
Thanks a lot!
This was helpful, thank you
I think this is among the most significant
information for me. And i am glad reading your article.
But wanna remark on some general things, The site style is great,
the articles is really great : D. Good job, cheers
Is there code to add to this that will format a particular part of the comment (i.e. make the last sentence in the comment bold and in italics)?
This is fantastic!
How would I add auto-sizing to it?
I tried adding this:
.Shape.AutoSize = True but it gives me an error and as a novice at VBA I can't figure it out.
.Shape.TextFrame.AutoSize = True
Hello I am so glad I found your web site, I really found you by accident,
while I was browsing on Bing for something else, Nonetheless I am here now and would
just like to say thanks a lot for a remarkable post and a all round entertaining blog (I also love the theme/design), I don’t have time to
read it all at the moment but I have book-marked
it and also added in your RSS feeds, so when I have time I will be back to read a lot more,
Please do keep up the fantastic work.
This is GREAT!
How should the code be changed in order to tun once for all worksheets in a workbook?