

We all know that to make a chart we must specify a range of values as input.
But what if our range is dynamic and keeps on growing or shrinking. You cant edit the chart input data ranges every time you add a row. Wouldn’t it be cool if the ranges were dynamic and charts get updated automatically when you add (or remove) rows?
Well, you can do it very easily using excel formulas and named ranges. It costs just $1 per each change. 😉
Ofcourse not, there are 2 ways to do this.
The easiest way to make charts with dynamic ranges
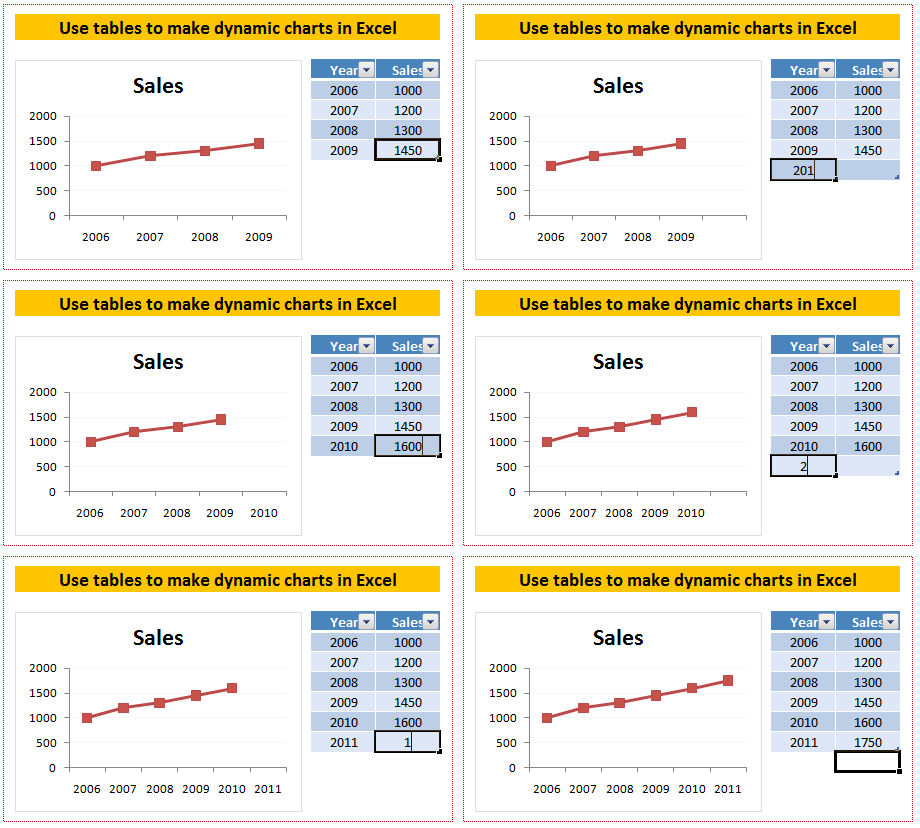
If you are using Excel 2003 or above you can create a data table (or list) from the chart’s source data. This way, when you add or remove rows from the data table, the chart gets automatically updated.
See the below screencast to understand how this works
Using OFFSET formula to make dynamic ranges for chart data
For some reason if you cannot use data tables, the next method is to use OFFSET formula along with named ranges.
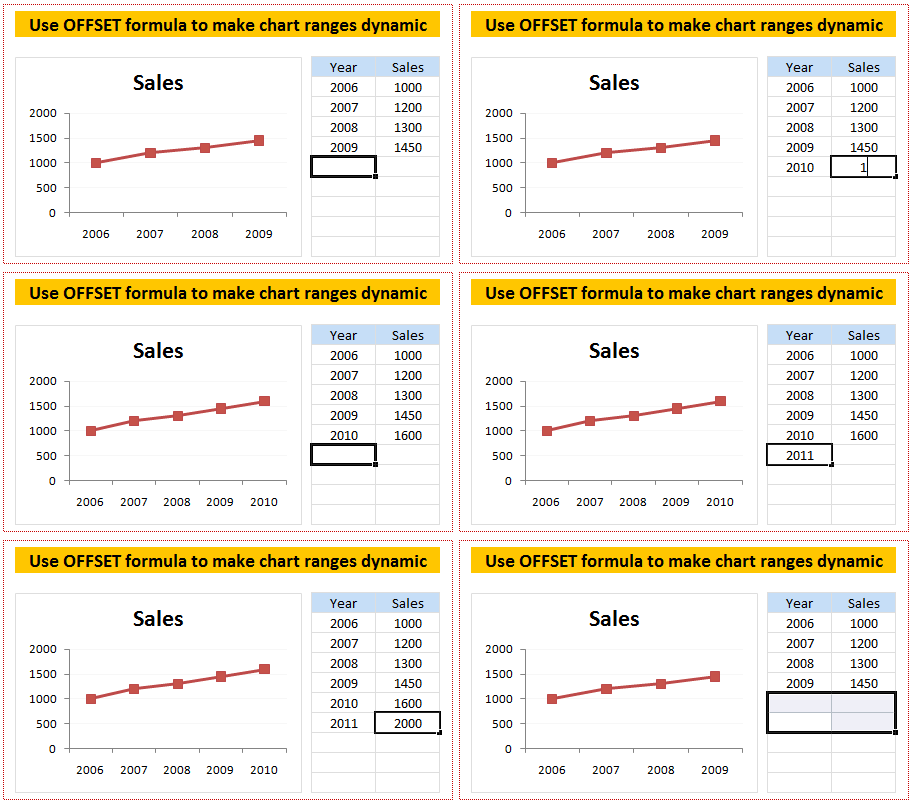
We all know that OFFSET formula is used to get a range of cells by passing on starting point and number of cells to offset. Steps for creating dynamic chart ranges using OFFSET formula:
1. Identify the data from which you want to make dynamic range
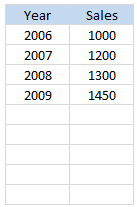 In our case the data should be filled in the following table. As user keeps on adding new rows we will have to update our chart’s source data.
Lets assume the data table is in the cell range: $F$6: $G$14
2. Write OFFSET formulas and create named ranges from them
Ok, the problem is that as and when we add a row at the end (or remove a row), we should update the chart’s data range. For this, we can use OFFSET formula.
A refresher on how to use OFFSET formula:

3. Create a new named range and type OFFSET formula
Create a new named range and in the “refers to:” input box, type the OFFSET formula that would generate a dynamic range of values based on no. of sales values typed in the column G. I have used the below formula. You can write your own or use the same technique.
=OFFSET($G$6,0,0,COUNTA($G$6:$G$14),1)
Set the named range’s name as “sales_data” or something like that.
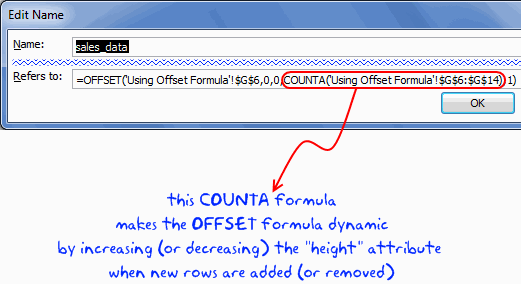
Now repeat the same for years column as well and call it “years_data”
4. Create a column chart and set the source data to these named ranges
Create a column chart. For the source data use the named ranges we have just created.
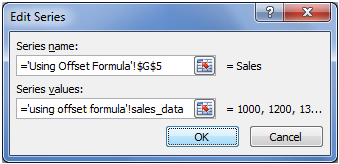
Important: You must use the named range along with worksheet name, otherwise excel wont accept the named range for chart source data.
That is all, now your chart is dynamic
Download the Dynamic Chart Ranges Tutorial Workbook
Click here to download the dynamic chart ranges workbook and use it to learn this trick. I have given Excel 2007 file since the file includes tables.
Bonus Tip: Edit chart series data ranges using mouse
If you have no time for writing lengthy formulas or setting up data tables, you can still save time when editing chart series data ranges. Just select the series by clicking on the chart. Now excel shows highlighted border around the cells from which the chart series is created. Just click on the bottom-right corner and drag it up and down to edit the chart series data ranges. (more: Edit formula ranges using mouse)
See the demo to understand this:

More tricks to make dynamic charts using Excel
Here is a list of tutorials and examples recommend just for you. Go check them out and make your charts even more dynamic.
- Filter Charts just like you filter Data
- Select and show one chart from many
- Dynamically Group Related Data in the Charts
- Use Data Filters as Chart Filters and Make Dynamic Charts
- A Dynamic Donut Bar Chart – Show total and break-ups in an interesting way
Tell me about your experience with dynamic charts using comments.


103 Responses
I was looking for how to do this about 6 months ago and found it. Just yesterday I realized I had forgotten about it. This time I won’t forget.
Thanks. Fantastic read. As always.
@Finnur.. thank you 🙂 Watch out for a fun use of this trick in the upcoming posts.
Hi, I have a reporting requirement on similar lines – making a line graph, with a dynamic range, reporting the last one month data.
I want to accomplish this using a VBA code. Basically I’m looking to incorporate a button which would update the range selection by one day whenever I click on it. Could you help with that?
@Ratna
Can you please ask the question in the Chandoo.org Forums and attach a sample file
http://chandoo.org/forum/
A very nice way to have a dynamic chart… Thank you for sharing 🙂
Now what if I want to be able to dynamically add a new series? All of the dynamic chart tutorials assume that there is only one series with new data being added. I’ve got a line chart with multiple data sets being tracked. I want to be able to add or remove a new data set dynamically. For instance, let’s say I’m tracking the sales figures for apples, bananas, and pineapples. I have a “YES/NO” field so a user can choose to show bananas and pineapples, but not apples on the chart. What then?
Hi Chandoo. Awesome page. MS did not make this easy. Strange. It’s very useful. Make one chart for the whole year, then add data as you go. I have a problem. Even if the result of a cell is =”” as in empty, the series function (or offset function) reads this as zero. Is there any way to get around this?
Many thanks
/Magnus
I have a similar issue. I use data pulled from Salesforce, and pivot off of it. I created tables that show the pivot data so I can easily chart it. I have a list of dates for the entire year (xaxis) and several values for the yaxis. These yaxis values update automatically when the pivot is refreshed and new data shows up. The problem is that if no data is in the cell, the offset formula still counts it as a zero. Any advice?
Thanks,
Jeff
I have been using this feature for a while successfully. I got a new laptop which has some trouble with this feature. The excel on the new laptop does not recognize the dynamic ranges in charts, and does not update the charts as the range chagnes.
What setup do I need to change in order to be able to use the dynamic charting?
The ranges are recognized outside of charts.
The formula bar does not show the range either.
Any suggestion what to chagne is appreciated.
Erika
@Erica: It should work ok. What version of Excel do you have on this new laptop.
also, when entering range name for the source data, you need to include the worksheet name as well, like Sheet1!range_name. Only then excel accepts that range for chart.
Hello …
I am experiencing a similar issue to Erica. When using both Excel 2007 on a PC and Excel 2011 for Mac, I set up the named ranges (including the data sheet name) and reference them (including the data sheet name) and the chart looks fine. However, nothing happens if extra data is added to the named ranges.
When I then check the source data references they are no longer named ranges but absolute references. It doesn’t seem to matter how many times I re-enter the named cell references or which order I do things. The chart just won’t update and the range references become static and absolute rather than dynamic. A colleague has had similar issues doing this sort of thing in Excel 2007 but not older versions.
Is there some sort of work-around I can use or an ‘update workbook’ type setting I need to adjust … ?
Thanks.
Hello again …
Problem solved thanks to my colleague.
Make sure the named data range IS NOT inserted in the ‘Chart data range’ section (which will disply the result of the named data range – and will therefore look like absolute references) but inserted through editing the data series within the ‘Legend Entries (Series)’ section.
That should do the trick – the problems I was experiencing are a result of being less familiar with this version of Excel.
Hope that clarifies things for anyone else who may have been having similar troubles.
Thanks …
When editing the source data for a chart the only location where I can enter the range name is in the Chart data range where you specified NOT to put it. The legend series section involves each individual series. I may be doing this wrong so could you give a extremely detailed explanation of where you are putting your data range name.
Thanks in advance
The info from this site is very useful. But I have a question. How can you create a dynamic chart if the month are on rows not on column as in the below tabel:
Jan 2010 Feb 2010 March 2010
1 2 3
I have tried all the exemples, but it does’t work. Can you please help.
Thank you !
@rrra
you will use an offset formula like
=OFFSET(A1,0,1,0,COUNTA(B2:B100))
I tried this formula but still does not work.
I have the labels of each row from b10 to b21, data will be added to the rows C, D, E, F and so on eventually for each row.
Please, help!
@Juan
Can you please post a question at the Chandoo.org Forums
http://chandoo.org/forum/
Please attach your file
You are a LEGEND!!!!! Do you realise how many tips I get off you for Excel.
Thanks Heaps! Keep up the good work, you Champion!
Thanks for sharing this. This was very useful and very clear to follow.
Hi Chandoo,
This method works fine for entering data manually, but I’ve got the same issue Reeves has, as per his/her post no. 4from 6 November 2009.
I’m trying to show a range of prices against a raw material, tracking this back from 2000 onwards per month/quarter.
However, the user may want to see a different selection.
Using match/offset I’ve got the data selected, but when applying the described method it shows the data for the range in the graph, but the whole date range on the X-axis, which I awant to avoid.
Any suggestions?
(Note: I have amended a VBA-script I found on Peltier tech, for adjusting 1 or 2 Y-axis, but this doesn’t seem to be working with the X-axis).
Thanks so much for this tip. My question is : if your series data has a formula in it to automatically populate the cells with data every month, EXCEL does not see this as an empty cell. Is there a way of still creating a rolling 13 month chart or do we have to manually populate the cells every month?
PLEASE HELP
Excel 2002 SP3
Bar graph with 2 series
2 named ranges defined in same workbook w sheet called: Annual Compare DATA
AnnualSales=INDIRECT(“‘Annual Compare DATA’!$B$3:”&ADDRESS(3,MATCH(9.99999999999999E+307,’Annual Compare DATA’!1:1)))
AnnualProfit=INDIRECT(“‘Annual Compare DATA’!$B$19:”&ADDRESS(19,MATCH(9.99999999999999E+307,’Annual Compare DATA’!1:1)))
(I know these work as I tested the sum(AnnualSales) etc in the Annual Compare DATA sheet)
Tried In Graph:
=SERIES(,,’Running Data Graphs.xls’!AnnualSales,1)
=SERIES(,,’Running Data Graphs.xls’!AnnualProfit,2)
Doesn’t work, (your formula contains an invalid external reference to a worksheet)
yet If both series are the same, or even a different name referring to the same actual range – it works!!! I tried everything for 7 hours – PLEASE HELP – > thanks
Anyone have any suggestions or fixes regarding my issue (hbeer444)?
Thanks in advance.
Have you tried using OFFSET or INDEX to define the ranges instead of INDIRECT?
No I havn’t CHANDOO – you think that may be better to rewrite it that way? – I will take a look at that…thanks
Hello Chandoo!
One question about this, is it possible to somehow set the marker option so that it will only show one marker as per year to date data without the need to do this manually. I have to do this is a regular basis update the markers of many charts to its current monthly/currently values. I have been wondering if there is an approach to avoid this and set this as an automatic procedure.
Usually we like to have only the current value to emphasize actual situation, we don´t need all markers appearing in the line chart, for each values but only for the last one.
Thanks a lot for your help!
BR
These are great tips!
But I have a question…
I have multiple series and the series are horizontal not vertical.
I also only need the current year, so my table has many months on it but I only want (let’s say I’m doing the chart for december and decemeber is the current month) Jan 2011-Dec 2011(current month). Do these functions only work if you want to add dates to the end. Is there a way to make the chart populate for only the current 12 month period?
Thanks
I’m having the same problem as derKaefer, but even with his explanation, I can’t figure out how to fix it. I reference the named range and the sheet appropriately in the formula, but even when I enter the named range using the “add series” field, the named range converts to an absolute range in the “Chart Data Range” field.
This is driving me nuts! Any help would be greatly appreciated.
@Sam
Did you read derKaefer’s second post where he explains how he fixed it?
Ya, he says: “Make sure the named data range IS NOT inserted in the ‘Chart data range’ section (which will disply the result of the named data range – and will therefore look like absolute references) but inserted through editing the data series within the ‘Legend Entries (Series)’ section.”
The problem is that I can’t figure out how to keep the data range from being automaticall entered into the ‘Chart data range’ section. I enter the data into the data series section, but excel is automatically adding the range into the ‘Chart data range’ section, too.
Any ideas how to keep this from happening? I’m pretty sure I’m using sheet and named referenes correctly…
-Thanks.
I have a problem:
I want to achieve a functionality that if a paste a set of data in my excel sheet(variable no. of rows and columns) and i run my macro it will show me the chart out of that data.
Can anyone help me on this.
Tushar,
If I understood your query correctly, then you want only the lates data set to show on the chart.
You can insert a new sheet where you may track the last row and column of the data.
Now everytime you import new data, you may store the last row and column number and also the new row and column number. Since you are already using VBA this would be very easy.
Now since you have the row and column number with you, use that to update the dynamic range that feeds onto your charts.
Thank you dude!
This PRO information helped me out to finish my worksheet 😀
much appreciated!
This page is very helpful!
I got the dynamic range to work on one worksheet. However, I need to use this worksheet as a template (I go to “move or copy, copy” to make a new worksheet). I’m using Excel 2010.
Whenever I do this, the formula in the new worksheet simply has the range from the template based on how many data points the template had when it was copied, not the dynamic range. I need each worksheet to use the dynamic range based on the information in that worksheet. Do you know how to do this?
Thanks!
FOUND A WORK AROUND:
a) have 1 worksheet opened in Excell (with dynamic chart)
b) save this file as “Template” (with Macro if you use it as well)
c) move the file saved .xltm to C:\Users\XXXXXXX\AppData\Roaming\Microsoft\Templates\
d) open fresh excel doc or any existing doc
e) right click the tab (worksheet) ad “Insert…”
f) choose the template you just copied
g) see the new tab (sheet) show up (or multiple if your template ahd them)
h) !!! MAKE SURE TO RENAME This NEW TABS WITH NEW NAMES! – IF YOU WILL IMPORT MORE OF THE TABS from same template into this document!!! Otherwise dunamism of your NAMEs migh get messed up! (i.e will refer to a wrong worksheet)
Great post. Helped a lot and looking forward for more.
Cheers!
Thanks!!!!
Hi chando ….Please share format file to have better understanding of OFFSET formula to create graph…….Please
@Chintan
Have you read either:
http://chandoo.org/wp/2009/10/15/dynamic-chart-data-series/
or
http://chandoo.org/wp/2010/11/04/analysing-large-tables/
Hi,
Refer both links. but, still my graph show that parameter as blank. can u please share the example file for ”
Using OFFSET formula to make dynamic ranges for chart data
Please….
@Chintan
Can you share your file so we can be specific for your requirements
Thank you Chandoo!
I’ve using this in a lot of charts, but recently I’ve got problems when I try to move the worksheets to another workbook, because the name ranges I created in old workbook will not be copied with the worksheets. I’ve fixed this by recreating name ranges in new workbook.
Actually, I’ve found another way to automatically update charts. When you select series range, you can select longer than the exsiting data points. For example, if there’re 4000 data points, you can select to 6000, then the charts will contain all the data when updated. And I arrange data in reverse chronological order, so I’ll not miss the newest data at least.
No sure what do you think about this method?
@Kunlin… Thanks for your comments. Ideally, adding extra points to the chart (even though they are blank) would make Excel slow. I suggest using tables to keep your dynamic ranges. This way, you do not have deal with moving named ranges to new workbooks or worry about growing or shrinking data.
Hi Chandoo,
I have a problem with the dynamic charts. whenever I close the workbook that contains dynamic charts the formulas will be changed. whenever I open the workbook I need to reinsert the worksheet name into that every charts data.
Please tell me how to solve this problem.
Awesome! Just what we were looking for to change our Gantt Chart in Excel!
Hi
I have been using the dynamic charts, they are cool, indeed.
Also, I use the Multile Time Scale chars described here:http://peltiertech.com/WordPress/plot-two-time-series-with-different-dates/.
I am not able to combine the two to get a dynamic chart AND multiple time scale in the same chart.
Any advice pls ?
@Josef
Can you post a sample of your data for us to see what going on, Refer: http://chandoo.org/forums/topic/posting-a-sample-workbook
Sample data is here:
https://hotfile.com/dl/168289539/fba040a/Time_Series_With_Different_Time_Scales.xlsm.html
Thanks for your attention. Josef.
I don’t know why, but I have not been able to make the offset functionality work. When i attempt to use the Offset function, I get an error message, “That function is not valid.” I am using Excel 2010. Is there something that I need to do to set the environment?
Super helpful post!
Thank you.
Chandoo,
Wonderful site.
Is it possible to do this for graphing on a scatter plot?
Thanks!
i want to make dynamic chart,in that rather than rows,but columns are going to get increase,row no. are fix eg. row no. would be 1 to 23 (hour) and column would be month names, and each month new column is added and chart needs to get updated with last 10 months values.
your any help will be appreciated.
Hi,
I have a chart linked to name range X. X is defined using OFFSET. In my dashboard chart throws an error “A formula in this worksheet contains one or more invalid references”. I want to suppress that message since I know my offset function doesn’t have any data to show and Formulas are totally OK !
I was trying to use dynamic ranges for my charts and kept getting ”That function is not valid” errors. None of the other web sites I read mentioned the need to have the sheet name in the reference (e.g. Sheet1!MyRange). Thank you so much!!
I believe I have this working “as advertised”. I am, however, using a “rolling” time period. The problem comes when I delete the first row of the range. I get a message “A formula in this worksheet contains one or more invalid references.”
Here’s the definition of the named range: =OFFSET(Sheet1!$D$3,0,0,COUNTA(Sheet1!$D$3:$D$19),1)
D3 is where the data begins. Once row 3 is deleted, the above error appears. Any other row is deletable and I can add data okay.
I need this because the first row of the data “falls off” as I ad a new “last row”.
Any ideas – Am I doing something bad wrong?
I had the same problem as Sam and derKaefer where my excel chart built using dynamic named ranges, does not update automatically after I have closed and reopened the file.
I realised that the problem is because named ranges are automatically renamed in excel to use the file name instead of worksheet name. eg “worksheet!named_range” is renamed to “filename!named_range”. This behavior somehow breaks the ability for the chart to autoupdate.
However, I realised that if I were to redefine the series values, the chart will be able to update automatically again. (However It breaks again once I close and open the file).
I solved it by creating a “Reset” button and assigning a macro which redefines your chart sources. VBA gurus will be able to solve this with ease. I simply recorded a macro since I’m unfamiliar with VBA.
This is only a workaround, and involves building a reset button each time. If someone has a better solution to implement dynamic charts without this workaround, I would like to hear from you!
Hi,
I want to create a dynamic line chart with multiple data set from Jan to Dec as X- axis and model names (eg A,B,C,D,E )as Legends. Data for A,B,C,D,E is arranged in descending order so model with no data will always be at bottom. I want legend to disappear in line chart when there is no data against that model in the month of Jan. I have already tried unsuccessfully with offset in name manger. Can anyone help please?
Here is the link to the excel file
https://www.dropbox.com/s/h11afxrhz9aacwi/dynamic%20chart%20problem.xlsx
@Mohit TAngri
Just to clarify
You don’t want a legend when there is no Data in January
But You do want a legend when there is Data in January !
Is that all you want ?
yes, this is the basic requirement.
Hi, Any solution?
Awesome post!
Hi, I am creating a template file with dynamic chart ranges. My problem is with the Series Values. I currently have the following: =’RainfallProbabilitiesTemplate.xlsm’!JanSeries This gives my filename followed by ! followed by JanSeries(dynamic range name of data to chart). This works perfectly – but I want to make the file name dynamic. I would be grateful for any help.
@Kary
You will have to include the Indirect Function
Indirect() takes a Text string and converts it to a range including the full filename, worksheet and cell range
This then allows you to use references or variables to setup
have a look at some of the Indirect examples using the Google Custom Search box above
Thanks for your reply. I am already using the indirect function. Currently I have the filename in R4, Sheet name in Q3 and the range preceded by an ! in D5 (i.e. !c5:c95). I have a range name called JanSeries which combines the sheet and range as follows: =INDIRECT(Calcs!$Q$3&Calcs!$D$5).
It works perfectly if I use as the data series:
=’GraphTemplate’!JanSeries.
However, my problem is that I would like the file name viz ‘Graph Template’ to be variable. I put the file name in R4. I have created a range name containing: =INDIRECT(Calcs!$R$4&Calcs!$Q$3&Calcs!$D$5) using both just the name and also including inverted commas and the ! in R4 but it just doesn’t work. This is the last remaining problem with this template and I’m desperate to solve it!
Thanks, Kary
@Kary
You have to ensure that the text has the correct ‘ marks which are required if the file or sheet names have Numbers or spaces in them
I usually setup a formula manually
then edit the formula and put a ‘ at the start
This is what the text in the Indirect must look like
Can you post the file or email me?
That would be great – what email address should I use?
Hi Chandoo,
Is it possible to create a dynamic chart using named ranges where the data extends both horizontally and vertically?
@Dinakar
Well, Yes and No
Dynamic charts can be done using the technique described here
http://chandoo.org/wp/2009/10/15/dynamic-chart-data-series/
But some carts rely on series being defined by the Rows or Column Ranges
Charts don’t automatically add ranges just because you add extra Rows/Columns
Having just said that you can use Dynamic Ranges to add Extra Series to a Pivot Chart
Define a named Range for the Data
Update your data
Refresh the Pivot Chart
Voila
This doesn’t work for all chart types
Thanks Chand0oo
your example showed a STATIC series with a dynamic number of points. Would you please be able to illustrate how to handle a dynamic number of series where each series has a dynamic number of points?
For example, sometimes the data source may contain 3 series, and sometimes the data source may contain 5 series.
Thanks
Perfect!
It worked perfectly! Thanks for sharing your knowledge.
Hi,
I have created a unique named range ‘year’, but need to show it as a drop down list for my dashboard on a separate sheet.
Data validation from data tools just creates the list of years without any filtering.
Say:
Year
2004
2004
2007
2006
2007
I have created a named range that gives me unique values. I need the same list with unique in a drop down list.
@Sarmistha
Have a read of:
http://chandoo.org/wp/2010/02/02/data-validation-using-an-unsorted-column-with-duplicate-entries-as-a-source-list/ ,
http://www.get-digital-help.com/2009/05/25/create-a-drop-down-list-containing-only-unique-distinct-alphabetically-sorted-text-values-using-excel-array-formula/
or
http://stackoverflow.com/questions/19388849/set-distinct-drop-down-values-based-on-vlookup
Hi Chandoo,
I need some help on the followings:
i have data like in the format:
products hrs
A 1
A 1
A 2
B 3
C 3
A 3
D 1
C 1
.. ….
…. ..
… ..
now in the above data table products can be added and hrs as well.. so i need a dynamic graph which can show per product total hrs spend. please note that we can not change the requiremnt it is filled on some days.
can you help me for this.
your above article is helpful but i need to work with grouping on same.
@Harsh
You will need to setup a summary table somewhere where you calculate the Sum of each product value using a Sumif() function
Alternatively select the whole data set, and the Insert, Pivot table
Then insert a Pivot Chart off the Pivot table
Hey there,
So I’ve been using this for quite a while and love the method.
Just lately though I have been working on a dashboard that references rather large amounts of data and have been trying to optimise my work load by excessively using named ranges, data validation and the INDIRECT formula.
I am familiar with the ‘select a chart from a list’ using linked images (http://chandoo.org/wp/2008/11/05/select-show-one-chart-from-many/)
However what I’m trying to do now is use the indirect formula to choose the data to show in the graph.
for instance “=’Test Series.xlsm’!ind” – where ind = “=INDIRECT(B$4$)”
This comes up with an invalid reference error.
Just wondering if there is a simple way of doing this before I start looking at more complex formulas…?
@Matt
You should be using something like:
=INDIRECT(“‘Test Series.xlsm’!B$4$”)
or
=INDIRECT(“‘Test Series.xlsm’!”&A1)
where A1 contains the Text $B$4
I have a schedule analysis spreadsheet I use for multiple projects. I have it set up to handle up to 104 weeks, however, some projects are 20 weeks, some may be 96 weeks, etc. In the past my graphs would extend out 104 weeks regardless of the actual length of the project and the only way to fix it is to go in and “re-work” the data range on every single graph.
This would work very well except I have formulas in all of the cells out to the 104th week. Excel reads that cell as having data and so the graph goes all the way to the 104th week. Is there a way around that?
Even better, I have a cell already that contains the last week-ending date of the schedule. Is there a way to have the graph dynamically include data to that date only?
@Michael
Please ask the question in the Forums and attach a sample file
http://chandoo.org/forum/
Hi!
I am trying to create a Dynamic Range for my charts with a data completed based on formulas.
Means, all the cells in the data shows values based on a formula. In that i have added that if the result is an error, it should give me a blank by – “”.
Due to this, the dynamic range is also considering the cells being blank as a result of the formula. Please help. I have tried Offset & Counta, Index, etc. but nothing is working.
If you want me to give a sample, please let me know when to post the sample file.
@Sk
Can you post the question in the Chandoo.org Forums
http://forum.chandoo.org/
Please attach a sample file to simplify the solution
Thank you Hui!
I actually got the solution…!
Hi all, this post is useful.
But if you want to simply expand or cut your chart range, or set a new starting point at 1 click (and even for multiple charts and series simultaneously) you should check out the excharts.com website, where you can download an excel add-in that can do this. (at a small cost of 3 EUR per copy).
Hi Chandoo,
I love your website. Though I do not like the way you chose to use one drive. Your example file does not seem to work and I cannot download it properly, to view it in Excel on my computer 🙁 🙁 🙁
@SK,
I have the same problem, maybe you can try, by changing the COUNTA to COUNTIF, like this:
=OFFSET($G$6,0,0,COUNTA($G$6:$G$14),1)
to
=OFFSET($G$6,0,0,COUNTIF($G$6:$G$14,”>0″),1)
for me it’s worked.
Hello !
I’ve been looking for this the longest time and I’m so glad I chanced on this page.
Just one problem I’m facing, my apologies in advance if this has already been asked because I didn’t have the time to scroll through all the comments.
I have my columns in formulas and the formula returns a blank “” when the result if empty. Not sure if I’m not following this right or its due to the fact that the cell is with formula, although returning to a blank the chart still plots it.
Appreciate your response !
Thank you in advance.
YJ
Hi, How can i create “Create a new named range”?
@Duman
Goto the Formulas, Name Manager Tab
No one ever answered Em’s question. Once you have created a dynamic chart in a worksheet, is it possible to use that worksheet as a template and copy it within the same workbook or new workbook without losing the dynamic named ranges?
YES< THIS IS A PROBLEM I RUN INTO AS WELL! — TRY Copy the worksheet you have a chart w/ dynamic name on ! — you get a copy of that graph on copied sheet BUT its series ranges are not DYNAMIC ANYMORE! (they are correct and refer new copied sheet BUT ARE NOT dependent on the formula in NAME ….. ANY HELP??
a1) Use local sheet references in your NamedFormula!!! (bad: =’fileName.xlsx’!YRANGE2 ) (Good: .=’Tab (2)’!YRANGE2
Hi Chandoo,
Thanks for this demo on making dynamic charts.
I have been facing a problem though. I have created a dynamic named range and have used it for a column chart. I have used the sheet name too while referencing the named range in the chart source data.
But when the data changes, the named range becomes static and the chart doesn’t get updated as it should. My source data is linked to a pivot, which in turn is linked to a slicer. Hence, when the slicer selection changes, the number of rows in the pivot changes, and the named range changes dynamically. But I see that the chart still takes the same number of rows. Would be really helpful if you could suggest a solution.
P.S. – I have tried work around, like hiding and unhiding the rows whenever the source changes. But that slows down the slicer.
Alok
Hi,
I found the problem. I had switched the rows and columns of the bar graph data. Looks like dynamic ranges don’t work when rows and columns are switched.
Alok
Dynamic Charts
All the Horizontal and vertical values are obtained by formulas from another sheet. When the dynamic names are given the chart does not take the changes and goes to the parent sheet from where the values have been extracted.
How to do a dynamic chart when values are extracted by formulas