 Ok, Coffee can be one of them, but may be after the 3rd mug of the day, you will ask the question, “so, what are the productivity secrets of Excel 2007?”.
That, my friend, is the reason why you should put aside the mug and read this post carefully. The post is pure filtered decoction of tips you must sip.
if you like this post (or for that matter if you like coffee) please add it to your delicious bookmarks or stumble it or tweet it.
Thanks, You are beautiful.
Turn on the Clipboard pane, Copy paste like there is no tomorrow

We all swear by ctrl+c, ctrl+v. A large part of my MBA case studies were submitted intime thanks only to the awesome clipboard. But do you know that you can turn on the clipboard feature in Excel 2007 in a full panel view and use it to speed up the copy paste activity.
Hold Down ALT to see what keyboard shortcuts are available, press key and you will see more

All you have to do is hold the ALT key down. And I can bet that you will learn a fun and simple keyboard shortcut for something that you use everyday. What more, in Excel 2007 you can use most of the Excel 2003 (and earlier) keyboard shortcuts.
Lock a feature to Boost up your performance, for eg. lock format painter and paste formats everywhere

When you need to perform certain action several times, like for eg. if you want to paste the same formatting over 40 different cells, you can lock the format painter by double clicking on it. See the screencast to understand how it works.
(When you can inserting shapes etc, you can use “lock drawing mode” option from right click menu)
Make your charts and tables go everywhere, copy them as pictures

When you copy a chart / table of cells as picture, they take less space and look lot better when pasted.
Add Invisible / Hidden features to your Quick Access Toolbar

You can add hidden features of excel 2007 like camera tool etc. to the quick access toolbar (the tools that you usually see next to office button). Just click on the office button > Excel options > Customize and select “commands not in the ribbon”. These are the features that are not usually shown on ribbon (some of them are shown when you lets say select a chart or table or something like that).
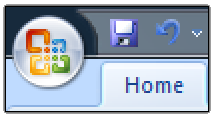
Move the Quick Access Toolbar down to save mouse travel time

I think that title says it all. See the image.
Always save the files in Excel 2003-97 compatible mode

Very useful if your colleagues / clients are still using old versions. Just go to Office button > Excel Options > Save and change the file type to Excel 2003-97.
Click on the corner of a group of Ribbon Icons to launch its UI

This is not applicable for all groups. But for some groups of icons you see a little squarish icon on the bottom right corner. Just hit it to launch a friendly office 2003ish looking dialog to make changes to the settings etc.
Add chart related options to Quick Access Toolbar to save time

If you make a lot of charts, then it pays to add the chart related options like “adding error bars”, “adding axis” etc. to the quick access toolbar. Then you can press ALT+number to activate this feature and work with it without even moving your mouse.
Create a named range quickly by typing the name in the corner of formula bar

You can quickly create a named range by selecting a bunch of cells and typing the name in the formula bar’s left hand corner where usually cell address’ is displayed.
See the screencast.
BONUS: Enable Developer Ribbon Toolbar in Excel 2007

If you in to mochas and trying to explore macros, then this one is for you. Enable the Developer toolbar from Excel options > Popular and you can play with all those form controls and macros.
More Tips and Tricks on using Microsoft Excel
Did you enjoy the post? Do you want more ? Well, it is not coffee, so you can consume as much as you want. Start with these and see where your mouse takes you.
Excel Productivity – Advanced Tips & Tricks
Excel can be Exciting – 15 hacks you don’t know
100 Excel Tips, Tricks and Resources
Sign up today and recieve an E-book with 95 Excel & Charting Tips