

Imagine you are the head of Accounts Receivable department at a large company. Drab, I know, But humor me and imagine.
Now, every month you get a transaction report like this:
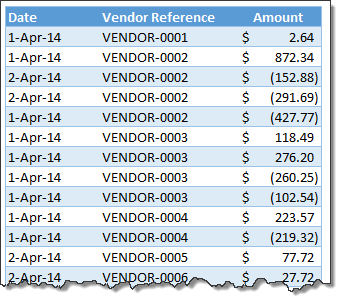
And you want to know which numbers are matching up.
i.e, if your company gave Vendor-0002 $872.34 on 1st of April, 2014 and your received below payments from them subsequently,
- $427.77 on 1st April
- $152.88 on 2nd April
- $291.69 on 2nd April
Then you consider the account matched since the total received is same as total payable.(427.77 + 152.88 + 291.69 = 872.34).
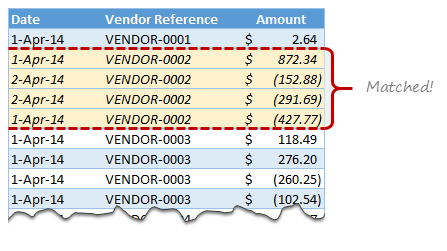
Manually identifying all such matching transactions can be tedious, boring & error-prone.
This is where formulas come handy.
Using simple Excel formulas, we can identify all matching transactions, highlight them using conditional formatting so that you can chase the vendors with an outstanding.
Note: thanks to Kirstin whose email question prompted me to write this article.
Using formulas to match up (reconcile) accounting transactions
Step 1: Lets take a look at the data
This is how our AR (Accounts Receivable) data looks above (very first image in this post).
For the sake of simplicity I have set up this data as an Excel table.
Step 2: Write the formula
Here is the criteria for matching.
- If the total amounts (paid & received) corresponding to a vendor is zero, we consider it matched.
- Else not.
Add an extra column to the table and write this formula.
=ROUND(SUMIFS([Amount],[Vendor Reference],[@[Vendor Reference]]),2)=0
What this formula does:
It gives TRUE if a particular vendor’s amounts to total to ZERO
else FALSE
How it works?
The SUMIFS formula sums up all the numbers for the vendor name in current row [@[Vendor Reference]]
The ROUND formula rounds it to 2 digit precision. We need to use this because of a floating point error in Excel (that returns extremely small values when the result should be zero).
Related: How to use structural references in Excel
Step 3: Fill down the formula
Fortunately, you don’t have to do this step. Excel automatically fills the formula down as we are using tables. Yay!
Step 4: Highlight matched rows using conditional formatting.
Make a note of the column where TRUE / FALSE values are calculated. In my set-up, it is column E.
Select the entire table. Go to conditional formatting > new rule from home ribbon.
Set up a rule like this:
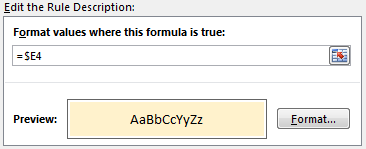
Note the mixed reference style $E4. This ensures that for highlighting all columns, Excel checks only column E.
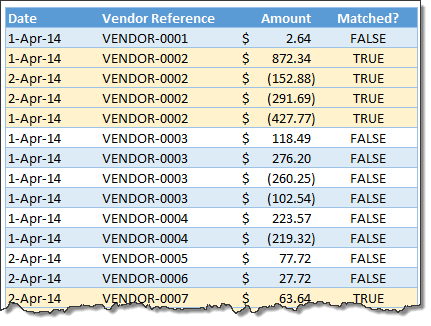
That is all. You have now matched all the paid-up transactions. Time to flex your muscles, put-up your legs on the desk and call those other people who did not pay yet.
Download example workbook
Click here to download example workbook & practice. Examine formulas & conditional formatting to learn more.
How do you reconcile / match-up transactions?
I will be honest. I have never been the head of accounts receivable department. Even in my own household, I do not handle receivables. My wife takes care of that. I handle payables (ie credit card bills, shopping expenses and other such things).
But I often use formulas to reconcile my bank statement.
What about you? Do you use formulas to match transactions. What techniques you rely on? Please share your tips & ideas using comments.
Bonus homework
Assuming we have data like above, what formula answers the question:
How many vendors have their transactions matched?
Post your formulas in comments.


45 Responses
I will use pivot table for above example. After pivot just use round formula to sum of amount.
=ROWS(Table1[Matched?])-SUMPRODUCT(Table1[Matched?]*1)
18 vendors have their transactions matched.
=SUMPRODUCT(Table1[Matched?]/COUNTIF(Table1[Vendor Reference],Table1[Vendor Reference]))
Regards
The total of an additional helper column
=IF([@[Vendor Reference]]=OFFSET([@[Vendor Reference]];-1;0);0;[@[Matched?]]*1)
I agree with Utkarsh – a pivot table is likely the fastest way to handle it using this example.
Personally I create a unique table of vendors, and then use SUMIFS formulas to bring in both the expenses and the payments into separate columns (because my ledger includes a description of type of transaction).
So my formula for invoices is more like =SUMIFS(Table1[Amount],Table1[Vendor Reference],[@[Vendor]],Table1[Transaction Type],”Invoice”)
And then there is a formula to pull the Payments in the next column
Fourth column (because the first column is the vendor name) is for difference between Invoice and Payment.
Another approach is to insert a new column with the following formula in C5:
=IF(AND(C4[@[Vendor Reference]],[@[Matched?]]=TRUE),1,0), then sum the total at the end of that column
The sum of the additional helper column
=IF([@[Matched?]]=TRUE, 1/ COUNTIF([Vendor Reference], “=”&[@[Vendor Reference]]), 0)
I would also use a pivot table to solve this… But, great formula!
Nice formulas to everybody! but no offense, just a modest comment:
“Simplicity is Elegance” like Albert Einstein said.
I would use a Pivot Table too!
I agree. A pivot table would be really simple & quick way to solve this problem.
On second thought, there are occasions where you would want to delete or move the data that is zeroed out. To my knowledge, this cannot be done with a pivot table. Therefore, the formula approach would be MUCH better as you can then sort by the TRUE responses and move, delete, copy, edit, color, etc. the data. I have a worksheet where I do exactly that and I have changed it to include the formulas you suggest in this article! Thank you!
if we have no reference in account ledger so how could we reconcile
I would also favor a pivot table. But thank you for the formula and conditional formatting example. I’m trying to learn more formulas because most of my coworkers do not like to use pivots and my boss usually likes to see the detail and how I got there from the raw data.
Chandoo, Interesting. I have never seen the @function used in a formula like that.
@[Vendor Reference. What exactly is the @ doing in the formula? Is it calling the entire column?
Thanks.
Patricia
Hi Patricia,
Thanks for the comments. The @ function refers to vendor name in the current row (same as relative reference).
hi chandu, could you please send me the excel sheet by putting this formula as I am not able to put this formula. please help.
My email id – naman011@yahoo.com
Create 1 helper column, populate all cells with the following formula, from cell F4 all the way to F261, assuming the data begin in cell B4,
=COUNTIFS(C4:C25,Table1[@[Vendor Reference]],E4:E25,TRUE)
– another cell, say G4, with this formula
=COUNTIF($G$4:$G$261,1)
Hi! I would favor the formulas, as I have hundreds of vendors, it would be harder to anilyze this by pivot, with formulas I have the possibility to filter and include the document number also, as it is important to me.
I’ve been listening for 10 minutes (YouTube) and then realized – vendors do not pay us, customers do, we pay vendors:)
Also the mistake with the round up in the pivot be solved if we add another column in the initial data table and ask it to round up and use it for the sum in pivot. In this case we would not need to filter with 0,01. I know this is an additional step, but sometimes it is harder to explain why a person needs to filter not by zero, if you send the file to somebody. Also in this case if we filter excluding the zeros we will be able to see the negative amounts, for my country this will be also valid, as we are obliged to return overpayments by law.
Thank you for showing it!
This is a great formula. I love the way it must include the same vendor in order for the calculation to work.
How would I rewrite the formula if I had to include the same vendor, and exact DATE to match to produce a “true” result, otherwise anyhting else would be false?
Thank you,
Gorden
Try
=ROUND(SUMIFS([Amount],[Vendor Reference],[@[Vendor Reference]], [Date], [@Date]),2)=0
Herbert
WOW! Thank you so much Herbert! This formula worked like a charm!
-Gorden
[@[Vendor Reference]] is not working
i have two ledgers to be matched.
first is maintained by me
and the second one is send by customer to me which he maintained himself .
there is no negative signs in the ledger and they are in separate sheets.
i want to reconcile them plz guide … will be very grateful thnx in advance ….
Hi Chandoo, why it has to be sumifs instead of sumif? Cheers!
Is there a way to change the formula, I need it to show as matched if it equals 0 or is >-5.00 or is <5.00.
Thank you
Krista
Dear Krista,
Not clear want you wish to achieve, but if you would like to see all transactions where the total amount remaining is between -5.00 and +5.00 then you can use either one of the following formulas:
=(ROUND(SUMIFS([Amount],[Vendor Reference],[@[Vendor Reference]]),2)>-5)*(ROUND(SUMIFS([Amount],[Vendor Reference],[@[Vendor Reference]]),2)-5, ROUND(SUMIFS([Amount],[Vendor Reference],[@[Vendor Reference]]),2)<5)
Regards,
Herbert
Sorry, this did not come out correctly in the comment.
The formulas are:
‘=AND(ROUND(SUMIFS([Amount],[Vendor Reference],[@[Vendor Reference]]),2)>-5, ROUND(SUMIFS([Amount],[Vendor Reference],[@[Vendor Reference]]),2)-5)*(ROUND(SUMIFS([Amount],[Vendor Reference],[@[Vendor Reference]]),2)<5)=1
Regards,
Herbert
Again not correct. Let me try one more time. This time one formula at the time.
=(ROUND(SUMIFS([Amount],[Vendor Reference],[@[Vendor Reference]]),2)>-5)*(ROUND(SUMIFS([Amount],[Vendor Reference],[@[Vendor Reference]]),2)<5)=1
or ….
=AND(ROUND(SUMIFS([Amount],[Vendor Reference],[@[Vendor Reference]]),2)>-5, ROUND(SUMIFS([Amount],[Vendor Reference],[@[Vendor Reference]]),2)<5)
The second one worked great, but now I still need to narrow down my list.
Example:
Vendor 1 $150.00
Vendor 1 $(150.00)
Vendor 1 $200.00
I would like a formula to show the first and second transaction as TRUE and just leaving transaction three as FALSE.
How can i match the transactions when i don’t have any base such as vendor name- All that i have in an excel sheet are numbers??
okay.. I’m still not getting through with this. so I’ve got the Suppliers’ column and two amounts that I want to double check.. How would my formula go? help please..
I wanted to say thank you for creating this formula. I have been looking for this formula for years. When I found out about this a few weeks ago, it made my work soooooo much easier and faster. I have to reconcile daily transactions just like the example and this formula just cut my work in half (or more). Thank you soooo much!!!
I HAVE A BANK LEDGER IN EXCEL AND I WANT TO SPLIT MY BANK LEDGER ACCOUNT WISE AND THEN PROJECT WISE FOR EXAMPLE I HAVE THIS COLUMN IN EXCEL “PROJECT”, “ACCOUNT”, “DATE”, “CHEQUE / INSTRUMENT NO.”, “DESCRIPTION”, “DEBIT” “CREDIT”, “BALANCE” AND I WANT TO MAKE A LEDGER OF TRAVELING ACCOUNT ON ANOTHER SHEET BY USING FORMULA WHO WILL FIND ONLY TRAVELING ACCOUNT ENTRIES ONE BY ONE AND PUT IT ON MY NEW WORKSHEET I HAVE APPLIED SIMPLE VLOOKUP FORMULA TO DO THIS BUT IT FIND ONLY FIRST ENTRY FROM BANK LEDGER AND PUT IT ON NEW SHEET AS MUCH AS DRAG IT DOWN TO OTHER RAWS BUT IT REPEATS THE FIRST ENTRY IT FIND IN BANK LEDGER NOT PUTING 2ND, 3RD, 4TH, . CAN SOMEBODY PLEASE HELP ME TO DO THIS YOUR COOPERATION WILL HIGHLY APPRECIATED
Why do you need a round function? You dont need to round it to 2 digits. Cant you use the formula without it?
i have bulk data of indian vehical number,in that i want to add desh(-) sign to make it easy is there any formula.respected all if u have any solution please share with me on jignesh.audichya@adicorpindia.net
if any new updation in formula please share with me to improve my khnowlegde
=ROUND(SUMIFS([Amount],[Vendor Reference],[@[Vendor Reference]]),2)=0
Can you please show this formulae in excel?
Amount=Range of amounts
Vendor Ref=Range of Vendor Ref
@[Venfor Reference] does this mean range??
it does not work for me.
Can you explain with detail formulae
HI I need to reconcille Ledger containing Chartfield details ( Account , BU,OU , Dept ID, Currency,Amount ) against the another sheet containing the chartfields details . This is for all geographies (country locations ) . Can any one please help with a formula . is is possible to write aquery and produce an automated report
HI I need to reconcille Ledger containing Chartfield details ( Account , BU,OU , Dept ID, Currency,Amount ) against the another sheet containing the chartfields details . This is for all geographies (country locations ) . Can any one please help with a formula . is is possible to write aquery and produce an automated report
Thank You for the great article. Theres one major issue, Your example is so simple I wish you can Email me a more complex one with solution Kindly
It’s not working for me. Everything comes up false when I know a lot of the lines arent.
Hi, i am trying to reconcile my GST return details with the details filed by the client. i have the below details available with me:
a. GST number
b. Invoice number
c. Client Name
d. Invoice value
e. GST value ( in three columns for Central GST, State GST, Integrated GST)
i was thinking of doing a vlookup of GST numbers. However i also need the correct invoice value corresponding to a particular invoice number. Can you please suggest a formula combining vlookup with some other formula. Or can you please suggest an alternate formula.
This is an outstanding formula. I need additional assistance with this formula. I need the formula to true rows within a vendor reference that has an offset and false the rows that do not have an offset.
For example,
Vendor Reference Amount Match
11111 (10.00) TRUE
11111 10.00 TRUE
11111 15.00 FALSE
22222 1,000.00 TRUE
22222 (1,000.00) TRUE
22222 2,000.00 FALSE
33333 400.00 TRUE
33333 (400.00) TRUE
33333 500.00 FALSE
Thank you for your help!
Amy White
Hi Chandoo,
RE: Matching transations using formulas in Excel
I do have a problem using the formula. I need to mach by Cost center by amounts received and paid to a total of zero, using two extra criterias: Revenue Category and Spend Category Could you assist on this one?
Cost Center Journal Source Accounting Date Revenue Category Spend Category as Worktag Transaction Amount Matched? Sum
CC60300 Contributions Balance Forward 7/1/2018 Investment Clearing – R0015 (1,087.68) =ROUND(SUMIFS([Transaction Amount],[Cost Center],[@[Cost Center]]),2)=0 0
CC60300 Contributions Balance Forward 7/1/2018 Investment Clearing – R0015 1,087.68 FALSE 0
Thanks for the help.
Lilian