

Last week I have reviewed Google’s flu trends chart and told you why it is an awesome chart. This week, I am going to show you how such a chart can be constructed in Excel.
First let me show you what I am able to do in Excel:
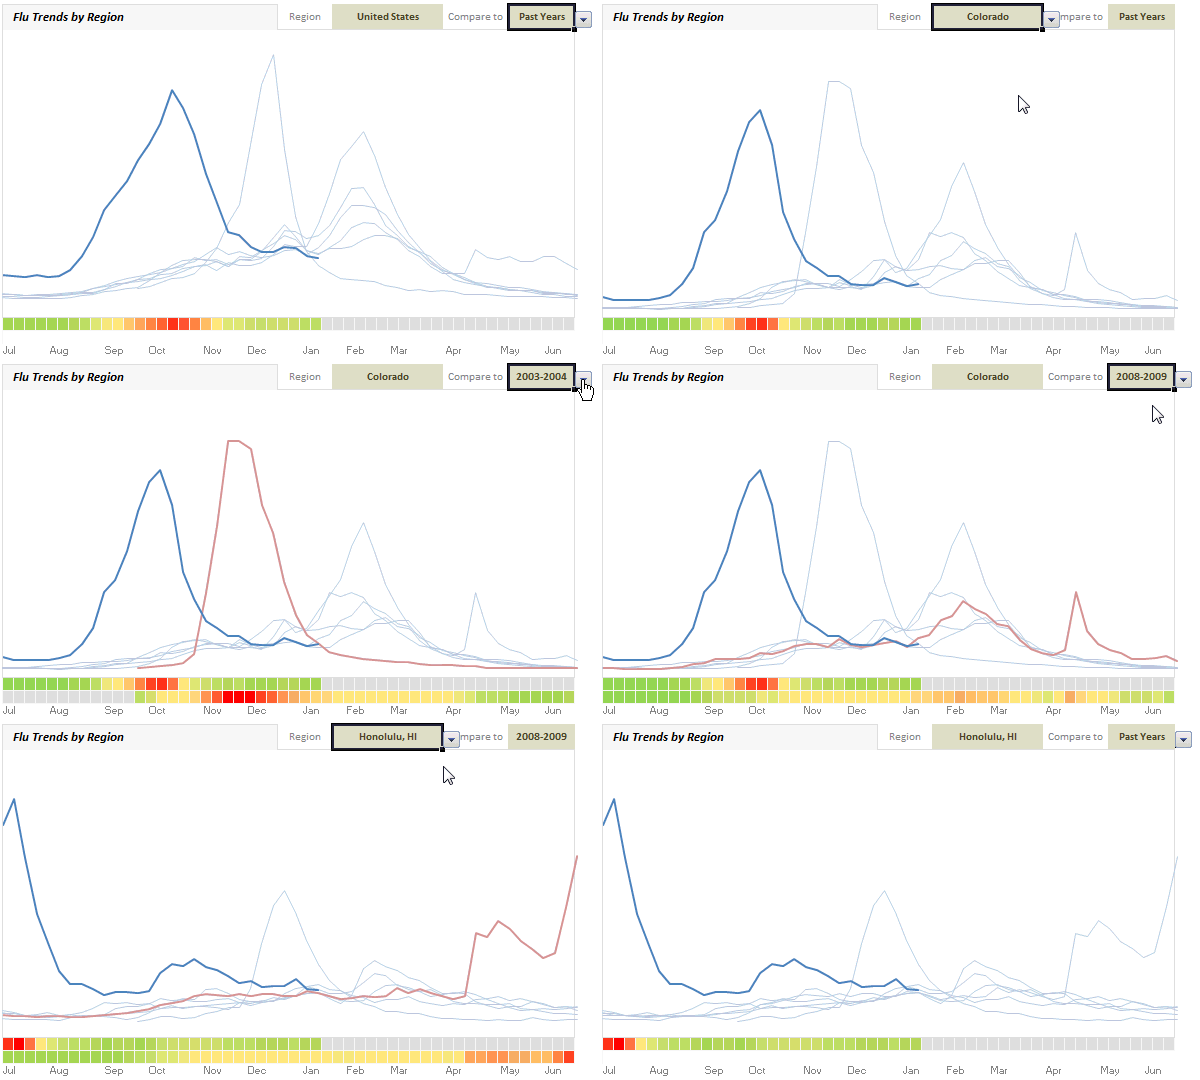
(compare this with actual chart on Google)
How I made the flu-trends chart in excel?
- Data, Data, Data: Data plays an important role in complex charts like these. The source data is thankfully available for download from Google. Flu incidence data is available by week (Sunday to Saturday) for every week since 28th Sep, 2003. For each week the data if given for all regions in various columns. But I was not able to use the data “as-is” to construct this chart. I had to massage and rearrange it a bit.
- The main issues is how flu season is classified (it starts on July and ends in June) and how the data is (we got weekly flu incident data, starting from Sunday to Saturday). The main issue here is each year, the weeks start on different dates. For eg. first Sunday in 2010 was on 3rd Jan where as in 2009 it was on 4th Jan. I tried using WEEKNUM() formula (examples), but it didn’t work well with the flu season (Jul to Jun). So I did some basic date math and ended up mapping weeks uniformly across years.
- The next issue is taking one big table of data with dates in rows and regions in columns and transform it to weeks in rows, years and columns and actual flu data for the selected region in the cells.
- Then I set up 2 cells, one where user would specify “region” and other where a comparison “year” can be selected. I have used data validation to control the valid inputs.
- I used the MATCH, INDEX formulas to fetch corresponding weekly values for all years for selected region. Thanks to MATCH, INDEX and HLOOKUP formulas, this is not such a big task either. And if the optional comparison year is specified, we repeat that years values in another column. Otherwise that column is NA().
- Using these columns, I made a line chart. Then I cleaned up the chart and formatted the 2009-2010 series in thick blue and rest all in thin light blues. The optional comparison series was colored in red (for contrast). [related: line chart examples]
- The only remaining piece is to show the heat map of flu intensities below the chart. For this I have used the very useful 3 color scale conditional formatting setting in Excel 2007. (of course, I had to setup some extra calculations so that the intensities are normalized across the region / years and change when user selects a new region, but you already guessed it.)

- I choose to drop the colorful legend as it adds little value.
- The rest is some formatting and presentation.
What I learned from this experience?
- When I looked at Google’s chart, I doubted if it can be created in Excel. But I was wrong. It can be done in excel, and it takes no more than 2 hours.
- Data and structure of it play extremely important role in any visualization.We should understand the data and know how to arrange / transform / massage it, to make better charts.
- Date formulas are a flu in the nose.
- Excel 2007 conditional formatting is just awesome. [more examples]
- INDEX, MATCH, LOOKUP formulas are very powerful. I *respect* them. [here is a tutorial]
Download flu trends chart and play with it
Download the file (Excel 2007 only). The file is locked, but there is no password. Play with it and tell me if you like it.
Do you like this chart?
Have you done something similar in Excel? What was your experience like? Do you like this chart? How would you improve / change it?
More visualizations using Excel:
Olympic Medals by Country | Survey Results Dashboard | Test Cricket Statistics | Dynamic Charts
PS: After a looong time this post had many “I”s
PPS: Have a good weekend.


31 Responses
G’day Chandoo, very slick display and a great way to display big chunks of repetitive data. Just wondering how you made the video of the demo. It looks brilliant.
The only addition to the graph I’d recommend is a time series below the 2003-2009 with the selected year highlighted… but it may be a little too much to ask 🙂
Wow Chandoo!
Awesome comes to mind first thing in the morning on the East Coast…have a nice day and weekend!
Como decimos en Venezuela: “Le Echastes Bola”
Very good and interesting!
How about doing it with excel2003?
A good thing is having two distribution charts (stripe charts) at leftside showing how the values of the compared series distribute over the min/max range. “Past Years” means comparing them all to the highlighted ( a single stripe chart for all the past years and a stripe for the current year). Other “years” mean comparing the blue and the red lines.
Over the stripe charts, mean and std deviation should be highlighted using the same color formatting of the heat maps. The stripes can be in grayscale.
Keep up the good work!
The video seems powerful also! I too want to know which tool you’ve used for it.
diego:
In the post:
http://chandoo.org/wp/2010/01/19/usernames-from-email-formulas/
Chandoo wrote:
“… I use Camtasia recorder to make screencasts like above. It is a fine software. You can get a free trail download from here: http://www.techsmith.com/download/camtasiatrialthx.asp“
Hi Chandoo
Great Work ……………………..
Anyway to learn excel Advanced Text processing ??????????
Thanks
I really enjoyed your chart! Looks like you put in a lot of effort between creating the chart, using Camtasia to demonstrate and explaining how you put the chart together. I just wanted you to know that your efforts are appreciated. It has given me an idea or two on putting together a unique chart for my industry as well. Thank you!!
Chandoo…
This is AWESOME! Superb work and thanks for sharing!
Cheers,
Sumit
Indeed, very impressive!
@Brook: I use Camtasia from Techsmith to make videos like above.
good suggestion about time series, feel free to modify the file and send it to me.
@Ubique, Nestor: Thank you 🙂
@Zakk: I find using Excel 2003 for this a bit tedious. But you can give it a try…
@Diego: Refer to Loranga’s comment
@Loranga: Here is your donut 🙂
@Carlos: Thank you. Please follow some of the text processing related posts here: http://chandoo.org/wp/tag/text-processing/
knowing text formulas, some VBA and patience can help. (also, if you are familiar with text processing concepts like frequency analysis, fuzzy text, synonyms etc… you can sail thru implementations).
@Jeanie: I am glad you like this. Welcome to PHD and I hope to see you around.
@Sumit: Thank you 🙂
Hi,
really great job!
I’ll try to lean it bit by bit first, then I’ll make a try to apply it for some data I deal with…finally I’ll let you know with some snapshots (hidding the data obviously) 🙂
take care and keep on going…great job! and great site or blog or whatever you want it to be called and remainded!
Kader
Hey Chandu – This is simply Suprb!!!
ur ideas are really inovative & unique, I’ve Never seen them anywhere in any type of Tutorials or forums… They are usefull in Real Business Analytics, Dashboard reports etc
Grt work & Keep them Coming..Will go thru all of ur posts & will surely fwd u my work if its usefull.. Will c u around bye tc 😉
@Sidhesh.. Thank you Sidhesh.
I like this one a lot. I’m working with some Canadian data (thanks for the tip on Google Trends!) and this is a really good example.
Fantastic! have a good weekend 😀
Thank you for sharing this.
You worked very hard on this chart and it shows.
You are very talented.
Love the website, learning heaps.
I have a small table of 3 columns, company names, evaluation scores and prices for tender submission evaluations that I have charted but would like to amalgamate into one chart and use a combo box to show the various columns of data.
When I add the combo box it just shows the number that the company is in the table, 3rd one down or 4th etc, instead of their name, why is this?
The table’s data comes from another sheet, would that affect the outcome?
Hope this makes sense.
Dave.. combo boxes return only the position of selected value. To get the name, use INDEX formula. Assuming the list in combo is mylist, in an empty cell, use =index(mylist, combo-selection-number) to get the name of entry.
For more on such interactive charts, see examples here: http://chandoo.org/wp/tag/dynamic-charts/
Please send me Inbound Dashboard in excel format
Fantastic website!
Do you have step by step tutorail of this as I cannot download the file.
I’m trying to create a ‘Run Rate’ for the contracts in work. I would like them colour coded like the above chart. Red we’re spending over our target, yellow on track and green ok but spending to little.
I have created a automated line graph which calculates target spend and cumulative spend however instead of having the colours at the bottom of the chart I would like the background to change colour, which will show whether the spend is int he green, yellow or red zone.
Any recommendations?
Hi Chandoo!
This is my first time to see something intuitive online about excel dashboard designs. Heat map is a great idea!
I really love how awesome the line chart is especially it changes depth (width) for contrast when choosing year of comparison.
I am looking online on how to change line’s width but can’t find any tutorial.
‘Hope you can share how. Thank you!
Hi, 5 years late, but just thought I’d stop by and say thanks for this presentation. Learnt a lot going through and modifying to suit my needs.
BTW, noticed that in the conditional formatting you have used “percentile” in one row under the chart and “percent” in the other. Why wouldn’t you want percentile in both rows?
Good day! Great work! Please tell me where to download this template? Thank you!
Hi Chandoo, there is no file to download on the shared drive.
Please provide the link from where we can download the file.
Thanks
Hi Chandoo! The shared drive shows a Error.
Where can i download the file?
Thanks!
Is there an updated download link anywhere? The link in the blog post is broken.