

Of all the hundreds of formulas & thousands of features in Excel, INDEX() would rank somewhere in the top 5 for me. It is a versatile, powerful, simple & smart formula. Although it looks plain, it can make huge changes to the way you analyze data, calculate numbers and present them. It is so important that, whenever I teach (live or online), I usually dedicate 25% of teaching time to INDEX().
Today lets get cozy. Lets start a fling (a very long one). Lets do something that will make you smart, happy and relaxed.

Understanding INDEX formula
In simple terms, INDEX formula gives us value or the reference to a value from within a table or range.
While this may sound trivial, once you realize what INDEX can do, you would be madly in love with it.
Few sample uses of INDEX
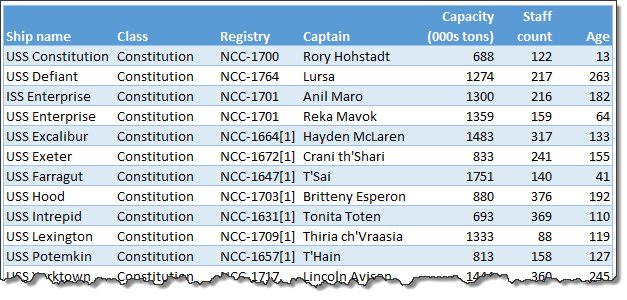
1. Lets say you are the star fleet commander of planet zorg. And you are looking at a list of your fleet in Excel (even in other planets they use Excel to manage data). And you want to get the name of 8th item in the list.
INDEX to rescue. Write =INDEX(list, 8)
2. Now, you want to know the captain of this 8th ship, which is in 3rd column. You guessed right, again we can use INDEX,
=INDEX(list, 8,3)
Syntax of INDEX formula
INDEX has 2 syntaxes.
1. INDEX(range or table, row number, column number)
This will give you the value or reference from given range at given row & column numbers.
2. INDEX(range, row number, column number, area number)
This will give you the value or reference from specified area at given row & column numbers.
It may be difficult to understand how these work from the syntax definition. Read on and everything will be clear.
7 reasons why INDEX is an awesome companion
Whether you are in planet zorg managing dozens of star fleet or you are in planet earth managing a list of vendors, chances are you are wrestling everyday with data, pleasing a handful of managers (and clients), delivering like a rock star all while having fun. That is why you should partner with INDEX. It can make you look smart, resourceful and fast, without compromising your existing relationship with another human being.
Data used in these examples
For all these examples (except #6), we will use below data. It is in the table named sf.
Reason 1: Get nth item from a list
You already saw this in action. INDEX formula is great for getting nth item from a list of values. You simply write =INDEX(list, n)
Reason 2: Get the value at intersection of given row & column
Again, you saw this example. INDEX formula can take a table (or range) and give you the value at nth row, mth column. Like this =INDEX(table, n, m)
Reason 3: Get entire row or column from a table
For some reason you want to have the entire or column from a table. A good example is you are analyzing star fleet ages and you want to calculate average age of all ships.
You can write =AVERAGE(age column)
or you can also use INDEX to generate the age column for you. Assuming the fleet table is named sf and age is in column 7
write =AVERAGE(INDEX(sf, ,7))
Notice empty value for ROW number. When you pass empty or 0 value to either row or column, INDEX will return entire row or column.
Likewise, if you want an entire row, you can pass either empty or 0 value for column parameter.
Reason 4: Use it to lookup left
By now you know that VLOOKUP() cannot fetch values from columns to left. It does not matter if the person looking up is the star fleet commander.
But INDEX along with MATCH can fix this problem.
Lets say you want to know which ship has maximum capacity.
- First you find what is the maximum capacity =MAX(sf[Capacity (000s tons)])
- Then you find position of of this capacity in all values =MATCH(max_capacity, sf[Capacity (000s tons)],0)
- Now, extract the corresponding ship name =INDEX(sf[Ship Name], max_capacity_position)
Or in one line, the formula becomes
=INDEX(sf[Ship Name], MATCH( MAX(sf[Capacity (000s tons)]), sf[Capacity (000s tons)], 0))
For more tips read using INDEX + MATCH combination
Reason 5: Create dynamic ranges
So far, your reaction to INDEX’s prowess might be ‘meh!’. And that is understandable. You are of course star fleet commander and it is difficult to please you. But don’t break-up with INDEX yet.
You see, the true power of INDEX lies in its nature. While you may think INDEX is returning a value, the reality is, INDEX returns a reference to the cell containing value.
So this means, a formula like =INDEX(list, 8) looks like it is giving 8th value in list.
But it is really giving a reference to 8th cell.
Since the result of INDEX is a reference, we can use INDEX in any place where we need to have a reference.
Sounds confusing?
For example, to sum up a list of values in range A1:A10, we write =SUM(A1:A10)
Now, in that formula, both A1 and A10 are references.
Since INDEX gives a reference, we can replace either (or both) A1 & A10 with INDEX formula and it still works.
so =SUM(A1 : INDEX(A1:A50,10))
will give the same result as =SUM(A1:A10)
Although the INDEX route appears overly complicated, it has other applications.
Example 1: SUM of staff in first x ships
Lets say you want to sum up staff in first ‘x’ ships in the sf table.
Since ‘x’ changes from time to time, you want a dynamic range that starts from first ship and goes up to xth ship.
Assuming ‘x’ value is in cell M1 and first ship’s staff is in cell G3,
=SUM(G3:INDEX(sf[Staff count], M1))
will give the desired result.
Example 2: A named range that refers to all ship names in column A
Many times you do not know how much data you have. Even star fleet commanders are left in dark. Lets say you are building a new ship tracking spreadsheet. Since your fleet is ever growing, you do not want to constantly update all formulas to refer to correct ranges.
For example, the ship names are in column A, from A1 to An. And you want to create a named range that points to all ships so that you can use this name elsewhere.
If you define the lstShips =A1:A10, then after you add 11th ship, you must edit this name. And you hate repetitive work.
One solution is to use OFFSET formula to define the dynamic range,
like =OFFSET(A1, 0,0, COUNTA(A:A),1)
While this works ok, since OFFSET is volatile function, it will recalculate every time something changes in your workbook. Even when someone replaces a bolt on landing gear of USS Enterprise.
This will eventually make your workbook slow.
That is where INDEX comes.
You see, INDEX is a non-volatile function*.
So you can create lstShips that points to,
=A1: INDEX(A:A, COUNTA(A:A))
*Even though INDEX is non-volatile, since we are using it in defining a range reference, Excel recalculates the lstShips every time you open the file. (reference).
Reason 6: Get any 1 range from a list of ranges
INDEX has another powerful use. You can get any one range from many ranges using INDEX.
Since you are a successful, smart & resourceful star fleet commander, you got promoted. Now you manage fleet of several planets.
And you have similar ship detail tables for each planet in a workbook. And you want to calculate average age of any planet’s ships with just one formula.
Again INDEX to rescue.
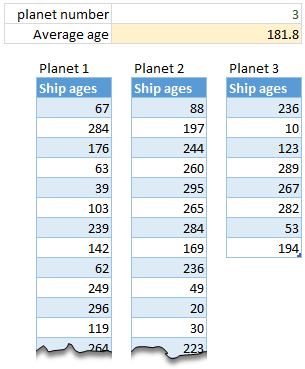
Assuming you have 3 different tables – planet1, planet2, planet3
and selected planet number is in cell C1,
write =AVERAGE(INDEX((planet1,planet2,planet3),,,C1))
The reference (planet1,planet2,planet3) will point to all data and C1 will tell INDEX which planet’s data to use.
Pretty nifty eh?!?
Reason 7: INDEX can process arrays
INDEX can naturally process arrays of data (without entering CTRL+Shift+Enter).
For example you want to find out how much staff is in the ships whose captain’s name starts with “R”.
write =SUM(INDEX((LEFT(sf[Captain],1)=“r”)*(sf[Staff count]),0))
Although LEFT(sf[Captain],1)=”r” and sf[Staff count] produce arrays, since INDEX can process arrays automatically, the result comes without CTRL+Shift+Enter
Where as if you use SUM alone =SUM((LEFT(sf[Captain],1)=”r”)*(sf[Staff count])) you have to press CTRL+Shift+Enter to get correct results.
Other formulas: SUMPRODUCT & MATCH too can process arrays automatically.
Download Example Workbook & Get close with INDEX
Since you are going to ask, “I want to spend sometime alone with INDEX in my cubicle right now!”, I made an example workbook. It explains all these powerful uses of INDEX. Go ahead and download it.
Get busy with INDEX.
How to use INDEX in Excel – Video
In this video, learn how to use INDEX formula in Excel with many real-world examples. You can also watch it here.
Why do you love INDEX?
I love INDEX(). If we get a dog, I am going to call her INDEX.
Updated on Feb 2024: We did get a dog, but we call her Excel!
That is how much I love the formula. Almost all my dashboards, complex workbooks and anything that seems magical will have a fair dose of INDEX formulas.
What about you? Do you use INDEX formula often? What are the reasons you love it? Please share your tips, usages and ideas on INDEX using comments.
Learn more about INDEX & other such lovely things in Excel
If you are whistling uncontrollably after reading so far, you are in for a real treat. Check out below articles to become awesome.
- INDEX + MATCH Combination
- Introduction to SUMIFS formula
- Dynamic Array formulas in Excel (especially FILTER) is a good alternative to INDEX
- XLOOKUP formula can do much more than INDEX
- More examples of advanced Excel formulas & INDEX


89 Responses
Reason 7 it says ‘ships whose captain’s name starts with “S”’ but then the formula has ‘LEFT(sf[Captain],1)=”r”’
Thanks JD for pointing this out. Fixed it now 🙂
Because it save me every time
For some reason I cannot download your file. It shows that format or data is corrupted.
Would you please repost it?
Thank you,
Dan
Can you try again.. I can download and open the file alright. Also make sure you save the file before opening it in Excel.
Hi,
still I cannot download your Excel example. Would you please save it in Excel 2003? Thank you.
@Kazdima
Just emailed to you
Hui…
Reason 4: Use it to lookup left
By now you know that VLOOKUP() cannot fetch values from columns to left.
What, It can’t?
Excel can lookup to the left and you can read about it right here:
http://chandoo.org/wp/2012/09/06/formula-forensics-no-028/
Now that would make INDEX look less sexy 😛
But you are right…
BUT Vlookup & Hlookup are much less auditable because you need to go and count so many columns (lines) within certain area, while for most lookups with INDEX&MATCH you can directly see the area it pulls the data from.
Maybe exception would be 2D-lookups, but then Vlookup wouldn’t do the trick at all.
Get two dogs and call the second one “Match”!
What would be the advantage of using offset over index? They seem to be interchangeable functions and index seems to always be better. I use index constantly and can never think of a situation I would use offset over index.
just curious if you had any thoughts….thanks
I agree. Once you are very comfortable with INDEX, there is little incentive to go back to OFFSET.
Offset gives the flexibility of the starting position of the dynamic range… not sure how INDEX can achieve it??
Two indexes one for the start ref and one the end ref. Separated by colon.
=SUM(INDEX(A:A,5):INDEX(A:A,10))
Sums A5 to A10
The values 5 and 10 could be replaced by cell refs to provide flexibility.
Hi Neale,
Thanks for that formula. It works fine. However the formula will look really long and “complicated” if i further to change the hard-code number to cell refs…
In this sense, I think OFFSET is a not bad alternative. 🙂
In INDEX example 7 on the spreadsheet, the displayed formulas in N25:N26 show a cell reference for L23; it should be L24 (the letter “r”) for both instances. Interesting column!
Hi Jim,
Fixed this. I have added a row after creating the file. Hence the mistake.
I use it for left lookup only.But after reading this post…seems I should try others too.
I am nothing without the INDEX formula.
I have a workbook that has a bunch of tables in it being crossreferenced every which way. Since the row I want is determined dynamically, I started using Index() with Match(). For my purposes the columns had to be be sorted alphabetically by header, and I knew that more columns would need to be added over time, which would break any formula where you specified a column number. Then I realized I just needed another match formula in there where I specify which header I’m looking for and the formula figures out which column number that is currently. Better than aspirin for curing that headache, and it wouldn’t have been possible without Index() or Match().
You said it right. See 2 way lookup formulas for similar examples and additional techniques.
http://chandoo.org/wp/2010/11/09/2way-lookup-formulas/
I am in love with INDEX Formula because of reason # 7 and Reason # 5. I like it so much.
Thanks Chandoo
In the sample sheet,
#1 ship name & #2 captain name:
it would have been nicer if you had formatted the example more like #5 so that the formula refers to a cell and we can change the number to see the result change.
Actually, I defined a highlighted cell for “Input Position” at the top of the examples and pointed both #1 and #2 at it.
#5 your text of the formula says “M17”, it should be “M18” as it is in the actual formula
It would be nice if you stated up front that the “sf” used in the formulas is a name for the table range B4:H23. Better still, make the name more descriptive than “sf”, ie “ship_info_tbl”
I am curious, what did you do in column N to display the formulas as text rather than results
I am curious, what did you do in column N to display the formulas as text rather than results
try this
‘=AVERAGE(INDEX(sf,,7))
You can format the cell containing a formula as Text (Format Cells) and then press F2 and press Enter which will then show the formula as text and it will not calculate.
Excel 2013 has a FORMULATEXT function that does it via a function.
PS: How did you place the links inside of the “Learn More” text box. They seem to be placed in column N, I just can’t figure out how.
Thanks for the good example sheet.
I have a special version of Excel where I can create cells on top of other cells.
Just kidding.
All of these are text boxes, neatly arranged together.
I really love INDEX too. Looks like we’re gonna have to fight to keep that girl named INDEX. She is mine.
I really love the array use of it.
Great tips. Thanks so much.
Thanks for the post Chandoo.
Yes, INDEX is a very versatile function.
In reason 5 Example 2 if you already have table names defined you can use =sf[Ship name] to define lstShips as this avoids the volatile issue.
I have used the INDEX version for dynamic names but am switching more and more to the table names for single column lists that need to be dynamic.
In Example 6 I’d probably use the CHOOSE function – which is also involved in Hui’s link above for a solution to the left hand side VLOOKUP.
I agree with you. It has been a while since I used INDEX to create a dynamic reference. I rely on tables for most of such needs.
Here is a link to Daniel Ferry’s blog on INDEX – he loves INDEX too.
http://www.excelhero.com/blog/2011/03/the-imposing-index.html
This was required reading for his Excel Hero Academy students – hence there are lots of comments.
@Neale
That link is already in Chandoo’s list of links above.
Apologies @Hui – missed that on the scroll down.
Good to know about INDEX. i will start using it in my class data records.
Just spent the day learning OFFSET, looks like tomorrow I will be working on INDEX, thanks for the post.
I love to use Index in charts so that they update automatically as dynamic ranges. It is a great time saver.
I have a question about how the reason number 6 syntax works. When it’s selecting the “3”(C1) in the function is it grabbing the 3rd table that is mentioned in the index formula? So if I had my selections out of order in the equation, it wouldn’t be effective?
Also I may have told a date in the past that I did love the INDEX function. Excitedly, while we were enjoying some super fancy five dollar pizza, I was attempting to explain how it had simplified a problem at work. When it became obvious he had lost track of the conversation I quickly summed it up with “I just love the INDEX function ok?”
Index function is very helpfull for dynamic chart as well for lookup data in table that i have able to used learning through chandoo.org. thanks
chandoo
Your site is awesome. Not only is it great Excel, it’s a lot of fun to read 🙂
Finally, I have a better understanding of the 2nd syntax of INDEX through example #6. Thanks!! 🙂
Thanks for sharing your knowledge.
A quick question, when I input this it give me an error. Little bit confused whether to write it this way
MAX(sf[Capacity (000s tons)])
or input
MAx(sf , E7(where the capacity is entered)
Any help will be appreciated.
This site never fails to excite me! Thanks for the lessons Chandoo! Waahooo! 🙂
I am trying to figure out how to do something and after reading this I think Index will be heavily involved, but I’ve never used it so I’m not sure how to accomplish this. Let’s take example 6 above and say we have multiple ships the same age across all 3 planets. Say I wanted to create a new list that listed all of the Ship Names that are 66, then 67, then 68, then 69 (i need 4 values in my situation). I am racking my brain for all of the formulas I know and I cannot get this.
Hello Chandoo,
I’m not sure if this question belongs with the Index function but here goes…I have a string of 3 sets of characters in one column in worksheet A, separated by a (-). The first and third values of each instance of that string are old values I need to replace with new values from worksheet B. Worksheet B has the new values in separate columns and it is compounded by the fact that the first and third values in worksheet A are essentially pairs that have to matched up with new pairs of values from worksheet B but worksheet B has those pairs of values in separate columns. Is there any way to search and replace the first and third set of values in worksheet A with the new values from worksheet B in one formula without VBA? I would be willing to perform two separate functions for each replacement if that makes this type of operation more feasible.
Any assistance with this problem would be highly appreciated. If anyone can figure out this problem, I believe it would be the most knowledgeable Excel person I have ever come across on the web or in life…you.
Thank you.
Paul
Hi Chandoo,
No one has ever made Excel sound so interesting. Need an insight though.
Is it possible get the cell Address of a certain unique value with in a given range.
What I have:
I Know the range of values
All values are unique values
I know the value – “x”
What I Need:
The cell address where that value “x” is written
Regards
Shailendra
I guess that Formula using average & index for getting an entire row or column is not working…Pls rply for that
Each month I have to send managers a data sheet that they can used to then extract data that relates to their expenditures for their program. The data sheet consist of rows of data, and sometimes these work sheets can reach 300,000 rows. I am looking for a way in which the managers can use a criteria and pull out all the rows (entire rows with approx 10 columns) that relates to their district only. this will give them the breakdown on this expenditure. What would be the best way to do this? Would this formula help?
Here is an example:
Programs Cost Element Cost Element Name Vendor Qty Amount
AA111 2002 Office Supplies ABC Company 2 $25.00
AA111 2002 Office Supplies Tom Sammy Ltd 5 $58.00
AA111 2002 Office Supplies Staples 8 $47.00
AA111 2003 Marketing Exp ASL Ltd 9 $856.00
AA111 2003 Marketing Exp PSL Ltd 4 $898.00
AA111 2003 Marketing Exp Mark Ltd 5 $526.00
AA111 2003 Marketing Exp OMA Co 6 $547.00
AA111 2003 Marketing Exp Star Ltd 4 $552.00
AA111 2004 General Equipment Xerox Ltd 2 $2,365.00
AA111 2004 General Equipment Bedrock Ltd 8 $365.00
AA111 2004 General Equipment Samu Ltd 8 $369.00
AA111 2004 General Equipment Stapes 9 $852.00
AA111 2004 General Equipment Compu Ltd 5 $777.00
AA111 2004 General Equipment Tom Sammy Ltd 2 $55.00
AA111 2004 General Equipment M&T Incorporated 6 $22.00
AA111 2004 General Equipment Match Co 9 $88.00
BB222 2002 Office Supplies Staples 5 $555.00
BB222 2002 Office Supplies ASL Ltd 2 $4.00
BB222 2002 Office Supplies PSL Ltd 1 $596.00
BB222 2002 Office Supplies Mark Ltd 4 $5,235.00
BB222 2002 Office Supplies OMA Co 8 $7,415.00
BB222 2002 Office Supplies Star Ltd 7 $6,985.00
BB222 2002 Office Supplies Xerox Ltd 4 $6,398.00
BB222 2002 Office Supplies Bedrock Ltd 5 $2,541.00
BB222 2002 Office Supplies Samu Ltd 5 $3,698.00
BB222 2003 Marketing Exp Stapes 4 $2,574.00
BB222 2004 General Equipment Compu Ltd 8 $586.00
BB222 2004 General Equipment Tom Sammy Ltd 9 $5.00
@Pat
I think either of these links will possibly help you do what you want:
Move Data to other Sheets
http://chandoo.org/wp/2012/05/14/vba-move-data-from-one-sheet-to-multiple-sheets/
Advanced Filter Move Data to other Files
http://chandoo.org/wp/2011/10/19/split-excel-file-into-many/
@Hui
Thank you Hui, but is there any options in Excel? I am not familiar with VBA.
I am trying to design a work sheet where the managers would be able to enter their Location number, as well as cost elements and do a search. Entering these two criteria should only shows the rows that belongs to these criteria. A manager can use up to 50 cost elements, so they can be doing multiple searches at a time. Just trying to simplify the process, rather than them going through 300,000+ rows of data.
For Example:
Enter your Location Here ———
Enter your Cost Element Here ——–
What ever you can help with will be much much appreciated.
Pat
I can’t even remotely begin to understand this article. I am trying to find a way to pull data from one spreadsheet into another, but the data may be in different spots depending on how many entries there are.
I suspect that this might be helpful, but I can’t make heads nor tails of any of these explanations or examples. Does anyone know of a place where they can explain these things to me as though I am seven years old?
I am ripping my hair out, and all the potential solutions I can find online are so far beyond my comprehension that they may as well be written in Latin.
What do I do for a living? IT Support. So I am not a moron, but I guess I don’t know enough about advanced Excel functions to be able to understand things like this. So maybe I am a moron. Help!!!
I am struggling to understand how to use Index and match. Is there a more simple explanation on your site? One for complete dummies like myself? I am trying to look up program names, match the date and air time to return the proper episode that aired on that date and time, but I cannot figure out how to apply the Index and Match formula. I have a table with all the program names, episode numbers and titles, and the dates/times their aired, and I need to bring those specific episode numbers and titles into a different table (to apply against the research data), but so far I can only do this manually by sorting both tables by date and time, and copying the information from one table to the other. If there were a way to perform this action with a formula that would save me hours and hours of work, and strain on my fingers. Thanks for any directions to help me better understand how to build a formula to perform this type of action. Your current directions are far too complex for me to grasp
@Gail
Did you read the links at the bottom of the post?
The two of interest are listed below
http://www.excelhero.com/blog/2011/03/the-imposing-index.html
http://chandoo.org/wp/2010/11/02/how-to-lookup-values-to-left/
Have a read of these and then come back if still stuck
Hello,
I need a little help for a formula.
I need a formula that gives me a number (taking account of another number) so i can reach another number.
For example i have now 3 days in stock and i need to reach 5.2 days. I can reach 5.2 filling a number that also is rounded up with a minimum quantity.
If i can give more details please let me know.
@Mircea
Can you ask the question in the Chandoo.org Forums
http://chandoo.org/forum/
Also attach a sample file with some data and your expected output
I use the Index Match formula to return cell values from a “hidden” worksheet within the workbook. Once a cell in column A has been populated, the formula (in data validation) returns data in cells B, C and D based upon the value entered in the first column.
How can I short out by max 5 or min 5 customer on their sales amount
hello..
I need some help…
Details r typed below..plz help me.
1) From the data entry area , I want to get the report [B]automatically . Batch wise & lot wise – total production[/B] & spoil
2) If possible also help me to get Batch & lot wise – production & spoil for a particular date or date range
date shift batch lot production spoil Data entry area
1-Dec A 10 123 100 1
1-Dec A 10 123 50 2
1-Dec B 10 123 200 3
2-Dec A 10 123 100 4
2-Dec B 10 5 50 5
2-Dec B 10 5 200 6
3-Dec A 10 5 300 7
3-Dec B 10 5 500 8
3-Dec B 50 2 400 9
4-Dec c 50 2 214 10
4-Dec c 50 22 565 11
4-Dec B 20 2 87 7
4-Dec c 20 43 10 8
4-Dec A 50 40 50 4
4-Dec B 50 2 200 15
5-Dec A 10 123 100 16
5-Dec A 10 5 50 17
5-Dec B 10 123 200 18
The belo wI hv calculated manully ..i neet it to be done automatically
batch lot Lot wise total prod Lot wise total spoil report area Batch wise & lot wise – Total production & spoil
10 123 750 44
10 5 1100 43
10 22 200 3
2050 90
20 2 87 7
20 43 10 8
97 15
50 2 814 34
50 22 565 11
40 50 4
1429 49
@TPS
Can you ask the question in the Forums and attach a sample file to make answering easier
http://chandoo.org/forum/
Hi,
I’m using the following formula to retrieve the last value from a column that is continuously filled in with data:
=index(A:A, counta(A:A),1)
Yet, if I want to use the same formula on a column that contains formulas, the upper formula is not working.
Can you advise me how to retrieve the last value from a column that contains formulas ?
Thx
@Adrian
=Index(A:A, MATCH(9e307,A:A,1))
9e307 is simply a large number which has to be bigger than the largest number you are likely to encounter in your column A
Hi Chandoo,
Thnx for such a great website.
I have a qtn.
Reason 5, Example 2:
You offered 2 different solutions:
=OFFSET(A1, 0,0, COUNTA(A:A),1)
=A1: INDEX(A:A, COUNTA(A:A))
Both should give the last name of the data in Colomn A. But when I try, I got different results and both are incorrect. Plus when I write those these formulas in different cells I got different results (which are also false)
I here uploade the image of the worksheet.
http://screencast.com/t/DLvGJhB3J
Can you please tell me what is going on there?
Where am I making the mistake?
Thnx.
@Torkunc
Firstly: =OFFSET(A1, 0,0, COUNTA(A:A),1)
This formula is returning an array starting at A1 and going down the number of items in Column A
This is shown by
=Counta(OFFSET(A1, 0,0, COUNTA(A:A),1))
which will return the number of items in the array
So using =OFFSET(A1, 0,0, COUNTA(A:A),1)
Simply returns the first item in the array = the item in A1
Secondly: =A1:INDEX(A:A,COUNTA(A:A))
This is a tricky one
If you simply enter: =INDEX(A:A,COUNTA(A:A))
Excel will return the last value in Column A
So the function: =A1:INDEX(A:A,COUNTA(A:A))
is the same as =A1:”Spitfire”
Now here is where it gets tricky
This is also an Array, shown by =Counta(A1:INDEX(A:A,COUNTA(A:A)))
which will return the number of items in column A
But the formula =A1:INDEX(A:A,COUNTA(A:A)) by itself depends on which cell you are entering it into
If you enter it into D4 it will return the 4th Item from Column A
If you enter it into D11 it will return the 11th Item from Column A
etc
Last Item
Now if you simply want the last item i’d use: =INDEX(A:A,COUNTA(A:A))
how to use index function with ropws fixed and column varying
@DRN
Use a cell or a formula to vary the 3rd component of the Index() function
eg: =Index(A1:D20,2,M1)
will select the value from Row 2, column M1 from the range
This post was helpful to get a grasp on the index function, but I am still having problems writing the function properly for what I need it to do. I have a calculated daily data sheet that pulls totals from a raw data sheet, and I am trying to pull the sum of each week’s worth of data from that daily sheet into a weekly data sheet. Using just a sum function (and not an index function) and dragging over the formula causes the following issue: the sum of days 1 through seven; the sum of days 2 through 8, etc. If I select multiple columns and drag through the formula, it is still a similar issue. I have tried to write an index function that will allow me to compile the weekly data for every week of the year, but I keep getting #VALUE or #REF errors. I grouped the data into a table and tried to index it that way, but to no avail. Any help would be greatly appreciated. I can also expand upon this if it needs further clarification.
I can get a sum(index) formula for one week for one row, but when I try to copy the formula down the column or across the row, it just merely copies the formula. It does the same for selecting multiple columns/rows in a similar pattern. The formula I made is as follows (with DCM being the table):
=SUM(INDEX(DCM,1,7):INDEX(DCM,1,13))
@Hayley
Your formula =SUM(INDEX(DCM,1,7):INDEX(DCM,1,13))
locks the start row at 1 and columns at 7 to 13 by use of fixed values in the function
You may want to try something like:
=SUM(INDEX(DCM,ROW(A1),Column(G1)):INDEX(DCM,ROW(A1),Column(M1)))
If this doesn’t help, please ask the questions at the Chandoo.org Forums and attach a sample file
http://chandoo.org/forum/
@Hayley
Please ask a question at the Chandoo.org Forums and attach a sample file at:
http://chandoo.org/forum/
I want excel sheet containing full index examples with unprotected sheet
Please forward to my mail id. Thank q
@Mohammad
Have you read the 3 links at the bottom of the post above
They contain a wealth of examples
I landed here after a colleague shared your post on volatile functions… I am guilty of using OFFSET for dynamic named ranges, and am intrigued by using INDEX.
Thought experiment: I have a table I am still working on. For now, column A always has data, and the table is four columns wide. I can use Index to describe this area thusly:
=A1:INDEX(D:D,COUNTA(A:A))
…but what if I want my range to resize automatically if another column is added? Is there a way to modify the formula to achieve that?
Dear Chandoo,
I need your support , We have 21 person and all guys name are different.
Lead 1 person against of 5 person or 2, 3 person.
I want to know what formula using if this condition.
Column A showing all worker name
Need column B showing all leader name,
Suppose if column A showing “Kamal” then in column B showing “Jitendra” and if showing Ujjwal then showing “Amit” like this.
Please support me if you have any idea.
Example:-
Kamal Jitendra
Raj Jitendra
sumit Jitendra
Hasan Jitendra
Babu Jitendra
Punkit Amit
Ankansha Amit
Sumitra Amit
Ujjwal Amit
Rajnesh Amit
Rajnish Ravi
Kishan Ravi
aloke Ravi
Jitendra Ravi
Rahul Ravi
Ramesh Naresh
Umesh Naresh
Narendra Naresh
Monu Naresh
Sonu Naresh
Chotu Kamil
Match function:
I am using match function for location Zero in my array which have multiple zeros at the top and bottom. to locate top bottom most zero on top side i am using “Match(0, A11:A111,1)”. it gives fine result until i don’t have too many zero rows after last non zero number.
see that data below for array:
Data1 Data2
0 0
0 0
0 0
0 0
0 0
0 0
0 0
0 0
0 0
0 0
0 0
0 0
0 0
0 0
0 0
0 0
10 0
10 0
10 0
10 0
10 0
10 0
10 0
10 0
0 0
0 0
0 0
0 0
0 0
0 0
0 0
0 0
0 0
0 0
0 0
0 0
0 0
0 0
0 0
0 0
0 0
0 0
0 0
0 0
0 0
0 0
0 0
0 0
0 0
0 0
0 10
0 10
0 10
0 10
0 10
0 10
0 10
0 10
0 10
0 10
0 10
0 10
0 0
0 0
0 0
0 0
0 0
0 0
0 0
0 0
0 0
0 0
0 0
0 0
0 0
in case of data2 i get the correct result as 50, in case of data1 i don’t it returns last cell value 75.
why its happening.. any idea
@Saurabh
Please ask this in the Chandoo.org Forums http://forum.chandoo.org/
Please attach a sample file to simplify the task
Hi,
Is the formula right? =index($W$396:$AO$433,DM25,DN25)
Thanks
Sampat
=SUM(INDEX((Billing_Calls+Shipping_Calls+Cancellation_Calls),C7)) Please help. I don’t know how to add named ranges in an index. If i do it with the + sign it works, but if i use the , it doesn’t work.
what can i study so this isn’t an issue? Thank you.
Hi Mike,
I am not sure of the issue faced by you, but what I understood I tried and its kind of fine with me.
=INDEX(G3:I8,(mycop1+mycop2+mycop3),1)
=INDEX(G3:I8,SUM(mycop1,mycop2,mycop3),1)
here mycop1, mycop2, mycop3 is named ranges
both of these gave similar result that’s what was your concern?
if you can elaborate bit more it will be helpful
First seriously thanks for the reply.
i think maybe the mistake I am making is in not understanding the first modifier.
G3:I8
I have =INDEX((Billing_Calls+Shipping_Calls+Cancellation_Calls),$C2) which comes out to 103
=INDEX(‘Data from Pentaho Day shift’!C1:O461(Billing_Calls+Shipping_Calls+Cancellation_Calls),$C2) = ref
So looking at your example. You have definitely identified my problem (thank you). It appears i have no clue on how to properly set my array for the index. Which is leading to me to have to use the forced + modifier.
I have a more complicated scenario I want to use instead of Vlook-up.
on spreadsheet A I have as an example, employee information attached to a position # on each row.
In Spreadsheet B – We have position numbers and Account numbers for each position in each row.
I want to take the Position number from spreadsheet A and find it in spreadsheet B to pull the Account number which will be in the row of the position number. From there I want to drag it down to find that info for every position number in spreadsheet A.
How would I do that?
thank you!
I learnt Index Match!!!! Yippeeeeee. Now I want to learn how to build dashboards with it
HOW CAN I USE VLOOKUP TO GET DATA AS GREEN APPLE FROM THIS TABLE
SHELF FRUIT TYPE
A APPLE RED
B APPLE GREEN
C CHIKO –
D ORANGE –
Seems it’s too late but..
most common usage of inner product is to solve such an Example #7 like;
=SUMPRODUCT(–(LEFT(sf[Captain],1)=L24),sf[Staff count])
instead of matrix multiplication, although the main focus of this article is on INDEX function.
I just wanted to say hello and thank you taking this chance.
I am trying to create a variable link to allow index function to pull data from various other excel spreadsheets kept in different directories with different file names.
The file names follow a strict naming convention; each spreadsheet is exactly the same, with one spreadsheet for each store being generated for each fiscal week of the year. I need to pull 7 cells of data, all in the same row, into a master spreadsheet to compare values for each of the 10 stores, each week.
=’O:\PathToMyWorksheets\StoreWorkgroups\CashierWorksheets\Store14\[FY2023_PD02_WK06_CashierSpreadsheet.xlsx]LotteryWeeklySummary’!$C$19
the above is one example for Store 14 for FY2023 Pd02 Wk06. By changing the date, the path to the correct store file can be generated using a CONCATE Function; However, I can’t seem to use the path in an INDEX Function. What am I doing wrong? Indirect only works if the files are open, and that is not practical for this purpose.