

Today we will learn an interesting animation technique that ONLY uses, … wait for it …, Excel Formulas. That is right, we will use simple formulas to animate values in Excel.
Intrigued? Confused? Interested?
First see these Excel animation demos:
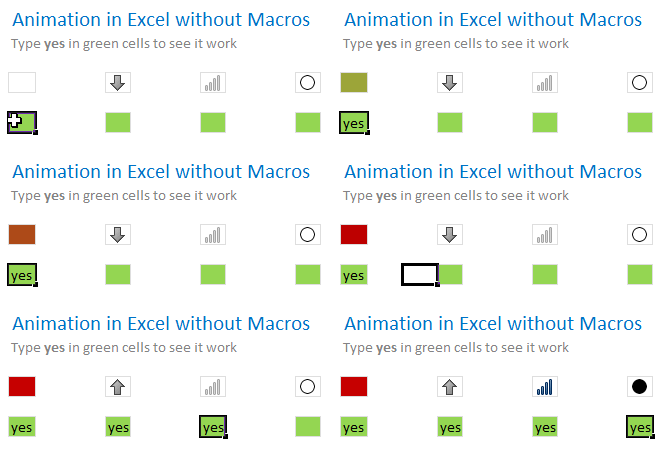
Animated icons & fill-color
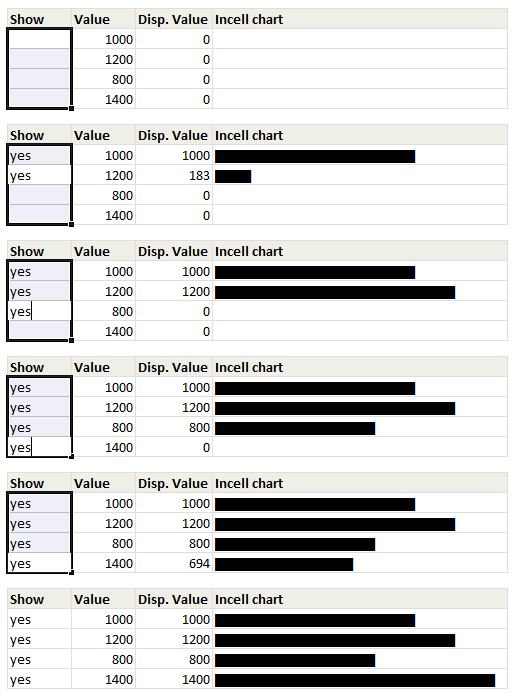
Animated In-cell Charts
Click here to download the workbook with these examples.
What is the secret sauce behind this animation?
Take 1 portion of crushed basil leaves, 2 portions of grounded roasted coffee beans and mix them with hot water. Add enough sugar and throw it away. 😛
Now, come back to your excel workbook and use circular references to generate the animation effect.
Understanding how Circular References & Iterative Calculation Mode work
In order to get this animation, you should be familiar with two excel magic spells – Circular References & Iterative Calculations. In simple terms,
Circular Reference: is when a cell refers to itself in the formula. For eg. in cell A1, if you write =A1+1, it is a circular reference. The reference can be both direct or in-direct (ie you can refer to cell B1, which refers to A1 again).
Iterative Calculation: If a cell has circular reference, excel can quickly go in to infinite loop (not the place where Apple is head-quartered). To avoid this, we use iterative calculation mode. When you enable this mode, excel solves the cell references only a certain number of times.
Here is an excellent guide on circular references.
How to enable iterative calculation mode?
Simple, go to Excel options > Formulas and then select iterative mode. Change the number of iterations to a large value (so that we can see some animation). Like this:
How to use Circular References & Iterative Mode for Animation?
It doesn’t take a lot of coffee to conclude that using circular references & iterative mode of calculation, we can increment a cell value from 1 to 100 (or 4000, if you fancy).
Assuming you want to increment the value in A1 from 0 to 100, and A2 is used to control the animation (ie if you type “Yes” in a2, only then we increment the values).
In cell A1, we write =IF(A2=”yes”,IF(A1>=100,A1,A1+1),0)
If iterative mode is enabled, when you enter yes in cell A2, you can see the value in A1 going from 0 to 100, very fast.
Now, if you change the formula to =IF(A2=”yes”,IF(A1>=4000,A1,A1+1),0), you can see the cell value in A1 going up from 0 to 4,000 in a few seconds.
But, what about animation?!?
Now that we have the cell A1 changing its value when we want, we just need to link this with conditional formatting to get some magic.
For eg. you can apply conditional formatting on A1 with the following rule to change cell color as the value increases.

Similarly, you can use the value in A1 to draw in-cell charts that grow as the value changes in A1.
Just let your imagination run wild.
Where can you use such animation?
Animation is a powerful attention grabber. I think you can use this type of animation in dashboards to display alerts. For eg. you can highlight portions of dashboard that changed when a different product (or month) is selected.
That said, I strongly recommend against overuse of animation effects. They can quickly become annoying. Not to mention, they are cumbersome to maintain (and add little value).
What are the limitations of Circular Reference based animation?
- You must enable iterative mode of calculation.
- This doesn’t work with charts. Excel charts do not pick up cell values unless the calculation is finished. So you cannot plug values in to charts to expect animated charts. If you are curious to build one, see Daniel’s animated business charts example.
- This can slowdown your workbook: Whenever you run the animation, excel is going to do thousands of calculations and this will slowdown your workbook.
Download Excel Animation Workbook
I have put together a simple workbook showcasing several examples of this technique. Download and play with it.
Excel 2007 link | Excel 2003 link
(Make sure you have turned on the iterative mode.)
Do you find this technique interesting?
To be frank, I find this technique more amusing than useful. But I wrote about it anyway as it shows what is possible with excel. It can be useful in situations where there is too much information and you need to call users attention to something.
What about you? Do you see any practical applications for this technique? Share your ideas and opinions thru comments.


50 Responses
Chandoo this gives me idea/thought to improve on the motion charts w/o using macros. We at SuSapta had built one by using the auto refresh (of import data feature) provision. But this kind of use of circular reference seems to make it more flexible. I will share the file if I happen to spend some time for that sometime soon.
Agree it is more from the point of view of amusement and joy of not using macros 🙂
Perhaps my system is a little fast!
I loaded this in Excel 2010 and the changes are almost instant!
and yes I checked the circular references!
@Squiggler… That happens for me too. Try changing the +1 portion of formula to +0.1. So, basically, you are increasing values by 0.1 instead of 1 at a time.
@Vipul… I would be interested to see what you come up with. Feel free to share an example.
Dear Chandoo ji,
I want to say thanks a lot for providing information related exl. Actually i need some function using by macro like sum, if, subtract and i have send you excel file on ur mail id , in which i can’t understood that how did make it. so plz give me details
Thanks a lot
Will surely share it. btw, the iterations may be off as default on some systems or set to some other limits, so if you want to make it always on and at certain limit, you may want to use the following code:
Private Sub Workbook_Open()
With Application
.Iteration = True
.MaxIterations = 32600
.MaxChange = 0.0001
End With
Calculate
End Sub
Thanks to Mr. Excel for this code at http://www.mrexcel.com/archive/General/9085.html
@Squiggler, try this in P5 cell to slow your Excel 2010:
=IF(N5="yes";IF(P5>=$O5;P5;P5+1+IF(REPT("A";32000)=REPT("A";32000);0;0))
;0)
Change the speed by editing the number of repetitions.
My last formula with , separator:
=IF(N5="yes",IF(P5>=$O5,P5,P5+1+IF(REPT("A",32000)=REPT("A",32000),0,0))
,0)
In Spain we usually use ; argument separator because , is the decimal number separator.
Awesome!
I lost 30 minutes of my life playing around with this! 🙂 Just kidding. A good trick to use with other co-workers who don’t have very much Excel savvy.
The curious thing is that in Excel 2010 with Max iterations set to 32,767 and Max Change at 0.00000000001 the animation was almost instantaneous. It’s unbelievably fast.
Is the Icon set Arrow group Incorrect in the animation piece today? It appears that the direction should be = you create a direct default…….
The submit deleted some of my comment…..<=
Looked further..I think ALL icon sets are incorrect in terms of exhibiting all views (half moon, 1/4 etcx)
@Alan.. What do you mean by that?
@Gregory: Is Excel 2010 so fast? I tried this with few other windows open (Firefox, file explorer, notepad++, 1 more excel file, an image editor and screen recording software etc.) and the speed varied between tests.
@Felipe.. you are welcome 🙂
@Sunil: Please post your questions to Excel forum – http://chandoo.org/forums/
@Chandoo, lets put it this way, I couldn’t get Excel 2010 to slow down. I had several things open as well. Maybe my system is fast, but I don’t think overly so. Excel 2007 performed about as you would expect.
You should try Excel 2010. You have it, right?
Any thoughts around taking stuffs like this from Excel to PowerPoint?
Very cool. I can see the downside to using this, but nonetheless a good trick to have up my sleeve!
P.S. What are the drawbacks to enabling iterative calculation?
this is awesome but excel 2010 doesn’t allow u to feel the slow movement – any help? Chandoo
why does any number entered with a “yes” generate only 1 Icon change versus 5? I enter 75, 250, 350, 4000, etc and get only one results. Should not the format elicit 5 options?
Hi Chandoo,
How can i enable the iterative calculations in Excel2002. Thanks!
Arman
I tried with CheckBox assigned to the same cell that require “yes” as input and changed the formula accordingly, also changed the font color to cell background color. It works well and become more simple just a “click” will do the job.
This is awesome but i could not change the iterative calculation mode…how do I do it? Where in the formula section is it? Can you put this in a .ppt and would it work once you load the .ppt or do you have to manually put the “yes” for it to work? Also, I want to put 2 different graphs in one graph using excel. Does someone know how to do it?
Amazing trick!
Thanks a lot for offset function guidence
Cool, but can’t figure out when I would want to use this. It did open my eyes to the changes in conditional formating between 2002 and 2007.
Wow its great dude, i’ll try this today then after will write you what happens, queries, questions.
Chandoo – — you are awesome. Thanks for posting all this great stuff on the web. This site has helped me immensely. (Also, it has made Excel more fun)
Excellent… I like it!
Chandoo…How to make a similar effect for the decremental chart..let’s say from 100 to 50 ??
hi
how we could flash/animate a cell if its value change?
i have below code and its work singly but i wanna make it dynamic;
””””””””””””””””””””””””””””””””””’
Public RunWhen As Double
Sub StartBlink1()
With ThisWorkbook.Worksheets(“Sheet1”).Range(“A1”).Font
If .ColorIndex = 10 Then
.ColorIndex = 2
Else
.ColorIndex = 10
End If
‘End If
End With
RunWhen = Now + TimeSerial(0, 0, 1)
Application.OnTime RunWhen, “‘” & ThisWorkbook.Name & “‘!StartBlink1”, , True
End Sub
You are a genius. Congratulations!
A lot of interesting info from you, Really appreciate!!
Can we use this make animated charts too ?
I can not get =IF(A2=”yes”,IF(A1>=100,A1,A1+1),0)
To work all I get in A1 is #NAME?
yes in A2 does nothing
Any help would be great.
@Jimbo
If you put that formula in A1 it is referencing itself
So put it somewhere else
That’s not the problem. It’s the ” is the wrong character for Excel. You need to use the double apostrophes/speech marks instead. Just replace them and the formula will work.
Hi Chandoo,
Animation is not working values are coming directly and cell are filled too instantly. I have enabled iteration calculation mode also. I tried this in Excel 2010 and 2013. Can any one help me on this.
Hi Chandoo,
A query for you!
I have been using =IF(N5=”R”,IF(P5>=$N5,P5,P5+1),0) as a trigger for a randbetween formula to display a 3-4second animated display (Lucky Number draw!). It has been working like a charm, running on Excel 2010.
Now I want to use it with Excel 2013, but I have yet to find a way to get it to run!
All I get is the random result, at the end of the 32767 iterations! I think I’ve checked every setting, but it’s possible I’ve missed one!
Any ideas would be greatly appreciated.
OOPS!
The formula actually is =IF(N5=”R”,IF(P5>=$O5,P5,P5+1),0)
That’s more like it!
Please send me the useful excel tips which can improve my online documentation which i maintain with the help of excel document list with hyperlinks of all docs in it.
Hello;
I tried the formula above. I am using Excel 10, but I do not get the 3-4 seconds animation display. Everything appeared at once after I typed the “yes”. What am I missing?
Hi Chandoo,
Animation is not working. Values are calculated instantly and cell are filled too instantly. I have enabled iteration calculation mode also. I tried this in Excel 2010 and 2013. Can any one help me on this.
Respected Sir,
I want to make ludo game through excel game which can be played by dice. I have created dice using excel but can’t generate interactive ludo.
Please help me urgently …as i have to present this after 2 days….please explain me how to make it with detailed process.
Fun stuff. I can get the iteration to run rather slow with the REPT trick above.
However, the conditional formatting doesn’t update until the iteration has completed. So there is no animation during the iteration and when done, it just jumps to the final “frame”.
I’m just playing for fun, but if somebody knows how to overcome this, I’d appreciate knowing. Thanks. Excel 2010 on Win 7, Core 2 Duo.
Chandoo.org, You don’t know how much I love you
there’s no such animation in excel 2013…
Thanks for tutorial.
I would recommend you to review the following link. There are nice animations created with Excel macro codes :
https://www.youtube.com/watch?v=U-8vp8T3V50
Chandoo, I am a beginner with Excel, I have used this platform for evidently very simple information organization, so I know my way around in a basic way. I need to make a background of a solid color that may need to be changed to accommodate a better visual of a ball. I need a 2-dimensional ball or spot (2.5 columns square to start) that may need to have its color changed from time to time along with its size. I understand this much now. This ball will need to traverse horizontally across the middle of the page in a straight line from one side to the other. Over my head and from here on. The speed will need to be adjusted until there is an appropriate frequency for the desired result TBD. The distance the ball travels may need to be adjusted inside the edges 5 or 10 columns TBD. A timer or switch located in a lower corner to start and stop would be ideal. Additional switches for control of speed and ball size would be valuable as well. Once all the adjustments are made there will be very little need to readjust, maybe. There will probably be hundreds of users in time. Is all of this possible? I ask so I don’t spend a lot of time learning all of this to find a dead end. Thanks for listening. Ross