

In this article we will learn what a Panel Chart is and how you can construct a panel chart in Excel.
What is a Panel Chart?
A panel chart is a set of similar charts neatly aligned in panels to help us understand some data which has multiple variables in it.
Here is an example panel chart showing the total defects per module over the last 4 weeks.
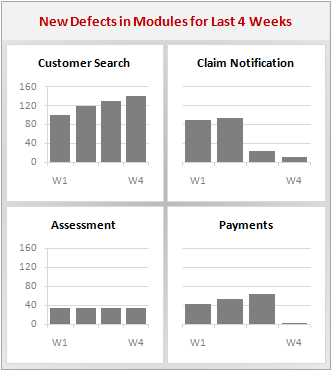
Panel charts are also called by names “trellis displays” or “small multiples”. They are an effective way to display multi-variable data.
Why use Panel Charts?
Excel has several built-in chart types like stacked column chart, clustered column chart that can help you visualize same data. I have shown 2 alternatives below. First observe them,
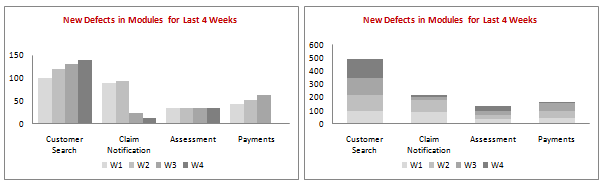
As you can see these charts communicate the data very poorly (despite using same colors and other chart elements as the panel chart). This is where a panel chart shines.
How to make a Panel Chart in Excel?
There are 2 approaches to make panel charts in excel.
1. Making one complex chart that internally has panels containing individual charts (requires lots of calculations and chart formatting.)
2. Making different charts and aligning them on excel sheet.
There are merits and de-merits both approaches, but I personally prefer #2, since it is very easy to make panel charts with that approach.

Step 1: Make different charts
Very simple. Make different charts, one for each panel in your panel chart.
Trick: Make the first chart. Format it completely. Now select the chart and press CTRL+D to duplicate it. Now, using the mouse adjust the source data ranges of this new chart. That is all.
Step 2: Adjust Axis Formatting of the charts
You should set the axis minimum and maximum values for all charts at the same level. This will ensure that users can compare values from multiple panels without worrying about axis scale.
Also consider setting the axis labels of subsequent panels (other than first) to white color (or background color). Since axis has same scale and limits, there is no point in showing that in every panel.
Step 3: Align the charts
There are various alignment options possible for panel charts. I have shown a few samples below:

Depending on the number of panels, choose an alignment that works best for you. Keep in mind that when you align vertically, horizontal axis comparison is easier and when you align horizontally, vertical comparison is easier.
So align the charts in a logical order that works for you. And that is all. Your panel chart is ready to roll.
Panel Charts – Things to keep in mind:
- Make sure all panels have similar axis ranges. Otherwise your audience cannot compare panels and the chart becomes useless.
- Select the alignment that is both aesthetic and comparable
- Panel charts usually contain multi-variable data. You must figure out what is the best panel arrangement (in our case, other alternative is, Weekly panels with Defects by Modules) for your audience.
Download Excel Panel Chart Template & Example Workbook:
Click here to download excel panel chart template & examples. [Excel 2007 version here]
Panel Charts – More Resources & Help:
- Jon Peltier has written at length about Panel Charts in Excel. Here is a beautiful article showing vertical panel chart example. Here is an article on Panel Charts with Different Scale.
- Kelly O’ Day has coined the term Panel Charts and he has several useful examples of panel charts in his site Process Trends.
- Juice Analytics beautifully explains what panel charts are.
- I have written about panel charts before. Learn more from incell panel chart, Incell dot plot panel chart, and see some example panel charts in visualizing market share changes.
Have you ever used panel charts? What is your opinion?
I find panel charts very powerful and insightful. However, I hate the fact that making them in Excel is so cumbersome. (but the effort is totally worth it.) I have used panel charts in various consulting and work assignments and wowed my audience.
What about you? Have you ever used panel charts? How do you make them? What is your experience like? Please share using comments.


32 Responses
HI
Thanks God that you made us understand about it. Here I am confused with one thing that how to merge two excel sheets.
When making panel charts, setup your columns and rows to the ciorerect width
Place your charts roughly right and then use
Alt Drag on the Corner and Side selection markers of the chart,
When you drag it will snap to the Cell edges ensuring they are all the same size.
They will also all resize when you adjust Row and Column sizes
Hi Chandoo,
The charts look great, but how do you manage to line them up so accurately?
Cheers
Kanti
I make sure all the charts are the same size and then I use the align feature. When you click on chart, go to the ribbon and click on the format tab; the align feature is on the right.
Hope this helps.
I think panel charts are great for comparing similar categories of things, such as the “Recovery by sector of S&P 500 companies” and “Salary expenses by department” examples on Jon’s site you link to above, or such as the “What do customers use BI tools for” post on your own blog. And no doubt they can be useful for seeing how one thing might influence another, as in Jon’s ‘Excel panel charts with different scales” tutorial you link to above. Dot plots perhaps even better, because you get rid of the distraction of the bars.
But looking at the specific data you chart above, I’d say that this is not so much a panel chart but rather 4 stand-alone charts aligned in space in some kind of dashboard. Perhaps it’s just the nature of the data, but I find it a lot harder to make any kind of meaningful comparison between them…which to me is the main reason for using a panel chart. I also find the space between the bars and the graph borders a little distracting. Whereas your panel charts in your post “How to Visualize Survey Results using Incell Panel Charts” really come into their own.
Maybe I’m just being pedantic. Panel is as panel does, I guess.
Anyway, here’s how I’d treat the data:
http://cid-f380a394764ef31f.skydrive.live.com/self.aspx/.Public/Chandoo%20panel%20chart.xlsx
Kanti
There are 2 ways
1. Select the first Chart, Hold Shift and Select the second, and third etc
On the Toolbar select Format Align
2. Read my previous post above, or below with fixed spelling
When making panel charts, setup your columns and rows to the correct width
Place your charts roughly right and then use
Alt Drag on the Corner and Side selection markers of the chart,
When you drag it will snap to the Cell edges ensuring they are all the same size.
They will also all re-size when you adjust Row and Column sizes
Panel charts: the least noisy solution to the problem.
Is there a way to automatically adjust the axis ranges? Let’s say that in your example the numbers for week 5 exceed 160; then you’d have to manually adjust each chart. It would be great if there was a way they would all automatically adjust to the same new maximum. I guess the answer is no, without VBA anyway, but maybe there’s a workaround I don’t know about 🙂
Kanti…check out http://peltiertech.com/Excel/Charts/AxisScaleLinkToSheet.html to see how to do this with macros.
Also, http://www.dailydoseofexcel.com/archives/2010/04/24/tm-autochart-connect-chart-axis-parameters-to-cell-values/ has some options (read the comments here also).
Hui,
Thanks for your instructions.
m-b
You can setup a set of data which will then be plotted in all charts
The data only needs to have the Min and Max values for the ranges
So it could be `=Max(a1:A10,M1:M10)`
same for min
Add the extra series to both charts
Make the line transparent (Color None)
Set the Charts to Autoscale on the Y Axis and they will now be the same as they both have the same Min and Max data
A really nice explanation of the technique for creating panel charts without getting involved in data issues.
I had created one using the same technique while charting the obesity trend data on the Flowingdata blog.- creating the chart and then copying the chart to create a panel chart.
[ http://picasaweb.google.co.in/paresh.shah62/BloggerPictures?authkey=Gv1sRgCP7xhaqijY2WEQ#5465760551118481506 ]
One issue on the panel chart above, the bars on the right appear to be thicker than the one in the charts on the left. This is probably because the axis label have been deleted [font not changed to white]. Visible elements in the charts should be similar; otherwise the difference in the elements will unnecessarily attract reader attention. It is best to change the font to white.
@Jeff… Excellent comment. You get 2 donuts for that…
I agree that the above data is probably a bunch of data points and could have been visualized the way you did (or as a simple clustered column chart). My intention is to demonstrate the technique and concept and while doing that I chose a dataset that did not do complete justice to the chart type.
Your solution looks cool btw…
@Paresh… I totally agree with your point on “One issue on the panel chart above, the bars on the right appear to be thicker than the one in the charts on the left.” Yes, I deleted the axis. I realized that mistake when the post was almost ready. I let it slip thru as it wasnt causing too much distraction. But I agree with you that one should not have different widths or heights for plot areas as this would distract viewers.
(PS: I did not make that mistake in today’s Facebook Privacy Panel Chart, which should hit the nearest browser window in the next hour or so.)
@Kanti… Follow Hui’s guidelines for aligning charts. I have all the alignment and distribution tools (align left, align middle, align center, distribute horizontally and distribute vertically) added to QAT and use them all the time.
@Hui.. Excellent idea on auto adjusting axis scales using dummy series. I will be blogging about that soon.
@kanti…I just realised I addressed my comment about VBA axis scaling to you in error. Sorry for any confusion…I meant to address it to m-b.
@Hui…that’s a great tip you gave m-b. Thanks for sharing it…the simple solutions are often the most elegant.
@the artist formerly known as Pointy Haired Dilbert…I stole this idea from Jon Peltier’s comment on Edouardo’s guest post at http://peltiertech.com/WordPress/sp500-recovery-by-sector/ and was glad for the opportunity to put it into practice.
I personally use J-Walks PUP (Power Utility Pak) utilities which has a fantastic tool, for aligning, resizing, simple nudges to size and locations to graphics objects
http://spreadsheetpage.com/
@Jeff & Hui… Thanks for the tips! Adding a dummy series makes total sense, I think I’ll start using this in reports pretty soon. That was the only issue holding me back to use multiple charts in a setup like this.
Chandoo,
Thanks very much for this — very helpful.
I have an alternate suggestion for keeping the dimensions of all the copied charts the same. If you manually adjust the dimensions of the plot area in the original chart, and then copy it, then it seems that Excel will not resize the copied charts when you delete the axis labels. So far it has worked for me.
(Your suggestion of colouring axis labels white produces a black background for the text on my computer.)
Hui,
I’m afraid if we select autosacle on Y axis, the min. level will become ‘0’.
Thanks for this tip, helped me a lot!
Hi thefe everyone, it’s my first visit at this web page, and paragraph is actually fruitful in support of me, keep up posting these articles or reviews.
Pls send new post