

This post is part of spreadcheats series.
Today we will learn a fascinating little feature in excel called “goal seek”.
But what good is a feature if we cant find a use for it? So we will build a simple retirement calculator using excel.
Before plunging in to the complex retirement calculations, let us spend a bunch of words understanding what this goal seek is all about.
What is goal seek in excel?
 We can think of goal seek as opposite of formulas. Formulas tell you what is the output of a bunch of variables used in an equation (for eg. sumproduct is an equation involving + and *). Goal seek tells you what inputs you need to give in order to get certain output.
For example, you can use goal seek to solve a linear equation or find the internal return rate (IRR) of an investment.
Now that you understand goal seek, let us plan your retirement. 🙂
Make a financial model to estimate your monthly savings to meet retirement goals.
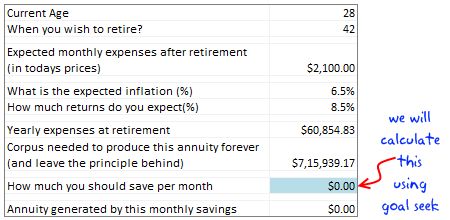
(Note: the image shows commas according to Indian currency formatting.)
In order to proceed, we would need some data, like,
(1) What is your current age?
(2) What is your expected retirement age?
(3) How much do you think you will spend every month when you retire (of course in today’s prices)
(4) Your expectation of inflation (%)?
(5) Your expected return (%) on investments?
Once the data is available, we will need to calculate the following,
I have shown the worksheet on the right with some dummy data.
(6) The yearly expenses at the time of retirement: (3) * (1+(4))^((2)-(1))*12
(7) Corpus required to generate the above amount every year (and leave the principle behind): (6)/(5)
(If these calculations are overwhelming, download the excel retirement calculator workbook here.)
We know how much corpus is needed.
We can use FV() formula to determine the future value of a series of payments made periodically and compounded at a given interest rate.
We know how much the FV() out come should be, but we don’t know how much the input (monthly investment) should be.
This is where goal seek is going to help us.
Let us assume the monthly investment amount will be in cell A5. Let us also assume, the interest rate is in cell A4, retirement age is in A3, current age is in A2.
We will write the FV formula in cell A6 like this = -FV(A4/12,(A3-A2)*12,A5)
(we have to negate FV since it uses weird accounting notations)
Since the cell A5 is blank, the FV will show the value as 0.
Now, we will use goal seek to find out how much cell A5 should have so that A6 will be calculated to the corpus amount required.
Go to Data tab and click on What if analysis and select goal seek. (In excel 2003, it should be in tools menu)
See this screen cast to understand how the goal seek works:

The goal seek window has 3 inputs. The cell you need to change. The cell you want to set and the value to set.
Once you use the goal seek it will find the correct (or closest) value to meet the goal and displays it. If you press OK, the value will be placed in the cell (in our case, in A5)
That is all.
Download the Retirement Calculator Excel Worksheet and play with it
Click here to download the retirement calculator worksheet. Follow the instructions in the workbook to see this example for yourself. Change values to find the amount that you need to save.
Do you find goal seek feature useful?
What do you do with excel goal seek? Do you use it in your modeling, planning worksheets? Tell me your experiences and ideas using comments.
Additional resources:
- Read remaining posts in Spreadcheats series: Become a spreadsheet guru by learning these nifty hacks.
- Excel financial formulas – Help on NPV, FV, PV and more
- Understand why you should start early when it comes to retirement savings
- Buy or rent calculator in Excel – calculate returns on property investments
PS: the retirement calculation steps are derived from this excellent article on smart investor


32 Responses
Goal Seek is Solvers poor cousin 🙂 However, to access Solver, you first need to add the Solver Add-in (Under “Tools” -> “Add-ins…”)
Are you sure the equation for calculating (6) is correct? I can’t seem to calculate your value using the dummy information. I always get high exponential values.
Can someone tell me if $7,15,939.17 is greater than or less than a million?
Great tip. You may want to check your “corpus needed” amount as it reads $7,15,939.17. I think it should be $7,159,391.77. you are missing a digit.
@GE and Greg.. the number is just 715939… I have been using Indian currency settings in my Windows Vista installation. That is why the strange location of commas. And obviously, the number is less than a million. It is just 715k…
How did you capture the “screen cast” above? — I’ve been looking for software that will do this — would appreciate your response. Thanks!
Your formulas look to be off. I keep getting ridiculous amounts and they do not match up with your own example.
i want to like this, but honestly you make it very hard. because you switch between hypothetical questions in one formula (1, 2, 3 etC) to hypothetical cell locations in another (a5, a4 etc) to a third set of cell values in the screencast, i honestly have done nothing so far except get frustrated and give up on learning anything. it’s possible i’m not too bright but wouldn’t it have been easier just to use a real worksheet throughout the example? or perhaps post the xls???
@All.. Please download the example workbook. I guess it will make your job simpler.
@Myron: I am not sure if you have implemented this correctly. Why dont you download the example workbook and let me know if it still throws wrong values…
@bon: I use camtasia studio. They have trial version on their website. Give it a try, it is a fine piece of software…
Hi,
Thanks for this nice excel sheet.
What I don’t understand is that there is no parameter for how long that I expect to live. In my mind this is a parameter relevant for the calculation.
Regards, Tom
PS. The box with the goal seek instructions contain cell references that are off by 1. For example “3. Set C15 as the cell to set”
This should be C16 right?
Very nice post. Goal Seek is one of these hidden gems which adds a lot of value to Excel.
That being said, I also want to warn people that they should take the results of Goal Seek with a large grain of salt. Inspired by your example, I just wrote a post illustrating how Goal Seek can fail miserably in certain cases:
http://www.clear-lines.com/blog/post/Excel-Goal-Seek-Caution!.aspx
Mathias
Sorry, updated the link to my own post… Goal Seek is not the only one to fail!
http://www.clear-lines.com/blog/post/Excel-Goal-Seek-Caution.aspx
Hi, Chandoo,
Great tutorial on retirement planning (its always great to teach people how and why can they save money), and with a such powerful yet simple tool as Goal Seek (the poor cousin of Solver, as someone greatly mentioned above).
Just a small tip on using Goal Seek, that often helps me: in your example, you want to make one cell (Annuity Generated) to be equal to another (Corpus needed). A simpler way other than typing the number on the Goal Seek text box is to create a new cell with the difference between both cells (C12-C16, in the example workbook). Then you just need to Goal Seek this cell to zero, changing the blue colored cell (it’s easier than inputing the number manually).
Best regards, Aires
@Tom.. “What I don’t understand is that there is no parameter for how long that I expect to live. In my mind this is a parameter relevant for the calculation.”
Not really. No one knows how long they can live. So instead my calculations find the corpus required for generating annuity forever (technically as long as the person lives). This has 2 advantages – (1) No need to assume the life span (2) the principle is left behind for people inheriting it.
Another option is to find corpus needed to generate annuity for say 20 years (or 40 years). In this case, we would need the life expectancy.
PS: I have corrected the descriptions.
@Mathias: Agree. Goal seek is good at finding solutions for linear and simpler equations. The more complicated it gets, one should either use solver or go for simulations. As you can guess, goal seek uses some kind of brute force to crack the formula.
Solver on the other hand uses more sophisticated operations research principles like maxima, minima, derivatives, boundaries (most OR problems have solutions at the boundaries alone). But modeling a problem in Solver is much more difficult. Goal seek comes handy in those cases.
Your post highlights some of the problems of this brute force approach.
@Aires: Very cool tip.. thanks 🙂
Very useful tutorial. One question about the calculation from a financial perspective, though.
Shouldn’t the FV calculation include both the interest accrued on the money AND the effect of inflation? I know that you account for inflation in the future value of the yearly $ required, but not on the investment side.
Or is the assumption that the interest rate (8%) is net of any effects of inflation (6.5%)?
I would like to know how to do stress test or what they call shocking of your financials. And so creating diffent scenario.
@Ryu
Have a read of the Data Table section of
http://chandoo.org/wp/2010/05/06/data-tables-monte-carlo-simulations-in-excel-a-comprehensive-guide
Can you update this Excel file to have an input cell for current value invested?
that is, if I have $10k sitting around to kick off this investment, it will definitely change my monthly investment number needed that your goal seek solution finds.
and if you’re bored (!), it would be nice to have the version with life expectancy as well. though one doesn’t know life expectancy, I believe the monthly number generated will vary greatly between “in perpituity” and “20yrs”.
thanks
Hi Chandoo… try this Retirement Calculator which I have created for financial planners. I run a popular program called “Comprehensive Financial Plan Construction using Excel-based Financial Planning Software” for financial planners in India.
http://networkfp.com/file/retirement-planningcalculator
I wanted to include goal seek function in the same and hence landed up on this page. I have also been recommending your website for all my students. Thanks for the information and tips you share.
I know that If we save a work book as “Excel Binary Work book” it reduces the time. However lately I ve identified that I had lost some data. Can some one educate me on this please !!!
How can make “goal seek” function appear immediately when i open excel ?
The future value formula which is a simple calculation is just not clear here. Besides, the zipped version has file corrupted and the unzipped version just refuses to open in excel, opening only in web excel. I have never understood why things cant be just simple, click on the link and the file opens up. A layman would not know and would not be interested in several options.
Hello Chando,
I came across this topic and Dash Board today. Would like to say “Thank you” for sharing your thoughts and to understand importance of retirement life planning and when i tried to download the Excel sheet and Zip version file i couldn’t able to see any file available for downloading.
Can you check and share me the file so that i can us e it
Thanks Ramhesh.. Sorry for the broken link. I have fixed it. Please try again.
Hello Chando,
Thank you for your quick response and help in resolving this issue.
I downloaded the file and it’s working.
Cheers
Really
Corpus = $7,15,939.17. This should have been corrected the first moment you became aware of the error.
What are your verifible qualifications?