

When I saw the Olympic medals won by each country by year infographic on nytimes my jaw almost dropped, go ahead see it and come back, I am sure you will love it too.
It is one of the coolest visualizations I have seen in the recent past and I see infographics all the time, its my passion.
So, I wanted to see if this infographic can be done in Excel, not pixel to pixel, but something close enough to pamper my ego. I was able to create something that looked like this:

Download the Total Olympic medals won by each country since 1896 excel sheet and play with it.
If you want to know how this is done, read on 🙂
1. My first challenge is to get the Olympic medal data per country
Thankfully, Olympics site has the medal counts by country data for each of the 25 editions of the summer games, [click here for 1896] I have copy-pasted the data to my sheet.
2. Next challenge is to find average latitude, longitude for all countries in the world
Thankfully CIA World fact book has the exact data for each country in a table, another ctrl+c, ctrl+v and I have the data in my sheet. [slightly refined data can be found on maxmind as well]
3. Now, the data is not clean
Unfortunately the data copied from Olympics site and CIA fact book doesn’t match as country names were different (USA, United States, United States of America for eg.), country names kept changing (do you know that Australia was called as Australasia sometime back.. :D). So I had to do quite some clean up (mainly using vlookup, filtering unique items etc.)
Finally, I had the data in a tabular format, country names, latitude, longitude, total medals won in rows, Olympic years in columns (1896 to 2004, except 1916, 1940 and 1944 when the games were canceled)
I had to convert latitude and longitude to y and x co-ordinates respectively so that I can plot them on 2 dimensions. I used this logic to do it:
x=(180+longitude)*(map-width/360)

y=(90-latitude)*(map-height/180)
4. Add a scroll bar form control and use it to select the year from 25 Olympic years
This was the easy step. I selected Menu > View > Toolbars > Forms to show the forms toolbar and then inserted a scroll bar control to my sheet. Then I associated it with a cell my sheet and limited the values to change between 1 and 25 (each increment for one of the 25 Olympic years)

Now, I have associated this scroll bar cell to fetch one Olympic years worth of data.
5. Create a bubble chart with the medal data
Now that I have the data in the format of x, y co-ordinates, medal count for each country for the selected year, I have created a bubble chart with this information, showing bubbles at each pair of (x,y) in the list.
6. Finally, show an outline map of the world in the background
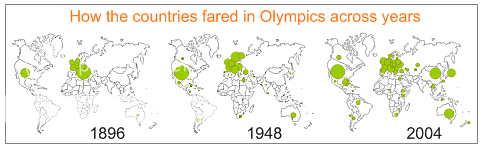
The last step was easy, I searched for an outline map of the world and used it as my chart background, even though this is not part of the original NY Times infographic, it helps me in ensuring that the bubbles are indeed shown in the right places.
 Of course there are some differences between my infographic of Olympic medal count and that of NY Times’, mainly,
- The bubbles overlap, but there is nothing I can do about it without writing additional logic. But as Nathan points out, non-overlapping bubbles may be slightly inaccurate.
- The other is, color of bubbles doesn’t change based on the continent it belongs to. Well, this can be done by editing the bubble colors manually, so I gave up.
- Finally, very few countries are omitted in this, mainly due to geopolitical changes, like Germanies getting united, Koreas getting separated, more countries becoming China :D, I did clean up 99% of the data, but there is always a troublesome country you never heard of.
Make sure you download and play with total Olympic medals won by each country since 1896 excel sheet
What do you think of this?
Also see: The art of excel charting – making ubercool dashboards
Junk the default charts, use this art grade templates instead
Did you fire a bullet graph today?


39 Responses
“color of bubbles doesn’t change based on the continent it belongs to”
I inserted a column for continent, sorted by continent, then split the data into series by continent according to this column. It’s easier to format half a dozen series than over a hundred individual markers. The technique is this one, only applied manually:
http://peltiertech.com/WordPress/2008/05/22/vba-to-split-data-range-into-multiple-chart-series/
I think it is a good site you want to visit for this post.
http://www.gapminder.org/
@Jon: thanks for sharing the article and sending the excel. I will do a follow-up to this soon.
@Robert: Thanks for the URL, I liked the gapminder gadget for google docs. I am trying to recreate this using motion chart widget for google spreadsheets, the only problem is, this is too much of data (almost 2500 rows). Will do a follow up post when I have the google doc ready.
interesting stuff – especially since it was done in excel. for the record, i think non-overlapping bubbles are OK. i was just pointing out that the new NYT graphics intern, Lee Byron, seems to like the effect.
thank you for sharing
Chandoo – your blog is great! I added you as an expert resource to The Dashboard Spy’s Big List of Experts.
super cool stuff! I came across a new data manipulation and visualization tool – youcalc.com (appears to still be in beta) – where a user has built some similar charts, apparently on real-time data: http://www.youcalc.com/apps/1219242654520
I love your blog. This post is particularly useful for me as I’m trying to do a similar chart plotting incident locations on a city map.
One bit of feedback: Your medal data seems a little flawed. One example is that you have China down as winning 0 medals at Sydney 2000. According to the NYT page, the won 59.
@Lincoln : thanks, welcome to my blog. 🙂 Looks like I have made a mistake while cleaning the data. China goes by various names in each year’s medal data. I must have omitted a few during the vlookups. Let me correct it and post it back here when I get sometime. 🙂
@Roger: Welcome to PHD, thanks for sharing the link with us 🙂
BOOOOOOOOOOOOOOOOOOOOOOOOOOOOOOOOORING NONSENSE 🙁
NOT NCE AT ALL ALL NONSENSE NTHIN USEFUL NEVER OPEN THS SITE HEHEHE 🙂
gud site
@Sukhmaninder .. welcome and thanks for sharing your opinion with us. Even though we love comments from readers, we would like to see comments on the content, methods, ideas presented here rather than simple “nonsense” stuff. As you may already know, you have a choice not to visit this web site ever again. Good luck..
I’ve been thinking on doing chart within chart in excel…
Eg : A bar chart within a pie chart particularly if (Others) category are plotted sometimes we need to chart all the different contributor to Others
& when i came accross your MARVELLOUS entry, i’ve been thinking can u add a bar chart within the bubble chart… i.e at the x,y coordinate, instead of drawing bulles, can we instead draw a bar chart. Then it would be easy to tie a chart to geographical locations…
@xSaed: thanks for the comments.
You can do combination charts in excel. But there are limitations on which charts can be combined with which others.
Another thing is the type of chart you are looking for : a scatter bar, I am afraid is not possible without some tweaks.
this gives me an idea for a future post though. Let me research it a bit and post next week if possible. 🙂
Meanwhile if you get an idea as to how you can do this, let us know.
Dear chandoo,
i think i got a crude solution 4 that challenge.. will try it out & update u later. 😉
UPDATE: kinda got it ;), i use the combination of x,y scatter chart, in-cell redux & a little inspiration. i post it here. I will do some clean-up to give it a nicer look.
@xSaed: Thanks for exploring this. I have seen your article on maps with bars on it. I guess it is a cool way to chart data, although there are few limitations. Here another way you can do this type of chart:
— use a map where each country is a shape (see the other olympics post where I have used that technique to create a heat map)
— now copy paste the shapes and align them on top
— use the chart to shape technique shared in the “select and show charts” post to dynamically load bar charts to the new shapes on the top layer.
— bingo…
Hi Chandoo, Great stuff.
First of all thanks a lot for the knowledge sharing. It is really commendable.
Secondly, I want to understand how this graph has been executed? Esp.. the conversion of lat & long to X & Y co ordinates – the formula and the following steps. I tried very hard but could not figure out the logic behind this graph.
Thanks
@Abhishek.. not sure if you still want the info.. I know I am almost 6 months late 😛
The logic to convert lat and long to X and Y is like this:
x=(180+longitude)*(map-width/360)
y=(90-latitude)*(map-height/180)
You have to assume some values for Map width and height. download the example workbook and explore a bit. If you still have questions, drop a comment 🙂
Thanks a lot Chandoo for the explanation.
I have downloaded the stuff and tried to xplore it also. One question remains is when u mention height and width; they are in what units ( cm, inches etc).
Also a suggestion, why do not you also start training folks on xcelsius?
Thanks, Chandoo! Just got turned on to this site by a colleague. Very cool application. One question: How did you line up your placemarks on the map? Do you know if the base map has a particular projection or coordinate system? Trying to line up a few inconsistencies, e.g. the Bahamas, and wasn’t sure how/if replacing the background would do the trick.
Chandoo, this is a great tool – am looking to use this to show how incidents are changing in various areas around the world. I am however stuck as the UK size of bubble seems to be sticking to the same – even though the numbers are changing significantly. The other countries seem to be changing in size based on the numbers but UK still same?
Probably an easy fix for someone who uses bubble charts often – hoping so anyway so you can help me out! Thanks.
Ok, just thought I would update. Managed to find this out and all I needed to do was add in an ‘anchor bubble’ if that is what you would call it. I added in an extra line with a number that was highest, then formatted it so that it disappeared. All other bubbles move sizes based on the biggest which I didn’t realise and that size doesn’t change. If you add one in and take all formatting off then you can’t see it on the graph and your bubbles change in comparison to that each time!
Anyway, resolved so thought I would share.
@Jaron: Good thing you figured it out. I was about to reply to you. Excel bubble chart’s bubbles are not drawn to scale, but depend on the range of values for the bubbles. You can use anchor bubble (and make it invisible or something) to control their sizes.
Hi Chandoo,
If I have to apply it for asia image and chart should filter only asia data. then will this formula still suffice or will it need any modification.I tried but the plotting is not proper
x=(180+longitude)*(map-width/360)
y=(90-latitude)*(map-height/180)
Hi Chandoo,
Just wondering if this example can be easily changed to an XY scatter chart. Say for example one didnt want bubbles just the same sized shape.
Its just that when I change the chart type to XY scatter it doesnt work
Chandoo, you rule. You really do!
Ok I need to change this
to a map of the USA
bubble per state
each bubble drills down into the data
any recomendations!
Hi Chandoo
Its amazing..
I tried doing this, but I am getting inverted bubble maps. Bubles suppose to be on top are on downside…..
can you please help me here?
Anand
Hi Chandoo,
If I have to apply it for asia image and chart should filter only asia data. then will this formula still suffice or will it need any modification.I tried but the plotting is not proper
x=(180+longitude)*(map-width/360)
y=(90-latitude)*(map-height/180)
Can you revert immediately if possible