

So who is up for an Excel challenge?
Shelly, who is an HR Manager sent this distress call last week,
First off, I LOVE your site. It is the first place I go for any excel question and I love the daily emails. I’m not sure if you answer direct emails, but I’m begging you to at least read this and let me know if I’m crazy or not (good thing you don’t know me personally :>). I’ve searched through you ‘ask an excel’ blog and I have not come close to anything I’m trying to accomplish. I’ll do my best to explain it.
I have a group of employees- lets say 100 employees.
Each employee has a performance rating attached to them.
I want to divide the group by 5%, 15%, 65%, 10%, 5% based on their performance rating.So for example how I manually do this is by running the report of employees.
I then sort the list by Performance ratings from High to Low (0.0-5.0 is our range and you can have decimals in between 0.1, 2.5, 2.3 etc.)
I then take the total number of employees and calculate the top 5%, next the 15%, then 65%, then 10%, 5% (so breaking them up into groups).
Doing this isn’t horrible, but I have to do this for each department and we are talking 700 departments. Each department is not alike- so some may have 50 employees while others may have 200+.
Is there an easier way to do this in excel??
Anytime an email starts with I Love, I am all ears. So naturally I read the entire mail. And I had to sympathize with her. 700 DEPARTMENTS?!? Can you imagine dealing with 700 departments with lots of disgruntled employees. I remember my performance evaluation & rating days back when I had a full time job. Almost everyone I knew hated their bosses during the appraisal season. And when hikes are announced, everyone (including the person with fabulous hike) would call their favorite head hunter and flirt. Aah, good old days of ratings & reviews.
But I digress.
So going back to our HR manager in distress, how would you help her?
Your challenge – highlight employees by performance rating
Here is your challenge.
- Download this file.
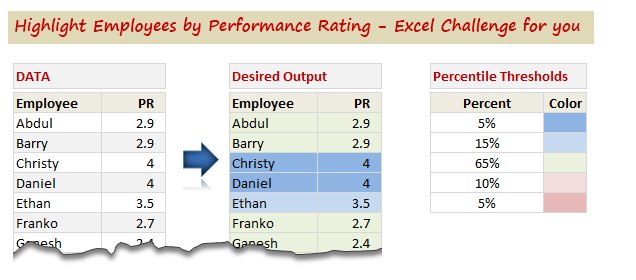
- It contains data & coloring rules.
- Set up conditional formatting such that you can highlight the data based on the rules
- Bonus points if you can set up conditional formatting rules such that they work on any sheet (assuming each department has their own sheet of data in same format)
- Share your rules & solution with us in comments
- Feel jolly good knowing that you are awesome in Excel.
Need some help? Check out these articles
Conditional formatting is one of my favorite features in Excel. Naturally, I want you to be awesome in it. Check out these tutorials & examples to understand how to solve this problem.
- What is conditional formatting & how to use it?
- Using formulas with conditional formatting
- Highlight top 10 performances with conditional formatting
- More on conditional formatting [more than 60 examples]
Download my solution
Now, some of you might be in same boat as Shelly. Please note that I sympathize with anyone who deals with people from 700 departments or more. But sympathy seldom solves struggle. So, go ahead and download my solution. Break it apart, examine the conditional formatting rules and fire the bottom 5% of your employees. Well, go easy on the last part 😛
Click here to download my solution.
Go ahead and share your solution
So what are you waiting for. Put on your Excel hats and get thinking. Once you have an answer, rush back to us & post it in comments. Go!
Need more challenges? Try these too
If you want more Excel challenges & homework, check out these.


15 Responses
While this might solve the question Shelly asked, there is another option that might be more useful – a pivot table could make a list of people who fall into the various categories, so, if you needed to simply see who got in the top bracket to give them a bonus, you would have that list
Simply sorting by the rankings would work too, but you would knock them out of alphabetical order.
Normal
0
false
false
false
EN-US
X-NONE
X-NONE
/* Style Definitions */
table.MsoNormalTable
{mso-style-name:”Table Normal”;
mso-tstyle-rowband-size:0;
mso-tstyle-colband-size:0;
mso-style-noshow:yes;
mso-style-priority:99;
mso-style-parent:””;
mso-padding-alt:0in 5.4pt 0in 5.4pt;
mso-para-margin-top:0in;
mso-para-margin-right:0in;
mso-para-margin-bottom:10.0pt;
mso-para-margin-left:0in;
line-height:115%;
mso-pagination:widow-orphan;
font-size:11.0pt;
font-family:”Calibri”,”sans-serif”;
mso-ascii-font-family:Calibri;
mso-ascii-theme-font:minor-latin;
mso-hansi-font-family:Calibri;
mso-hansi-theme-font:minor-latin;
mso-bidi-font-family:”Times New Roman”;
mso-bidi-theme-font:minor-bidi;}
The solution I chose makes use of the percentile formula.
The percentile formula returns the value representing the K-th percentile of a range of values. The range of values is the first criteria, and K is the second criteria in the formula.
I applied Conditional Formatting according to the formulas in the order below:
5% =$C6>=PERCENTILE($C$6:$C$33,0.95) Dark Blue
15% =$C6>=PERCENTILE($C$6:$C$33,0.85) Light Blue
65% =$C6>=PERCENTILE($C$6:$C$33,0.1) Green
10% =$C6>=PERCENTILE($C$6:$C$33,0.05) Light Red
5% =$C6<PERCENTILE($C$6:$C$33,0.05) Dark Red
The issue I noted with this approach is that Zambi was not highlighted in my solution as it is in the solution provided. Unless I am mistaken, and I very well may be, the 10th percentile for this data set is at 2.21, so Zambi would fall above the 10th percentile with a PR of 2.3.
The first step to this was figuring out the ‘buckets’; what scores should fall into each range. In attempting to match the formatting of the spreadsheet, I determined the buckets below.
5% = 95% to 100%
10% = 90% up to but not including 95%
65% = 10% up to but not including 90%
10% = 5% up to but not including 10%
5% = under 5%
After that, it is a relatively simple matter to plug the necessary values into the conditional formatting formulas as shown above.
One final consideration is that while the buckets above match the color banding on the spreadsheet, I believe that the original request suggests a different color banding with 6 buckets shown below.
Top 5% = 95 to 100% Dark blue
Top 10% = 85 up to but not including 95% Light blue
Top 65% = 35 up to but not including 85% Green
Bottom 10% = 10% down to but not including 5% Light Red
Bottom 5% = 5% or under Dark Red
This leaves one final bucket of 10 to 35% (exclusive of both values) that is not highlighted and so would remain white.
Thank you Chandoo and Shelly for an interesting and useful exercise. This is certainly a valuable technique to have in my reporting bag of tricks.
Use of PERCENTILE is a smarter way of doing it. Below is my solution.
First 5 % = Apply conditional formatting (Dark Blue) as highlight “>=” =PERCENTILE(C:C,0.95)
Next 15% = Apply conditional formatting (Lighter Blue) as highlight between =PERCENTILE(C:C,0.95)-0.01 and =PERCENTILE(C:C,0.8)
Next 65% = Apply conditional formatting as highlight (Olive Green) between =PERCENTILE(C:C,0.8)-0.01 and =PERCENTILE(C:C,0.15)
Next 10% = Apply conditional formatting as highlight (Lighter Red) between =PERCENTILE(C:C,0.15)-0.01 and =PERCENTILE(C:C,0.05)
Bottom 5% = Apply conditional formatting (Red) as less than =PERCENTILE(C:C,0.05)
I agree, this is a challenge faced by HR managers every year and use of percentile formulae is the most popular solution which permits further processing like making bell curve, applying increments based on segmentation etc.
Hi Chandoo,
I came at the same solution as yours (not looking at yours first) but I have hard coded the conditions in the conditional formatting. For example:
=AND($C6>=$D$10,$C6<$D$9)
I have done the same thing 5 times for each condition. This makes the formatting independent of the order of specification. I think it will work better across versions of excel.
To copy the same thing in all sheets, Shelly can copy these formatted cells with format painter and apply it to the relevant cells in next sheet and so on! I know 700 sheets will be difficult but I dont know of any other way to apply conditional formating rules to the whole sheet.
First i have used percentile formula in the next column of “percentile Threshold” where E5, E6.. is input to colour code.
The idea behind doing this is to replicate the formula for any range and any threshold
=PERCENTILE($C$3:$C$30,1-E5)
=PERCENTILE($C$3:$C$30,1-E6)
=PERCENTILE($C$3:$C$30,1-E7)
=PERCENTILE($C$3:$C$30,1-E8)
=PERCENTILE($C$3:$C$30,1-E9)
Now i have given logic to different employee by applying “if Formula”
=+IF(J3>=$G$5,1,IF(J3>=$G$6,2,IF(J3>=$G$7,3,IF(J3>=$G$8,4,5))))
where ‘J” referes to PR and “G” refers to percentile derived from above mentioned formula.
once again it is replicable (just change reference points)
Now comes the major part of Conditional Formatting, i have used “use a formula to determine which cells to be formatted”
Formula =$j=5, format “required colour” Applies to “$I$3:$J$30”
plus put tick on stop if true
This solves the query, important point that this is repeatable and can be done for n number of departments
Thanks !
I had done some reading on it and in Excel 2010 a new function has been introduced, percentile.exc. Attaching a video which also talks why the old percentile function shouldn’t be used as it acts erroneous at times. Might be worth a watch Chandoo,
http://www.itechtalk.com/thread10579.html
@Deepa
Quit correct.
Where ever you use statistical spreadsheet functions and are using excel 2010 you should use the new versions of the functions as MS did a lot of work to speed up and fix errors in the old functions.
Warning: If you use the new Excel 2010 statistical functions in Named Formulas most of them will crash excel so do keep that in mind.
Hello Chandoo,
When i first read the challenge file, i thought, the color that need to be applied for a given rule, also need to be picked dynamically as given in rule set. But in the solution file, i found that color is hard Coded. So in case, someone has same data, but wants different colors, he/she needs to goto manage rules and change colors.
Let me know if my understanding is correct, and if yes, can we also make the color to be applied dynamic?
Thanks
Kishore
HI I ALSO USED THE PERCENTILE FUNCTION. HOWEVER, I WENT A STEP FURTHER AND USING THE SMALL() FUNCTION I SORTED THE DATA BY PERCENTILE SO THE COLOSCHEME WOULD BE GROUPED BASED ON THE VALUE. THIS WAY IT IS BETTER AND EASIER TO VIEW.
Hi, i have got doubt regarding to the percentages that has been put in chandoo’s spreadsheet, i cant understadn how he put directly. can some one please explain how chandoo put the percetages straight way that i stated below..
5%
15%
60%
10%
5%
I have stumbled on this post as the solution has been already given so I have taken the liberty to record a video where I show the implementation of it as well as adding a filtering feature which I hope can prove to be useful.
Thank you
http://www.xlninja.com/2012/06/28/how-to-use-excel-to-highlight-employee-performance-rating/
Question for Chandoo:
I came to your site late but am totally loving these challenges 🙂
I guess it all boils down to how the bins are set up.
I agree with the PERCENTILE.INC function.
pls help me understand where I am wrong.
I have determined following the bins:
bottom 5% <=2.00 (F6:F33 <=PERCENTILE(range,.05))
lower 15% (5+10) <= 2.40 (F6:F33 <=PERCENTILE(range,.15))
lower 80% (5+10+65) <=3.46 (F6:F33 <=PERCENTILE(range,.80))
lower 95% (5+10+65+15) <=4.00 (F6:F33 =PERCENTILE(range,.95))
top 5% <=4.20 (F6:F33 <=PERCENTILE(range,1.00))
I find that only Tom is highest scorer and unique top 5% achiever.
I notice that Chandoo has included Christy and Daniel in top 5% achievers. How can there be 3 people in top 5% out of a population of 28 (5% of 28 = 1.4, i.e. only one person can achieve that status)?
I tried different ways but cannot get to that distribution.
Rest of the work is simply organizing the conditional formatting rules with Stop If True box checked.
Thanks for your insights