

In the last installment of excel 2010 features, we will explore the backstage view (or file menu) in Excel 2010.
Background on Backstage view:
Most of the windows based applications have a File menu. This is the usual place you go to create, open, save, save as, print and close. In Office 2007, Microsoft ditched menu based navigation and introduced Ribbon. They moved all the formatting, pivot, charting, formula, print etc. options to various individual ribbon tabs. But they couldnt move the functionality of File menu to a separate ribbon. Instead, they moved all this functionality to Office button – a clone of file menu.
Now, I am not sure what you felt about office button when you first saw excel 2007, but I was like “wtf?!? where do I click to open a file?!?” After a couple of days of working with office 2007, I learned to use the office button. But it remained a usability issue for most users.
Thankfully, MS rectified this problem and added a ton more features by restoring the beloved File menu in the form of backstage view.
Here is how it looks when you start excel 2010 (or any other office 2010 app):

Using Backstage view to get things done:
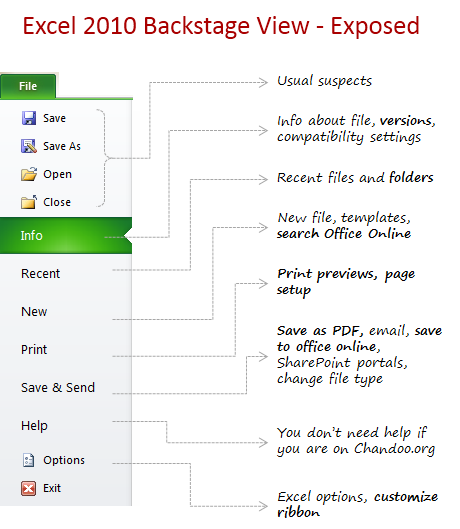
I have made a small illustration explaining various backstage view features, See it below:
(bold text is indicator of features that make you even more awesome)
Tips on Backstage view in Excel 2010:
- Office 2010 automatically identifies various folders you work with and shows them in “recent places”. You can quickly access these by clicking on Recent option from file menu.
- You can pin frequently used files and folders to recent list. This can save you a lot of time if you tend to work with same set of files.
- In the Recent files list, there is a check box called “quickly access…” Check that to see last 4 files used in the file menu itself.
- From Info sub menu, you can access previous versions of a file.
Share your tips and impressions of Backstage view:
Have you tried Excel 2010? What are your impressions of the File menu? Share them using comments.
You can install the free beta version (stays active until October this year) and experiences all the features first hand. Go here to download.
More articles on Excel 2010:
- How to make new ribbons in Excel 2010?
- New Features in Excel 2010 Conditional Formatting
- What are Excel Sparklines & How to use them? [Excel 2010]
- What is new in Microsoft Excel 2010? [Office 2010 Week]
Attend Free online training program on Excel 2010 features [May 25th and 26th, 2010]


17 Responses
Hi Chandoo,
I’ve subscribed to your blog via Feedburner and want to thank you for the great stuff that you regularly post. THANKS A MILLION.
I didn’t really understand the fuss about the Office Orb button. It’s not that difficult to master. The feature to pin the last few files, is really cool.
The only issue I’ve had with backstage is that it’s slow to open. The Orb is zippier and it doesn’t take up the entire screen. So, in my view, Orb rules for the moment. Not to discredit the backstage view, but as a heavy user of shortcuts, Orb seems better.
Meh.
Not to be a jerk, but time spent on this could possibly be better spent giving us more actual features. To put it this way: I spend at least 20 hours a week screwing with data. Less than 1% of that time is spent saving files and/or printing files.
No beef, just saying.
haven’t downloaded the trial of 2010 yet but it looks like MS is trying to bring back some of the old that people miss form the pre 2007 version. Can’t wait to try it.
@Dan L – I’m surprised and curious about your comment. What capability would you further want to see in Excel?
I probably sounded a bit flippant there.
Basically: if I were to make a list of priorities to improve the above average user experience, messing with the file menu probably wouldn’t make the list. I’d be asking for say—-a more advanced name manager or adding additional bang to lists/tables. Conversely, I’m not going to rush out to the store to drop a couple of bucks on 2010 if one of premier features is just an upgraded file menu.
Again, it’s no beef and it’s not flame bait. I love Excel. To give you an idea as to how great I think it is, it’s really the only piece of software that I’ll actually spend money on and – much to my dismay – I’ll buy a copy of windows to go along with it. If spending actual cash dollar and going through the trouble of installing a operating system which I loathe doesn’t indicate a strong commitment, I don’t know what does.
I’m just surprised by it, I suppose. On balance, Excel is the only component of MSO that is indisputably best in class. Perhaps it’s me being spoiled, but I would take more depth to something like the sparklines feature rather than just a rebranded file menu.
Hi Dan,
You weren’t flippant, but I was very very curious what features that Excel was lacking. Yeah, it has some limitations but I believe it can be made to do almost everything, hence my comment.
The File menu upgrade is just one upgrade in Excel 2010, there are a lot of changes in the software, a lot of them under the hood. Chandoo will speak on them this week and as time progresses.
I agree Sparklines are good and I guess they should catch on, given it’s simplicity. The most technologically advanced addition is of course Powerpivot. ( I read one 65 GB server file with 100 mln rows was converted to a 1.5 GB file in Excel & Powerpivot). The performance of Office 2010 is better than ’07. My guess is that you’re a user of Office 2007 and that’s why you don’t really find the upgrade worthwhile, which is what a lot of reviewers have said on many forums.
I don’t know why you dislike Windows, but Windows 7 is an awesome OS. that’s another discussion 🙂
Good Day.
Maybe that’s the problem. It was quite a jump from 03 to 07. The jump from 07 to 10 – not so much. I’ve heard some curiously differing views on power pivot. One person says you can shred through massive quantities of data in a heartbeat, one person says it’s a wonky poorly thought out glorified pivot table. Can’t these people come to consensus?
I haven’t yet tried win7. I thin the last win that I had any significant exposure to was Vista. I don’t suspect I’ll be going back:)
Try Win7, you’ll stick on to it and wont feel like going back to XP again. Take my word for it. Vista was a big haggle with performance!
According to Bill Jelen, an Excel MVP; PowerPivot as the best thing from Microsoft in 15 years. (he’s even writing a book on that). It’s a glorified PivotTable and the market for it might be limited ATM, but it’s to appease to the BI analyst who doesn’t use Excel for Data Analysis. Let’s see, because very few reviewers have focused on PP in Excel 2010 reviews.
@Rahul.. Welcome to Chandoo.org and thank you so much for the passion and knowledge you are displaying here.
I agree that often backstage feels sluggish (plus few issues like creating a new file is 2-3 steps more now).
@Dan l: Very good point on “time spent on backstage could be used for something else…”. I guess folks at MS have some grand vision for the backstage (otherwise they wouldnt spend so much time introducing and crafting this feature in all office products).
but a simpler file menu like every other windows app along with some backstage (settings) ui would have been enough… But excel, much like other office apps grew in complexity and now ms wants us to save files to cloud, do internet fax and much more, all from file menu…
——
Try Win7, you’ll stick on to it and wont feel like going back to XP again. Take my word for it. Vista was a big haggle with performance!
——
Thanks, but no thanks. I’m sure windows 7 is good and all, but I’ll stick to my Kubuntu.
Chandoo:
You’re probably right on that. It might just be a product of some expected differences in usage habits over the next few years.
@Chandoo
Thank you for your comment. Makes me happy 🙂
Coming back to backstage, it’s now fully loaded. It’s an extension of what one can do with the new flavour of Excel – save to sharepoint, skydrive, save as WMV( in Powerpoint), etc.
I believe, that’s something Microsoft can’t do about. Office is the standard, so it has to be everything to everyone. For most users, 80/20 rule applies, but Microsoft has to cater to 100%, that’s why the sea of options in that increases in every version. The best option IMO, is to use keyboard shortcuts, customize the QAT & Ribbon ( in Excel 2010) & use Macros for oft repeated tasks.
Ckeck your computer’s power!
Select all cells in a sheet. (Excel 2007 or Excel 2010)
Type your name or any word in active cell.
Hold the control key and press enter.
What are the results?
If excel manage to do this in any PC, I want to know the configuration of that PC.
Backstage and putting the “print” functions into the ribbon? Sounds like a great update to the Excel 2010 features. Does anyone know if there is a simple way to customize the menu lists that appear when you have focus on a cell in the spreadsheet and right click the mouse? Now that would be a great feature! Adding “print” to these right click menus would be nice.
Hi. Thanks to Chandoo for covering this relatively new stuff.
But… I just don’t get all this hype over the “backstage” – IMO it’s cumbersome, takes up the whole screen, is filled with information that I do not need to see and it just gets stuck there adding extra movements for my mouse, wrist and clicking finger.
Question to MS developers or whoever can answer – when I move down from one line to next under File – from Save to Save as to Open etc., why do I have to do a separate step of an individual click on each command before I get related info which then takes up a whole screen and won’t go away until I either click another command or move mouse to the (still-hated) ribbon? (btw, customized QAT is pretty much the only way I survived the ribbon). I don’t need this information overload even before I opened my spreadsheet, this is distracting and, at this point in time, I don’t find it necessary.
Wasn’t it possible to keep it as as it was in office 2003 – just scroll the mouse over all commands, without separate clicks on each, and whilst I’m hovering a bit longer over one command, say Recent, the list of recent files appears on the right side, without taking up the entire screen, AND it disappears when my cursor moves away. No need of separate movement of cursor to the far right, no need of separate click on close X sign. Simple, easy, elegant.
Is there a way at least to cut this backstage in half? There’s nothing in Options. If you know how to do it, kindly advise. Thanks in advance
P.S. – question applies not only to Excel, but all Office
I find that each iteration of Excel, while making improvements in some areas, really makes things a lot more tedious for those of us that have worked with Excel for many years. Things I used to simply right-click on now take three or even four mouse clicks to get to the final destination. This is truly frustrating. As Julia says above, 2003 was really the last really decent upgrade. Now, it feels like Microsoft developers are just doing busy work. This backstage garbage is pointless, and again, makes things tedious. I want to click “File” and select the file I just closed from the list that SHOULD be showing there. But NO! Instead I’m taken to an info page that is worthless for most, if not all, of the jobs I do in Excel. I finally got used to ribbons. I don’t like them at all, but I’m used to them. Microsoft set the standard on what we as consumers should expect when we hit that “File” menu. Now they’ve decided that, after umpteen years, we need some backstage crap? What a PITA!
@Rita B
Unfortunately Rita your experience in upgrading is all too common
However having gone through the pain myself I wouldn’t go back now.
Excel 2010/13 are very solid releases which once you have adjusted to the new layouts are imminently more productive
Hui…
hi all,
i need help in one thing i.e display backstage controls on sheet change event.
now very simple how to refresh controls in excel like refresh ribbon.