

Often when we are making spreadsheets for forecasting or planning we would like to keep the starting month dynamic so that rest of the months in the plan can automatically rolled. Don’t understand? See this example:
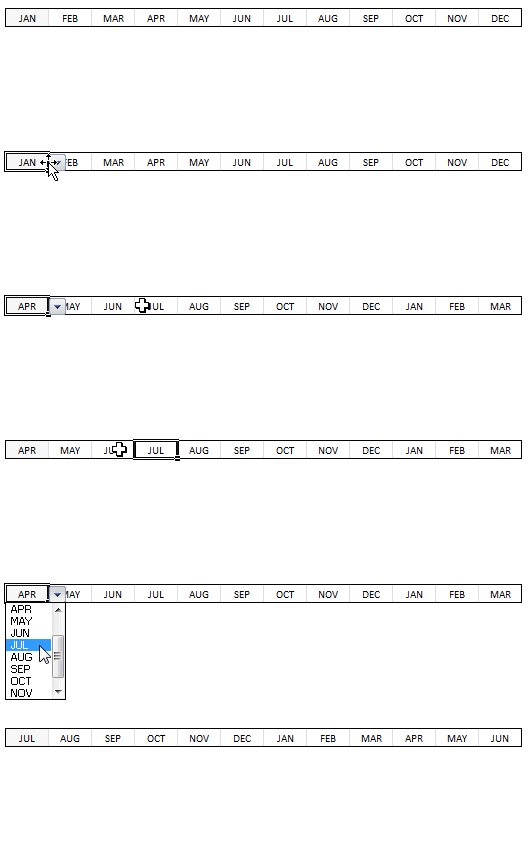
This type of setup is quite useful as it lets us change the starting month very easily. We can use such a set up in, for eg. Gantt Charts to change the project start dates with ease. Today we are going to learn how to set up automatic rolling months in Excel.
To set up such dynamic rolling months in Excel, just follow these simple steps:
1: Create a list of all the months
Enter the month names in a bunch of cells (Tip: Just enter the first month name and then click at the bottom right corner of that cell and drag to get all the other month names). Let us call this range as B5:B16. If you prefer, name this range as “lstMonths“.
2: Set up data validation drop down list on the first cell for automatic rolling
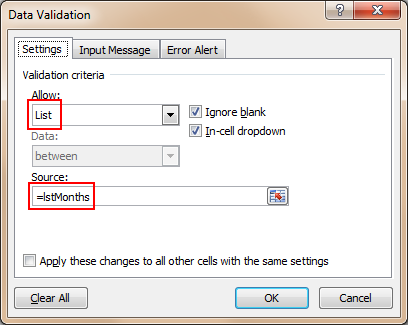
Now, let us assume we will use cells A1:A12 for automatic rolling months. Select A1 and set up data validation list on it (so that users can only enter a valid month in that cell) and use “List” type as validation. See below:
3: Now write formulas so that we fetch consecutive months based on first month
(Thanks to comments from Jeff, Hui, Vipul and others. I found a simpler and easier way to write the formula)
We will simply use Excel’s date formulas so that we can fetch consecutive rolling months based on the first selection.
Assuming the date is selected in cell A1,
In A2, write the formula:
=DATE(2010,MATCH($A$1,lstMonths,0)+COLUMNS($A$2:A2),1)
What is above formula doing?
- It is using the DATE Formula to create a next months first date.
- The part MATCH($A$1,lstMonths,0) is used to fetch the position of selected month in the range lstMonths
- The part COLUMNS($A$2:A2) is used to generate the sequential numbers in excel.
- Make sure you have formatted the cells A2:A12 as “date” with code “mmm” to show 3 letter month codes.
- Rest all you can figure out easily 🙂
A more complex solution
in-case you got some other types of values instead of months:
To make it a bit simple, I will use a helper cell where we can identify the position of selected month in the list of months, like this:
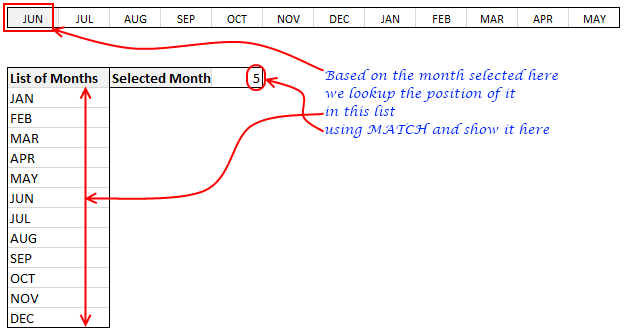
I have assumed that Jan is 0, Feb is 1 … Dec is 11. Also, assume, the helper cell is in $B$4.
Now, If the selected month is “5”, then the other months will be 6,7,8,9,10,11,0,1,2,3,4.

The interesting part here is the sudden jump from 11 to 0 as highlighted above.
To get this type of output we must use an excel formula called as MOD.
What is Excel MOD Formula?
MOD formula takes 2 numbers tells us the remainder when first number is divided by second number. [Excel MOD formula, Introduction, Syntax & Examples]
So how to use MOD formula to setup rolling months?
Very simple. We just take the value in $B$4 (position of the first month in the list) and then add +1 to it and then find out the MOD of it when divided by 12. We now use this number to fetch the corresponding month from lstMonths.
We use +2 for second month…. +11 for the last month.
We can simplify the +1, +2..+11 part by using COLUMNS formula to generate the sequential numbers for us.
The formula looks like this:
=INDEX(lstMonths,MOD($B$4+COLUMNS($A$2:A2),12)+1)
- The Mod portion of this formula tells the position of the second, third, fourth, … eleventh month based on the first month.
- We have to add +1 to output from MOD because we are using 0,1,2,3 positioning the month in B4, where as INDEX use 1,2,3,4 positioning.
- INDEX formula then fetches the corresponding month from
lstMonths(orB5:B16)
That is all.
Download the example workbook and learn on your own
I have prepared a short example workbook where this technique is demonstrated. Feel free to download it and play with it to learn more.
Where would you use such a rolling month setup?
I have once used the rolling month set up in a forecasting spreadsheet (where we made cash flow projections for a startup we were planning to acquire). I am also planning to upgrade my gantt chart templates include rolling month setup.
What about you? Where would you use automatic rolling months?


76 Responses
Cool. I take a different approach…if my first date is in cell A1, then I enter this into A2: =DATE(YEAR(A1),MONTH(A1)+1,1)
…and then copy it across. Any time you change the date in A1, the other dates update accordingly. You may need to use a custom number format of MMM if you want them to appear as months, as in your example. But they are still stored as dates. This is particulary useful in situations where a formula somewhere else in the spreadsheet might refer to these dates. For instance, in the row below these date headers, you may refer to the header date using the GETPIVOTDATA function to pull data from say a pivot table for the particular date concerned.
Jeff
Have a look at
=EOMONTH(A1,0)+1
much shorter
Please help we work on a guarantee period if an item is bought on the 1-Jan-12 the exp date will be 3 months later1-Mar-12 what is the formula to use on excel. i am still a beginner in exel.
@Sonja
Assuming your date is in cell A1
=Date(Year(A1),Month(A1)+3,Day(A1))
.
An aside: If you purchase on 1 Jan and have a 3 Month Guarantee, Doesn’t that expire 1 April, not 1 March as your post stated?
Another way is to put a validation in A1 and use B1=date(year(a1),month(a1)+1,day(a1)) and drag to the right. Then custom format the cells to mmm.
What a timing!! Jeff and Hui were faster than me 🙂
Very interesting creation of dynamic rolling months. I’ve never thought to use mod before now, especially to help work out a reference.
I think perhaps the above two formulas of DATE(YEAR(A1),MONTH(A1)+1,1) & EOMONTH(A1,0)+1 are better for date references as you always want to refer to months as serial numbers rather than text for ease of use. But the post solution may have more specific uses for actual text lists or non linear series. I can’t think of any specific examples at the moment though.
I posted a version of your spreadsheet that also has my implementation on it. Note the formula that points to the dates across the row header, and returns the number of days in the month for that heading date.
http://cid-f380a394764ef31f.skydrive.live.com/self.aspx/.Public/dynamic-starting-month.xls
As you can see in the spreadsheet, you also have good control over how you want the dates to appear. i.e. as months only, as months and years, as full dates, etc.
=EOMONTH(A1,1) ..?
Hui…thanks for that. Very handy to know. Don’t know why I never stumbed across that one sooner. Thanks again.
EOMONTH was hidden in the Analysis Toolpack until Excel 2007 and was disabled by default
@NotAnExpert
EOMONTH(A1,1) will return the date at the End Of the Month, 1 month after the date in A1
eg: EOMONTH(Date(2010,4,6),1) will return the 31st May 2010
EOMONTH(A1,0) returns the date at the End Of the current Month, +1 makes it the first of next month
ie: EOMONTH(Date(2010,4,6),0) will return the 30th April 2010
@Hui, Jeff,Vipul: Thanks for suggesting a better approach. I have modified the post now.
@Hui : Great contribution with =Eomonth, did not know it even existed. Thanks.
Certainly not a faster way than suggested by Jeff and Hui, but its more straightforward, since it does away with the usage of MOD, even the result in the Match function using your formula of =MATCH(B5,lstMonths,0)-1, is misleading. I presume since that is an helper cell, its more likely not be displayed in the real spreadsheet.
But I would modify it the formula in cell f8 to be : =MATCH(B5,lstMonths,0)
and copy this formula across range (c5:m5)
=INDEX(lstMonths,F8+COLUMNS($C$5:C5))
Darn it! Chandoo, I displayed my ignorance here….. that formula I posted is terrible. First the F8 needs to absolute, and it does not roll back after DEC. Sigh! Ok,You need the MOD afterall! I might have not pressed the Calculate button to realize the error in the cells, first time around!
If you’ve added in the Analysis ToolPak, wouldn’t you just use EDATE?
Still on Excel 2003 though
@Andy
Once, you have the end of the month/start of the next month EDATE will continue to return the 1st of each month as you say. It won’t allow you to find the end of the current month or start of the next month.
@All.. I didnt use EOMONTH as first cell is not really a date (but a text value of either Jan, Feb … or Dec). If the first cell is formatted as Date (the data validation list also should also have dates) then it is possible to use EOMONTH.
@Chandoo,
Okay, but you can still eliminate your look up table by just using this formula in A2…
=TEXT(28*(1+MOD(MONTH(–(“1″&A1&”2000″)),12)),”mmmm”)
and then copy it across.
To all who liked EOMONTH
Please remember that if you distribute a workbook to others they have to enable the Analysis Toolpack or else they will have lots of errors throughout the workbook.
@Chandoo,
I just realized you wanted abbreviated month names and all in upper case. Here is the formula I should have posted in my last message which does that…
=UPPER(TEXT(28*(1+MOD(MONTH(–(“1″&A1&”2000″)),12)),”mmm”))
Interessant post.
As now I use something like :
=INDEX(Lst_Months;MOIS(MOIS.DECALER(DATE(ANNEE(MAINTENANT());EQUIV(First_Month_Selected;Lst_Months;0);1);1));1)
I use a french version of excel. That mean function name must be someway different in us/uk
index = index
mois = month
mois.decaler = edate
Annee = year
Maintenant() = now()
equiv = match
That seems similar to your first solution.
The result is like : 01/02/2010 (first month selected by user)
01/03/2010
01/04/2010
…
and month format (mmmm) for viewing results.
Very usefull to work on array formula for a dynamical chart
Hi Rick. I can’t get your formula to work. Could you check it, or possibly post a workbook somewhere with it in?
Ahh, I see that you were using two minus signs in a row, but wordpress turned them into a long dash. Problem solved.
So the formula is =UPPER(TEXT(28*(1+MOD(MONTH(- -(“1″&A1&”2000″)),12)),”mmm”))
(I’ve put an extra space between the minus signs, which Excel doesn’t mind, so that wordpress won’t misinterpret them as one long dash)
Thanks Rick and Jeff, this is the most straight formula I could find that fit my needs
@Jeff,
Thanks for picking up on that (I’m sure it would have confused other readers as well)… I completely missed that the comment displayer (WordPress?) turned my two minus signs into a long dash. I’ll have to try and remember that for future postings; or simply use a multiplication by one (*1) in place of the two minus signs, which would work in the same way.
Dear Sir how excel will automatically wriite a dayformat in cell for Eg 12-04-2010 in words in another cell
@Wilson. assuming the date (12-04-2010) is in cell A1, in cell A2 write =A1
now, select A2 and press CTRL+1
here set format as “Custom” and then write dddd dd,mmm – yyyy to get the date as Monday 12, April – 2010.
One of my friend shows me in excel that the digit showing in one cell automatically writting in words in another cell.If we change the digit that will reflect in the cell where it showing by word.Eg: if my cell A1=1950 this will appear as one thousand nine hundrad and fifity in A2.How can I make it????????? pls help me in this puzzle
@ Wilson
Have a look here
http://support.microsoft.com/kb/213360
I tend to use the DATE(year,month+1,1) to get the next month, because EXCEL will automatically do the roll forward of the year if the next month is 13. Try DATE(2010,13,1) = 1-Jan-2011. You can then use TEXT(date,”MMM”) in SUMPRODUCT to pull all the values for a particular month, from your data table.
If you want pull-downs to select the month and year, then you can create a hidden row, that shows the months as TEXT(R-1C,”MMM”) to get a list of months to use as a validation list and then use the formula DATE(selected_year,selected_month,1) to set the starting month. To get the selected_year, you can use a validation list, that runs from YEAR(today())-1, YEAR(today()), YEAR(today())+1
If you want EOMONTH(A2,1) without the analysis toolpack use DATE(year(A2),month(A2)+2,1)-1. This has the advantage that EXCEL will handle the leap-years for you.
weekday(cell reference,3) will start the day from tuesday .For starting the date from saturday as 1 what I have to do???Pls help me
@Wilson, I think this does what you want…
=1+MOD(A1,7)
Okay, if I only want to track months used….say for 60 months–How would I use this formula? I.E. A person is only allowed 60 months of time, they have used six of those months, and I want to know when they would approach say 54, 58, and 60 months.
Thanks in advance.
@Cheryl… Assuming the person enters the months used in cells B1:B60, you can set up conditional formatting rules to highlight cells as you approach 54, 58 or 60th months. Just use the COUNTA() formula to count the number of months entered up to that point.
i’m really struggling here, i’m trying (in vain) to have a rolling callender spread over a staff monthly timesheet
ideally i’m like to enter the 1st of the month and the resulting formula automatically puts days and dates across the page, in a sunday to saturday order
example:
date entered – 01/01/2011
sun mon tues weds thurs fri sat
01
02 03 04 05 06 07 08 etc etc ect
please please help me with this, i’m having a nightmare
I am trying to do the exact same thing. Hope we get a answer
Thank you – it worked perfect! Instructions easy to follow and big bonus having an example spreadsheet to download
Hui – great comment on EOMONTH() function! It really helped!
Question: I am trying to create a “Month” list that stops automatically, depending on the ending date. In cell A1, user can select beginning date from list of dates. In cell A2, user needs to specify ending date from list of dates.
In B2 = A1, and A2 = EOMONTH(B2,0)+1 and can copy down to cell A3, A4,…, etc. It works! Except, I don’t know how to input make the list stop!!!
For example, User enters “Jan-11” in A1 and “May-11” in A2. In cell B2:B13, “Jan-11” to “Dec-11” is displayed. I want B6:B13 to not display those months. Instead maybe a “#N/A” could work.
Any ideas??? Thank you for your help experts! 🙂
@Tony
.
I assume you meant
B1: =A1
B2: =EOMONTH(B1,0)+1
.
I would change B2 to
`=IF((EOMONTH(B1,0)+1)>$A$2,NA(),EOMONTH(B1,0)+1)`
and copy down
Hi,
I found one another way to do same thing…
Place the following formula in next column of drop down cell and drag till end.
=INDEX(lstMonths,IF(MATCH(B5,lstMonths,0)=12,1,MATCH(B5,lstMonths,0)+1))
You will get same result..
Thanks you
I’ve got the months to roll perfectly thanks to this… but I still need some help. I’m doing a annual sales report, how do I make the sales numbers in the columns below the dates move as the months move? I want to be able to see the data for any 12 month range.
I would like to know this to. I have tables that have data that gets older as the year progresses and would like to track when something moves from the one month column to the two month column etc.
Is there a way to do this?
Is there a formula that will populate the first day of the NEXT month no matter which day of the curent month it is? So, the formula would have to look at what the current month is and return the date for the first day of the next month of the same year. I’d really appreciate any help.
@Rebecca
=EOMONTH(A1,0)+1
of course any date in December will return 1 Jan the following year
@Hui. EOMONTH is a very helpful formula. Thanks for sharing
@Rene
EOMonth Rocks!
=Eomonth(Date, 0)+1
is my Fav
Is there a way to conditionally format a cell for expiration dates?
If I have something that expires and I put that date in a cell, can I make the cell change from white background to green at 90 days out, then yellow 60 days out and red 30 days out and then black out the cell when the date passes? I’ve looked but can’t find anything that goes past a few weeks maybe a month. Is there a program better than excel to make this work? Thanks for the help
@Jon
There are a number of posts here at Chandoo.org dealing with exactly this
Try using the Google Search Box and then look through the posts
Often this is described in the comments of the posts so make sure to read there
I have read through all of the posts here, but I am not sure if any of them answer what I am looking for. I am trying to create a spreadsheet that I can use as an employee schedule. I want a row that contains all of the days of the week for the entire month of any given month and always starting with Sunday (even though the month may not start on Sunday). In the row immediately below it, I want to show the date of that month (numerically month/day) coinciding with the day above it, always showing the date or blank if tha day of the week does not fall within that month. I also want this to be able to be changed from one month to the next simply by changing the value of the cells establishing the month and year.
is there a way to rolling up values below the “Months” title’s?
When we work with ms excel a difficulty faced very much time. When we delete a row a10 on one sheet1 then delete the same row on another sheet2 please help me.
I am tyring to validate weekly payments over 156 weeks. it will normally start with 4 weeks but the end date could vary, for instance it could be only 2 or 3 days. Further points to note
The payment are calculated in 4 weekly installments
payments are made once a month
The payments all have different dates within the 4 weeks period
The objective is to be able to validate that there is no overlap in the payment received and also there are no gaps and also the end days are calculated correctly.
I have the start date, monthly payments file (once a month for all payments) and end date for all.
Any help would be appreciated
Hi,
Hope someone can help me.
This is great, but can anyone tell me how to reverse it, so it starts March and then goes back E.g.
March, February, January, December, November ETC.
Thanks
Dan
@Dan
In step 1 above, simply put the list of months in the reverse order
Hello
I love this thanks, but how can I utilize the user entering a start and end date and then each month of that range shows up? So if the start date was April 1, 2014 and the end date was June 30,2014 Apr, May and Jun would show up? Then from the months showing up I would use index to get at the data from the raw data.
Thanks.
Hi guys
how can i find first date of every month from a data list like given below?
05-Nov-03 19.67
06-Nov-03 19.85
07-Nov-03 19.80
10-Nov-03 20.01
01-Dec-03 21.30
02-Dec-03 21.42
03-Dec-03 21.66
04-Dec-03 21.76
05-Dec-03 21.55
08-Dec-03 21.68
01-Jan-04 23.58
02-Jan-04 23.79
05-Jan-04 23.61
06-Jan-04 23.28
07-Jan-04 23.21
03-Feb-04 22.09
04-Feb-04 22.48
05-Feb-04 22.42
06-Feb-04 22.51
01-Mar-04 23.05
03-Mar-04 23.16
04-Mar-04 23.04
01-Apr-04 22.83
02-Apr-04 22.95
05-Apr-04 23.19
Pls help me…
Thanks
@Dharmendra
If you want to apply it to Conditional formatting
Assuming your data is in A2:A26 apply a CF using
=IFERROR(MONTH($A2)<>MONTH($A1),TRUE)
I followed along fine with the post as is with one exception. For the work I do, a 12 month rolling sum, it is the last month where the change must occur, not the 1st month. In addition, by convention, here in the U.S. January is considered the 1st month of the year not the 0 month.
Downloading the workbook made things sooo much more easily viewed. Thanks for posting that.
The fix……
If others would like the last month, of a 12 month period to change vs the first month to change – i.e. I have data through Dec, I used data validation to change Dec, on far right to Jan and all the months on the LEFT change accordingly such that the month on the far left changes from Jan to Feb, and the month in the data validation cell now becomes Jan of the new year.
The formulas one need only delete the -1 in the MATCH formula and the +1 in the INDEX formula IF YOU WANT JAN TO BE MONTH 1. From the testing I’ve done, seems to work just fine – WRONG – Dec is fine but when I go to JAN, in the validation list the previous month should be Dec and it’s APR! What….back to drawing board. If someone see’s this issue let me know – most likely the MOD function, never have used.
Best Holiday wishes,
I believe you have an error in steps 2 & 3 above. You indicate you are using “cells A1:A12 for automatic rolling months” which is data in a column. In A2 you use the formula =DATE(2010,MATCH($A$1,lstMonths,0)+COLUMNS($A$2:A2),1) in which COLUMNS($A$2:A2) is used to count the number of columns. As the cells you are using are in a single column this value will not increase as the formula is copied down to the subsequent cells. To use A1:A12 for the rolling months the ROWS function needs be used or the data oriented in a single row which is what you indicate in your displayed example.
How can I arrange not only month are rolling but the data in the month as well and how I modify this to make rolling months for 2015 and 2016. example: March 2015 – February 2016.
MOD formula is working for transposing three months Jan, Feb, Mar, but is giving error when I add all 12 months. What am I missing?
Works (for 3 month) – =CHOOSE(MOD(ROW()-2,5)+1,”Jan”,”Feb”,”Mar”,””,””)
Fails when I add rest of the months.
=CHOOSE(MOD(ROW()-2,5)+1,”Jan”,”Feb”,”Mar”,””,””)
Dear People, I wanted to split the dates in to installment as soon I give number for ex: If A1 value is 01/01/2017, and if enter 1 in A2 one installment date should reflect in A3, if I give 2 installments in A3 and A4 like this how many numbers I give it should split accordingly, please suggest us the vba code or any function.
Regards
Madhu
@Madhu
Can you please ask your question in the Chandoo.org Forums
https://chandoo.org/forum/
Please attach a sample file to get a better solution
Hui, thank you…sometimes I’m unsure where to ask what – if that makes sense.
My questions centers around xml and XSLT or xsl. I have multiple paragraphs in xml separated by a space/carriage return/blank row/whatever ya wanna call it. In xml space means nothing as I’ve come to realize. I have generated a “stylesheet,” ie. xsl code to show that verbiage in html. When I “pull” the xml file into my Firefox browser, the paragraphs are not separated, they are on top one another.
It would seem that to separate the paragraphs there would need to be code added to the xml file vs the xsl file. I have Googled & Googled to no avail, I’ve used , I’ve used , I’ve used I’ve even tried this and even in the xml file – all to no avail.
With something so pervasive as simply separating paragraphs I cannot fathom why it appears so complex. This is only my 2nd week – this is for a college class, not business related nor work related, for a college class in communications.
If you or anyone can help, it would save my sanity. Thanks much.
@Mort
Can you please ask your question in the Chandoo.org Forums
https://chandoo.org/forum/
Please attach a sample file to get a better solution
Can you Please suggest I have 19 Line item and 16 Regions monthwise data I need forecast template
@ Kavitha
Please ask the question at the Chandoo.org Forums
https://chandoo.org/forum/
Please attach a sample file to ensure a quicker more accurate answer
Thanks! This a great online site.
I want to calculate a rolling return on investment for 12 consecutive months, said months advancing once each month. One must take the ‘0’ month to the ’11’ month, and calculate the increase or decrease in value. Then, take the ‘1’ month and the ‘0’ month and do the same thing, And so on and so on, ad infinitum.
Hi, I want to add a month and remove the first month from a list of 12 months. So what I mean is let’s say we have 201501 201502…201512 as a list of months. I would like a way to now have 201502 201503…201601. How would I do this?
Hi
Could you please advise how I could amend the following formula:
=DATE(YEAR(B1),MONTH(B1)+1,DAY(B1))
I want to increment the month but the last day would be the last day of the following month eg 31 Jan 2020 when increased by one month would give 29 Feb 2020 ( as it is a leap year, but otherwise would give 28 Feb 2020).
Currently the formula above results in 02 Mar 2020, which is completely incorrect.
Please help.
Many thanks
Shamim
@Shamim
Try: =EOMONTH(B1,1)
I want to do this exact formula – but it is not working. I just keep getting a #VALUE!, it doesn’t seem to recognise the drop down options?
I have tried various formulas noted here to get the months to appear across the page, but all to the same result. So I think I must be creating the drop down incorrectly.
Your example above references ‘lstMonths’ in the source, but on the set up data validation example page it refers to cells which you have set up the months in a table. This is also confusing me, if I change it to source to the =lstMonths it rightly says I am referring to a data range which doesn’t exist. Have a missed a stage?
Okay – I noted that there is a type and its not l, but a 1st Months. I have redone the formula – but it is giving me -1 month and only appears in the column next to the drop down column – it is not repeating across 12 months?
=DATE(2020,MATCH($C$6,Q2:Q13,0)+COLUMNS(D6:N6),1)
please can you advise what I am doing wrong?