

Filtering is a simple yet powerful way to analyze data. When you apply filters to any list of values, Excel gives you some really useful pre-defined filters so that you can analyze the data in a variety of ways.
So, assuming you have data like this:
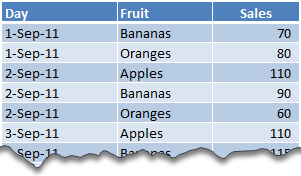
We all know how to filter data for Bananas.
We also know how to filter data where Sales > 70
But, what if you want to filter data such that Fruit is Banana OR Sales is more than 70?
Sounds tricky, Right?!?
Well, not so tricky. We can use Advanced Filters to do just this (and more).
Here is how we can filter values with Fruit=Banana OR Sales>70
1. Insert a few blank rows above your data
2. We will use this space to define the conditions for our Advanced Filters
As you can guess, to use Advanced Filters, you must write down the conditions for filtering in cells.
3. Now, set up cells like this.
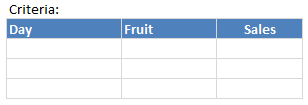
4. In first row, write =”=Bananas” against Fruit column
Note: we use =”=Bananas” instead of =Bananas because whenever you write = Excel thinks you are writing a formula.
5. In second row, write >70 in the Sales column
If you write this in first row, then the filtering would happen for Fruit=Banana AND Sales>70
6. Now, select any cell with actual data and go to Data > Advanced Filter

7. Select cells as shown below.
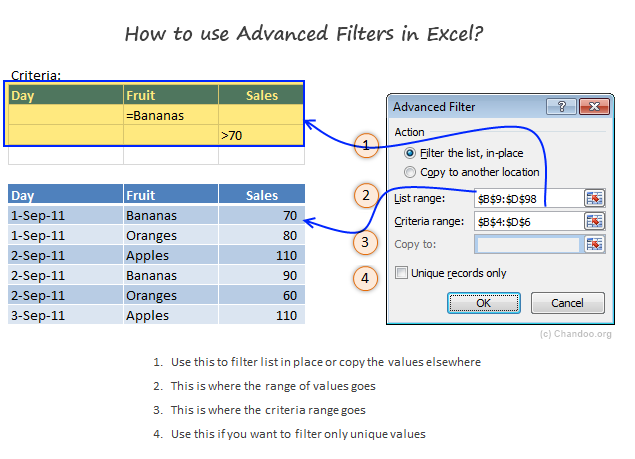
8. Click OK, and your list is filtered
Pretty cool, eh?
Some Tips about Advanced Filters:
- Use Copy to Another Location Option to copy the filtered values elsewhere.
- Excel creates a named range criteria upon the first time you apply advanced filters. As you can guess, this range contains the filtering criteria. With some creativity, you can dynamically change this (or create it) and make advanced filters even more advanced 😉
- Do not select blank criteria rows: Make sure you only select criteria rows with some data in them. Otherwise, Excel will not filter.
- Use with VBA: Advanced filters are pretty powerful & very fast. So, if you need to process a large list and create a sub-list that meets a criteria, you can do that thru Advanced Filters and even automate the process with a bit of VBA (more on this during next 2 weeks).
- Few more advanced filter tips on Contextures: Debra shares some really nice examples on advanced filters. Check them out.
Download Advanced Filter Example Workbook:
Click here to download Excel workbook with Advanced Filter Example. Play with it to understand how you can filter like a fine coffee maker.
Do you use Advanced Filters?
I have rarely used advanced filters before writing this example. A reader’s email prompted me to learn this technique. And now, I am very eager to play with this so that I can share few more awesome implementations with you.
What about you? Do you use Advanced Filters? What do you use them for? What are your favorite tips & ideas? Please share using comments.


31 Responses
Advanced Filters are very helpful/powerful! After teaching this topic a few times, I started suggesting that when setting up your ‘criteria’ COPY AND PASTE the field names instead of retyping them. All too often users where specifying what field they wanted for their criteria and misspelled them (hidden spaces from copying field names from other sheets or importing from another program where a nuesense).
I also shared this:
Critieria
Field1 Field 2
a x
b y
If you use A and X, its like saying, ‘find records where Field1=A AND Field2=x. it will only return records where BOTH conditions are met. Ex: Field1=Apples / Field2=>50
If you specify A and B, its liek saying, ‘find records where Field1= A OR B. It will return records that contain either A or B. Ex: Apples OR Bananas. In the article sample, since there is no “AND” condition for either field, it acts on the OR; showing only the records with Banana in the Friut field OR any record with a Sales value greater than 70.
I use it constantly, especially to get unique list to incorporate into sumif statements.
What criterion will you use to find Fruit=Banana AND Sales>70?
[a1]Fruit——-[b1]Sales
[a2]”banana”—[b2]”>70″
both criteria would be in the same row. then it would look for any records that have “banana” AND Sales >70.
make sense?
Download Advanced Filter Example Workbook:
Click here to download Excel workbook with Advanced Filter Example. Play with it to understand how you can filter like a fine coffee maker.
The example is damaged and will not open in Excel.
Hi,
I learnt this from http://www.ozgrid.com and use it to power a filterable, multicolumn, multiselect listbox using rowsource.
Although I could probably have done it more efficiently with arrays, using Rowsource is great as it automattically adds headers that my users need, allowing me to re-use the code with minimal changes in different scenarios.
I use the Unique records only opotion to generate source lists for list boxes, these list boxes in turn populate the criteria. Used iteratively it allows users to easily find contact details from a list of 6000+ contacts from various companies, divisions & departments.
Another good post, thanks
M
Advanced filters are great. And this is the example of use:
http://www.excelhero.com/blog/2010/07/excel-partial-match-database-lookup.html
@jason Thanks a ton mate! Very greatful this blog, learn something new everyday… 🙂
Hi
The information is very useful.
Thanks
Sathya
I’d like to know how to simulate Advanced filtering by formulae. And for the target range (not just the source range) to be dynamic, so that a list of results can be generated like the advanced filter does without going through the manual stage of specifying the data source, criteria and target.
In the formula I could figure out how to specify the source range and the criteria, but don’t know how to specify a dynamic range of *target* cells to where the list of filtered data would be copied.
This may be asking alot, but I’d like to at least ask!
Thanks, Dominic
What’s special about learning this is that it opens up another powerful feature of Excel: Database functions, like DSUM, DCOUNT, DGET, etc…
The same criteria setup you use for advanced filters can be used to define the criteria used for the database functions. With a bit of trickery you can even dynamically feed the criteria through an OFFSET fuction and create nifty multiple criteria setups.
You can replicate the results to that of special SUMPRODUCT based tables, but without the same overhead. In my experience the database functions calculate about 50 times faster than the equivalent SUMPRODUCT; so if you’re setting up a long term and repeated analysis it’s worth the extra effort.
@DottyDom
One of the problems with trying to arrive at any dynamic output using formulas is that the results can only ever extend as far as your formulas go. If the output is of a fixed size, or at least the largest size it can extend is a known value then you can acheive a chain of formulas which will go from a dynamic input and produce a variable output, but the key thing is it can never be bigger than the extent of the formulas that deliver the results.
Beware doing this where you want to extend the output formulas to the full scale of the sheet. It will likely be very very slow to calculate, and the saved file will be very large.
Jason and Dominic,
I have used database functions for analysis and they work great for dynamic results. On top of that I wrote a macro that will sort a certain data based on advanced criteria to generate a list in place. I generate a graph of individual items in the list. One great advantage of the macro is that the lines corresponding only to sorted list appear making the chart dynamic as well.
Here is an example of the workbook that shows use of database functions in Excel. http://pankaj.dishapankaj.com/share the file is ‘Use_of_Excel_as_database”
Jason… this can lead to some confusion!! ahahahahaha the jason and Jason tag team! lol
I used the advanced filter dialog box all of the time, not for filtering though! Often I would have a list of data, and I quickly need to get the unique records on the list – advanced filter to the rescue! In the dialog box, check ‘unique records only’ and give a cell address to copy the data too, and wallah! you have a unique list in a couple of secs, and as Chandoo would say, all you need to do now is sit back, sip your coffee and bask in your awesomeness.
I just tried to recreate this example in Excel 2007 and it seemed to work properly. But then I noticed that the data in the example table did not include a row where the sales figure for bananas was less than 70. So I removed the advanced filter and added another row where the sales figure for bananas was 14. I re-applied the advanced filter (making sure that the list range included the new row), but the filter did not display the new record. Maybe I misunderstood the filtering criteria, but shouldn’t the advanced filter display ANY record where Bananas is listed in the Fruit column?
PS. I did everything imaginable to make sure that the problem was not due to typos: I copy-pasted the list header into the criteria header cells; I copied “Bananas” from a cell which was appearing in the filtered list; I even cleared and re-applied the advanced filter several times (making sure that the references were all correct). Can anyone advise why I didn’t get the expected results?
I finally found my error. I failed to include the leading equals sign in the cell with the text criteria (I typed “=Bananas” instead of =”=Bananas”).
Although I’m ashamed to admit it took me so long to discover my mistake, I’m glad I took the time to try this example; whenever I’d encountered references to Advanced Filters before, I had skipped them over, thinking they sounded too complicated.
Big ups to Chandoo.org for providing a simple example scenario that made me comfortable enough to experiment with!
I would like to know how to use “List name” in ‘Copy to’ filed. I want list of unique items. Is it possible with advanced filter option?
Some helpful additions:
1) The match text is NOT case sensitive
=bananas and =Bananas both yield the same results
2) Rather than making a formula of the value, you can either prefix the cell value with a single quote, or define the Criteria Range cells as Text, for example:
‘=bananas
3) Wildcards do work, so the following criteria value will find ‘bananas’
‘=b*s
really its useful.
But this will not work if we are changing the value of criteria. In that case we have to apply the same procedure of Advanced Filter again if we are changing the criteria.
Please help to make the criteria dynamic so that whenever we are changing the criteria value then we do not need to apply the Advanced Filter again.
@Nikhil
Have a look at a Formula based approach at:
http://chandoo.org/wp/2011/11/18/formula-forensics-003/
Hello,
Excellent post.
How would you do if what you need is to paste the whole content of the cells, including formulas, using the advanced filter method with vba?
I have asked an excel advanced filter question at below link. Can you please help me in that question :
http://stackoverflow.com/questions/19698572/excel-2003-advanced-filer
Hello.
I used the VBA code in the file here and modified it to my needs and it works great on an unprotected sheet.
The data range I named Table2, has cells that are locked because of the formulas I need to protect. The code will not run on a protected sheet with locked cells. I don’t need to sort but I allowed Autofiltering since the code is about filtering. Here is the link to the file on drop box
https://www.dropbox.com/s/vzvqcgcfsbhebkp/Payroll%20-%20Weekly%20-%20Rev%201.0.xls
Thanks