

When analyzing business data like sales, shop visits or productivity, one of the questions managers always ask is,
What is the best month / week ?
To answer this question, we need to make a chart that looks like this:
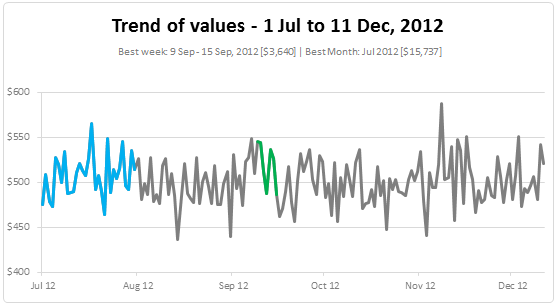
How to highlight best week or best month in a chart?
Today, lets learn how to highlight portions of such charts that correspond to best week or best month.
First, an important rule
To highlight data: If you have all the numbers for this chart in a range A1:A100, and you want to highlight the maximum value (or top 10 values), you use conditional formatting.
But with charts: there is no such thing as conditional formatting. So we must imitate the effect. This is done by creating extra series of data (for best week, best month etc.) and formatting it accordingly.
So the rule is To highlight a portion of chart, we need to create another series for that portion and format it the way we want.
Step 1: Create a regular line chart from your data
Lets assume our original data is like this:
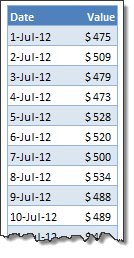
Select it and create a line chart to depict the trend of values.
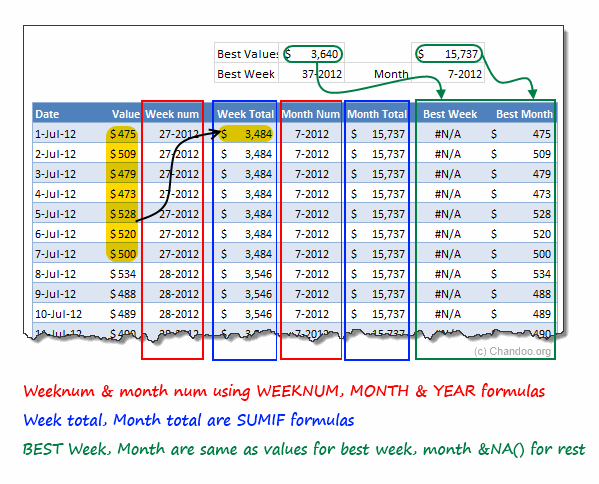
Step 2: Calculate Weeknum
Weeknum will have the week number for each date. This is calculated by =weeknum(date)&”-“&year(date)
Step 3: Calculate Best week portion
For our analysis, lets assume that best week is the week with highest total sales. To do this:
- Add one more column, lets call it weekly total. In this, sum up the total for each week. The formula =SUMIF(weeknum, current-weeknum, values) will give this.
- Now, find the maximum of this column using =MAX(weekly-total)
- Add one more column – best week. This will have NA() for all values except the maximum week. The formula for this would be =if(weekly-total=max-weekly-total,value,na())
Step 4: Add the best week series to chart
Copy the best week column and paste it in your original chart.
At this stage, our chart has 2 series:
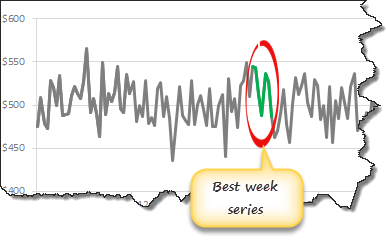
- Original line corresponding to all dates
- Best week line corresponding to only best 7 dates
Format this new series in any way you want. And your chart highlights best week.
Step 5: Follow similar process for Best month
To highlight best month, you need to calculate month, monthly total, max-monthly-total & best month values. Once they are ready, just add the best-month values to the chart and you are done!
Calculations Explained:
See this illustration to understand how the calculations for best week & month work.
Download Example Workbook
Click here to download the example workbook & play with it. The workbook contains 2 charts.
- Best week & month highlighted
- Best week & month highlighted along with drop lines
Examine the formulas & resources section of download file to learn more.
Do you highlight portions of charts?
Highlighting a portion of chart is very useful to draw user’s attention. I do this all the time in my dashboards & reports. Unfortunately, there is no automatic way to do this. So we resort to techniques like this.
What about you? Do you highlight portions of charts? What techniques do you use? Please share your ideas & tips using comments.
Also, read more on Dynamic Charts, Excel Tables & Interactive Highlighting in charts.


12 Responses
So what happens if there are 2 “best” weeks
Sam,
You would then use a if statement something like if week is higher than a certain sales goal then pull the week, else #N/A.
This would make your highlight series have several occurrences. Allowing for multiple Weeks.
Hey chandoo,
I had subscribed to your mailing list 3 months back. Really great work being done here. Just wanted to congratulate you on such a great site.
Two things stand out
1.Really focussed
2.Really helpful for the focus group
Example this tip on conditional formatting on charts is a great idea.
regards
sreeni
http://www.sreenivaskandakuru.com
Cool!
I did similar chart using the same technique to show(highlight) n best/worst data points . Thanks for the inspiration to another possibility 🙂
Ah great post for a cool rebuild on my side, thank you very much!
What a pity, I couldn’t handle the column-reference like [#THis Row], [Week num] or [value]. Where can I define this?
Thank you very much and keep on charting, greetings, SomeintPhia
@SomeintPhia
You can define named Formula to calculate these type of values
thank you and now I understood, that there is an easy possibility to adress colums with a defined named range .. cool!
Happy Charting
Hmm, it worked fine with the download example, but I was wondering where all the names can be found ([Week num] or [value]). What do I oversee?
Thank you for the help.
@SomeintPhia Goto Formulas
.. there is only [bestMonth] and [bestWeek] defined
hi,
i downloaded ur workbook i understood how you did the graph, but the problem is when i want to make similar one, my graph shows #N/A values like 0 (zero) on graph. how can i correct this? thnk u
Hi, I have past 5 week data in my hand with different classifications or header. My manager asked the trend for increase or decrease the value of the classifications.please assist me how to project the trend. Example apple is the classification and I have the rates for last five weeks. How i to project the increasing or decreasing trend. Also if I have more fruits then how to do it. Please help me to do this trend