

This is a guest post by Vijay, our in-house VBA Expert.
Often I have thought, if I could have write “Select EmployeeName From Sheet Where EmployeeID=123” and use this on my excel sheet, my life would be simpler. So today we will learn how to do this.
People spend a lot of time thinking whether to use Excel as their database or not. Eventually they start using Access or SQL Server etc.
Today we will learn how to use Excel as a Database and how to use SQL statements to get what we want.
Excel as a Database – Demo
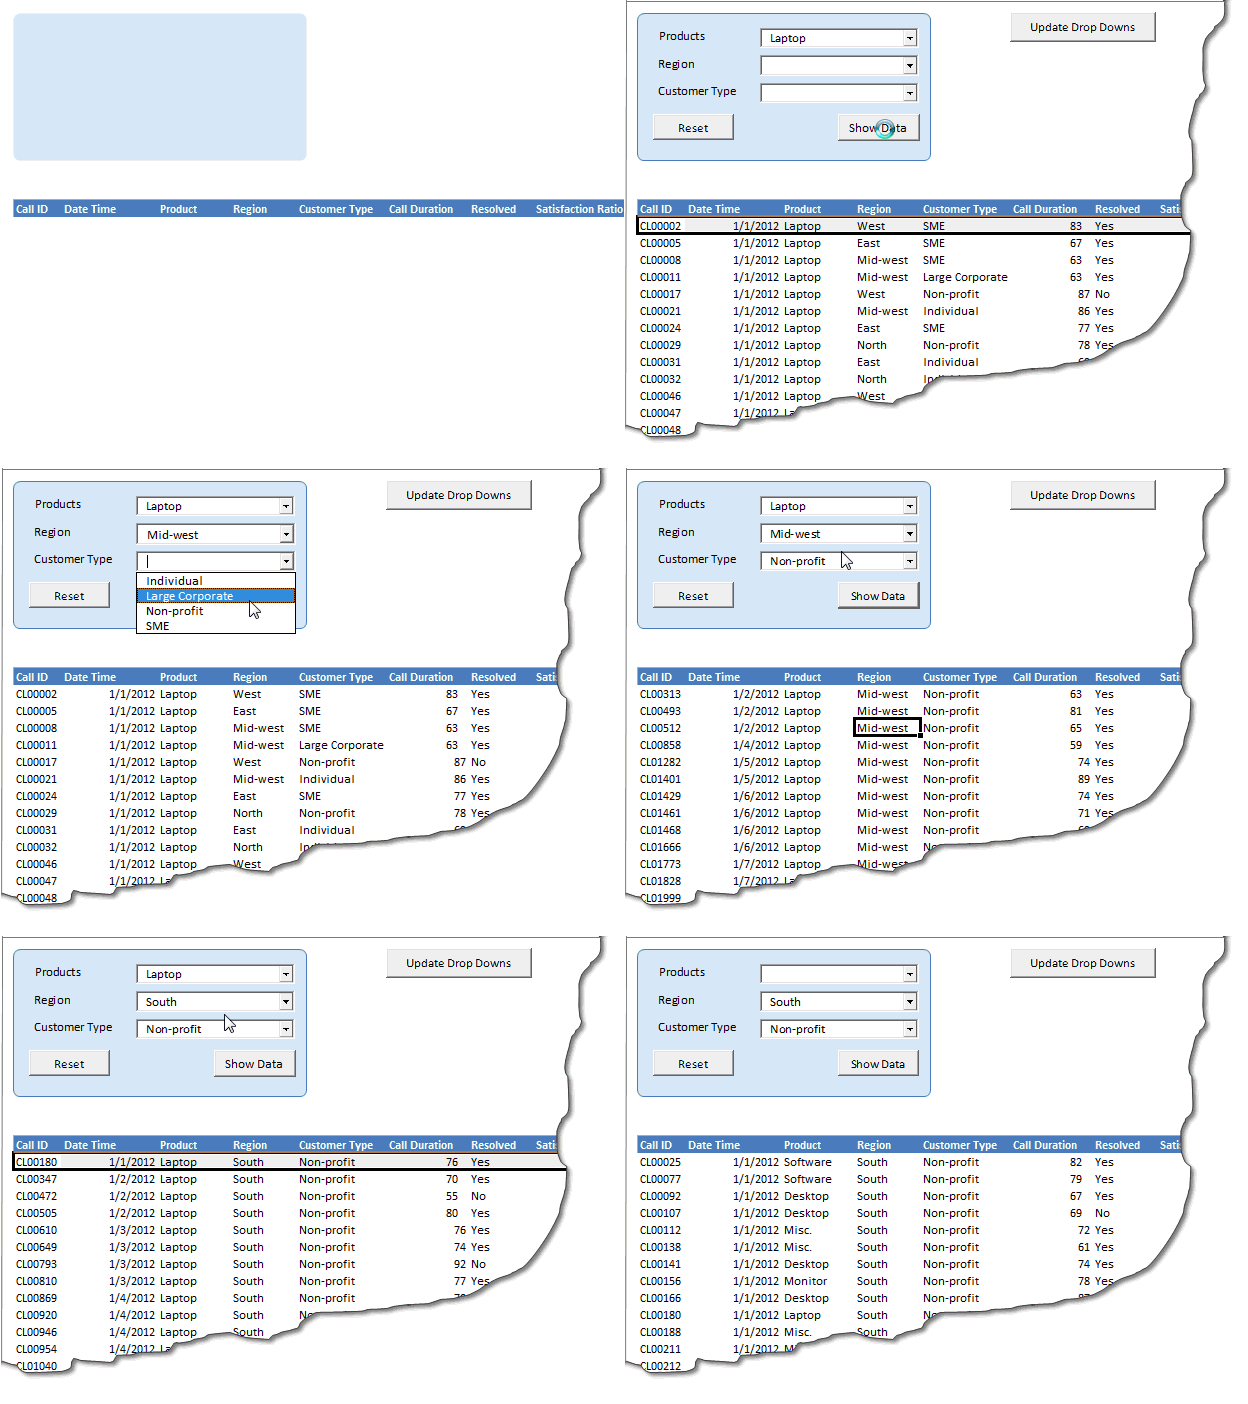
We will learn how to build this:
Before we begin:
- The entire sheet (where the raw data has been stored) will be referred as one single database table by Excel. This is very important to understand.
- This has nothing related with the in-built Table (2007 and greater) / List (2003 and previous) feature of Excel.
- If you know SQL (Structured Query Language) your task becomes much easier.
Setting up Excel as Database
We need some raw data and we will utilize Customer Service Dashboard sample database here.
Let’s get started.
First we will design the structure of what all option we want to present for filtering the data, which you can see in the interface below.
Once the user clicks on Show Data we will use a SQL statement to filter-out the data as per the drop down options selected by the user and the put them in the table below.
We will also use another SQL statement to populate the top right hand side table for calls data when all the 3 drop downs have some options selected.

Adding Active-x data objects reference
We need to add a reference to the Microsoft ActiveX Data Objects Library to be able to use the worksheet as a database table. You can do this from Visual Basic Editor > Tools.

I usually select the most recent version, however if you are developing a product it will be best suited if you are familiar with the operating system and office version used by the end-user’s system and accordingly select the best version available.
Opening Excel as a Database
Once this is done we need to hit the road with some VBA code.
Public Sub OpenDB()

If cnn.State = adStateOpen Then cnn.Close

cnn.ConnectionString = "Driver={Microsoft Excel Driver (*.xls, *.xlsx, *.xlsm, *.xlsb)};DBQ=" & _

ActiveWorkbook.Path & Application.PathSeparator & ActiveWorkbook.Name

cnn.Open

End Sub
The above procedure is the heart of this post, this is where we define how to use the current Excel workbook as our database.
cnn.ConnectionString = "Driver={Microsoft Excel Driver (*.xls, *.xlsx, *.xlsm, *.xlsb)};DBQ=" & _

ActiveWorkbook.Path & Application.PathSeparator & ActiveWorkbook.Name
On this line, we define all the possible file extensions that we are allowed to create an Excel Workbook and then use as our database.
Let’s understand the code module
When you click on the Update Drop Downs button, the VBA code uses the “Data” worksheet as a table and then finds unique values for Products, Region and Customer Types and then populates them as ListItems for the ComboBox controls.
Example for Products drop down
strSQL = "Select Distinct [Product] From [data$] Order by [Product]"

closeRS

OpenDB

cmbProducts.Clear

rs.Open strSQL, cnn, adOpenKeyset, adLockOptimistic

If rs.RecordCount > 0 Then

Do While Not rs.EOF

cmbProducts.AddItem rs.Fields(0)

rs.MoveNext

Loop

Else

MsgBox "I was not able to find any unique Products.", vbCritical + vbOKOnly

Exit Sub

End If
What is important to notice here is how the Table and Fields have been identified using square brackets unlike traditional SQL where we just provide the name, also the table name has to be suffixed with a $ symbol at the end.
As I have suggested earlier, one entire sheet will be treated as one single table, so if you have multiple datasets that were currently organized within one sheet you may have to create multiple sheets to store that data to be able to use them as tables. This would also make maintenance of data easier.
Using Excel SQL to consolidate two sheets in to one
Many people ask, how to consolidate 2 or more sheets which have the similar data. Well I would have adopted this method and wrote a simple query as below.
SELECT ID, FirstName, MiddleName, LastName, Age, DOB From [Table1$]

UNION ALL

SELECT ID, FirstName, MiddleName, LastName, Age, DOB From [Table2$]
This would allow me to use both the sheets as one table and fetch all of my data into a new sheet.
Download Excel As Database Demo File
Click here to download the demo file & use it to understand this technique.
Do you use Excel as a database?
Do you also user Excel as your database? If yes please put in the comment below how do you use the same and what has been your experience. Leave a comment.
More on VBA & Macros
If you are new to VBA, Excel macros, go thru these links to learn more.
Join our VBA Classes
If you want to learn how to develop applications like these and more, please consider joining our VBA Classes. It is a step-by-step program designed to teach you all concepts of VBA so that you can automate & simplify your work.
Click here to learn more about VBA Classes & join us.
About Vijay
Vijay (many of you know him from VBA Classes), joined chandoo.org full-time this February. He will be writing more often on using VBA, data analysis on our blog. Also, Vijay will be helping us with consulting & training programs. You can email Vijay at sharma.vijay1 @ gmail.com. If you like this post, say thanks to Vijay.


220 Responses
Worst thing ever to do. Excel is as much a db as is Access.
Use excel as a spreadsheet and leave databases work to databases.
It’s bad enough seeing spreadsheets with multiple worksheets being used and screwed up by people without letting them think it’s a database.
Excel has a place in business just not as a db.
In many companies DB people are usually overworked and everyone else is just stuck with large Excel data files that need to be manipulated. In such cases it’s unreasonable to expect people to wait until the DB person gets to their issue so managing the data in Excel is a good option.
Worst thing ever to do. Excel is as much a db as is Access.
Use excel as a spreadsheet and leave databases work to databases.
It’s bad enough seeing spreadsheets with multiple worksheets being used and screwed up by people without letting them think it’s a database.
Excel has a place in business just not as a db.>>>
I might have agreed with you thru Excel 2007 but since the advent of PowerPivot, Excel is as much a database as any other relational database. I suggest you read either Rob Collie’s book “DAX Formulas for PowerPivot or Bill Jelen’s Power Pivot for the DATA Analyst” (emphasis mine) This is a gamechanger
Hi.. i need to do a small project with two text boxes here i need to retrive and insert the data in database. here the database i need to use is Microsoft excel 2007…… can u explain me it by step by step procedure
I don’t like negative comments like that one, I must say!
If you like argue about the sex of angels, I would say that Access is not a bullet proof database either…
This is a great tutorial and it helps me a lot. I have two tables in Access, one with the provinces, districts and postal codes in Thailand. I added the second one with the tambon (subdistricts). The first has got 928 records, the second 7373 records. I want to keep only one table by writing the postal codes in the second table. This is a one shot action, so why should I modify my VB6/ADODB/SQL/MsJet programme for that purpose??? I am glad to use SQL instead of a ‘Find’ in VBA.
Thanks a lot Chandoo
I totally disagree with you because I’ve been using Excel as a database for several years already. Access might be superior in handling and storing data, but, as in my case where my data are updated almost daily, and I need instant analyses (which are complex I should say) to monitor progress, Excel is the best way to go. Charts are also easier to create and update in Excel (my Access can’t even create a chart unless you copy paste it as an image!). I think it depends on the need or circumstances and nobody could conclude that a certain program should not be used for a certain task even if it has the capability. Also, this is an Excel and not an Access site…
Anyways, it is good to know that SQL could be used in Excel. I should really learn how to do it ASAP! As of now, I’m using the For… Next loop to search for a particular data in my macros which seem “UNawesome”! 🙂
I love that this is the first comment
No anyone reading this NEVER EVER EVER(!!!) USE EXCEL AS A ‘DATABASE’… EVER
Yea, tell that to my terrible IT dept, Graham.
I’m stuck using MS products. The company firewall uber restrictive and every request I’ve made for db server or server app has been denied.
I’m an engineer at a global company…my salary is in the low six figures. There is no way I’m gonna quit.
So…guess I’ll be making a ‘database’ with Excel while getting wildly overpaid for it.
Hey Chandoo is this taught at Excel School? Man, this is the awesomeness thing I had ever seen!
@Kafran… This is included in our VBA class. Visit http://chandoo.org/wp/vba-classes/ if you would like to join us.
Excellent and thanks Vijay for providing such as an easy way to create DB using EXcel.
Ashwin
Excel has database functions. http://office.microsoft.com/en-us/excel-help/CH006252820.aspx
If you use this, you can avoid VBA. I use these for work and visualization purposes. A sample file can be downloaded here http://pankaj.dishapankaj.com/share
To save someone time, neither of these links work.
Fantastic.
I use Excel as a ‘database’ but using more conventional (non-vba) methods so this is great.
I agree with Graham, in so far as Excel is not designed to be a database and therefore you should keep its use to a minimum and make excel do what its best at, number and data manipulation, not data relationship management. However, on occasion it is very handy to use it in a minor way as a database instead of having to link different applications (which sometimes is not possible due to IT security policies) to achieve a result.
More articles like this are a must.
Thanks
Dave
Great! What a coincidence? Only yesterday, I was searching for “database” in this site & did not get much information.
While I agree that Access is better used as a database, there are situations where we are forced to use Excel. Please write some more articles on databases. Thanks Vijay!
Thank you very much Vijay this is really creative work. I hope it will continue.
I have liked your teaching on vba class too. thanks again.
I agree about the fact that Excel isn’t a database but I think it’s great. See practical use in a select numbers of situations. Use it wise I would like to say. Thanks for the information and I looking forward on more topics.
Regards
Gerard
I have seen excel file.
It seem it in nothing other than filter.
Good little demo. Note that the square brackets are only needed if your table or column name has a space in it. But I think its good practice to use them whether or not your table or column name has a space in it.
You can also use this character to do the same: `
For instance, you could remove the brackets from [data$] with and the query still works fine. But you could not remove the brackets from [Customer Type] because of the space, although you could use `Customer Type` in place of [Customer Type].
In regards of whether you should use Excel as a database, I don’t see why not. What’s worth pointing out is that you can also modify this approach to take data from just about any database and present it in Excel.
I’d be inclined to not hardcode the sheetname into this code. Instead i’d add this to both modules:
Dim sSheetName As String
sSheetName = “[” & Sheet2.Name & “$]”
…and then replace all 11 instances of this:
[Data$]
…with this:
” & sSheetName & ”
(including the quote marks)
I have been using EXCEL as a front-end for managing data in Access DB. But could not find any easy way to manage the movement-between-records and other features that were available with VB6 “Data Control”.
Is there anything equivalent available in EXCEL 2010?
Regards,
@Uday,
The VB6 Data Control was built for such tasks and functionality. However there is nothing native within Excel to support this.
Could you specifiy what exactly you are after and maybe we can create something that would benefit everyone.
Thanks for the response Vijay. I have built a utility in EXCEL/Access for maintaining my Expense/Income as well as Investments in a consolidated form that always gives me up-to-date reports.
The data is obviously in Access and so is the “Master/Transaction Maintenance”. What I have done is built the maintenance function using EXCEL VBA/Forms but you end up writing a huge code for all functions explicitly (add/modify/delete/view).
Wanted to know if there is anything available that can reduce this development time?
Cheers,
Hi Uday. A very clever guy i’ve got to know called Craig Hatmaker has written a great Excel App to update an external database. It’s still a work in progress, but it’s very very clever, and there are some very good functions to allow you to modify the database that you could probably amend.
To quote from Craig’s own documentation:
There are times when Excel is perfect for manipulating data in databases. Examples include tariff/rate tables, journal entries, and employee time sheets. Excel also works well for maintaining simple lists like code files.
Traditional approaches to leveraging Excel in data entry have end users key data into a formatted spreadsheet, save it to a shared directory, then run a server side program to check data, and if everything is okay, update the database. This approach has multiple objects on different platforms involved in a single task complicating development and maintenance. In addition, validation results are delivered well after entries have been made frustrating end users.
A better approach, in my opinion, is to put that same validation and update logic from the server program into the Excel entry sheet so there’s just one object to maintain. This has the additional benefit of providing end users with immediate feedback as to the validity of entries.
Though this App specifically updates the Employee 2003 table in Microsoft Access’ demo database, Northwind 2003.accdb, the template can be easily modified for use with any database.
Craig tells me he’s happy for me to share the file with you. Flick me a line at weir.jeff@gmail.com and I’ll send you a link to the documentation as well as the access table and excel app he uses.
Also, check out Craig’s blog at
http://itknowledgeexchange.techtarget.com/beyond-excel/forward/
Broken link.
Hi Vijay ,
Thanks.
Narayan
I agree with most of the comments. Never use Excel as a DB.
Use Access or another DB to handle all your data then just set up an odbc and use Excel to make pretty the data.
hi,
i hace ado 2.6 . i use windows xp and office 2007.
how can i find version 6.0.
regards
Aditya
@Aditya,
Version 6.0 is available from Windows Vista onwards.
The below link talks about the version history for MDAC.
http://support.microsoft.com/kb/231943
(however there is no mention of 6.0).
Another helpful atricle I found was …
http://www.vbforums.com/showthread.php?t=527673
hi vijay, why when i change the combobox to call the data by date, it’s always say “data type mismatch in criteria expression”. can you help me to solve this problem?
i think its because the date format, maybe
Vijay –
Thank you for giving those of us without a copy of Access the opportunity to keep progressing with Excel. Very good information!
Best-
Susan
Thanks, Vijay for posting on the topic use excel as database. I hope this has helped many of excel users.
Hi Chandoo,
I understand describing this technique as “using Excel as your database”, for a lack of a better term. But it could be misleading. Excel makes for a poor database, but your article is not really bastardising Excel in lieu of a proper database as some may interpret. The main concepts in your article are about using ADO and the Excel ODBC driver. This technique applies whether you’re using a text file, SQL Server tables, or spreadsheets. Therefore, I look at it more like using Excel as your “data source”. I think it would be valuable if you could explain that a little more so that people understand the context. This is a powerful and time saving technique, great for anyone’s arsenal, so it’s sad to see people make blanket statements against it. Although I do agree in principle that databases make better sources the majority of the time, there are valid reasons for using ADO and Excel in this fashion.
In addition, I hope people understand that you can also use query tables and list objects to accomplish the same. The added benefit is that you can record macros to get generic VBA code, don’t have to worry about references, and can also use MS Query to fine-tune your SQL if you’re not fluent.
Lastly, people should understand that there are significant caveats like how data types are determined or issues with complex SQL statements. I can get into my experiences with this if anyone wants more details.
This is great. When I download the Excel database demo I keep getting error. Is the demo not working for others too?
Thanks
It worked for me. I first downloaded it using “open” instead of “save” and I got errors. I looked at the code and the ado connection was referencing the spreadsheet from http://img.chandoo.org/vba… rather than my computer. I then saved the file to my desktop and ran it from there with no problems.
can you explain how to change the code….i’m getting the same errors
Hi, I just want to add those lines for use in the case your database has one or more field’s date (column), and you need to select data from a interval.
I think this is useful because SQL has many sintaxe’s variation and this works with VBA:
dvenc1 = Format(Sheets(“View”).Range(“G6”).Value, “dd/mm/yyyy”)
dvenc2 = Format(Sheets(“View”).Range(“H6”).Value, “dd/mm/yyyy”)
dpago1 = Format(Sheets(“View”).Range(“G7”).Value, “dd/mm/yyyy”)
dpago2 = Format(Sheets(“View”).Range(“H7”).Value, “dd/mm/yyyy”)
strSQL = “SELECT * FROM [data$] WHERE ([vencimento]” & _
” between #” & dvenc1 & “# And #” & dvenc2 & “#)”
strSQL = “SELECT * FROM [data$] WHERE ([pagamento]” & _
” between #” & dpago1 & “# And #” & dpago2 & “#)”
dear José Lôbo
very thanks for your operational cods 🙂
Hey, I like this. This also has a practical side where the data will “eventually” end up in a true DB.
However, I have a question: I downloaded the sample file, and was unable to run it because the ado library wasn’t activated.
If this file was shared with others, would they also have to enable the component in excel? Is there a way to make this happen automagically(tm)?
Thanks
Jay, I found the code below, that can automatic load/unload the library, if it has been installed in your machine:
‘Put in the module “This workbook”
Private Sub Workbook_Open()
MsgBox “Oi, obrigado por carregar a Biblioteca”, vbInformation, “JFLôbo”
‘Include Reference Library
‘Microsoft ActiveX Data Objects 2.8 Library
On Error Resume Next
ThisWorkbook.VBProject.References.AddFromFile “C:\Program Files\Common Files\System\ADO\msado15.dll”
End Sub
Private Sub Workbook_BeforeClose(Cancel As Boolean)
‘remove ADO reference
Dim x As Object
n = Application.VBE.ActiveVBProject.References.Count
Do While Application.VBE.ActiveVBProject.References.Count > 0 And n > 0
On Error Resume Next
Set x = Application.VBE.ActiveVBProject.References.Item(n)
y = x.Name
If y = “ADODB” Then
Application.VBE.ActiveVBProject.References.Remove x
End If
n = n – 1
Loop
End Sub
awesome, thanks.
I also found that I can enable all the “ADO” libraries back to some point, say 2.6, and order their “priority” and save the document. They will show as “missing” if you look in your references, however the code will still run. Seems the original attempted to load 6.0, which I didn’t have. Now, with the others specified, it eventually found one that worked. in other words, the reference was actually saved with the file and automatically loaded, I just didn’t have it.
I’ve never seen a better way to use Excel as a database than via Laurent Longre’s Indirect.ext function. Set up multiple Excel spreadsheets, populate the data, then consolidate them without opening them – I’ve used it many times and it’s fool-proof…no need for VBA, just using your brain for the data analysis piece afterwards.
I tried to modify the query to Select based on [Date Time] and encountered the following error when click on Show Data
[Microsoft][ODBC Excel Driver] Data type mismatch in criteria expression.
This could be due to restriction where the value has to be a text value instead of Date Value.
Any suggestion how to overcome this?
Many thanks to Vijay for this fantastic post
On a post above, dated (04/09), I gave an example of selecting dates into an interval. Dates are on their right format on the cell.
HI Vijay ,
Thank for posting this thread. I used the excel sheet and ammended it according to my data. Now the problem I am facing is that when I run the Update drop down button I am getting error [MICROSOFT][ODBC Excel driver] Too few parameters. Expected 1 in the line rs.Open strSQL, cnn, adOpenKeyset, adLockOptimistic. can u please help me out on this .
Hello Ankita,
Your SQL statement needs to be looked at. You may send me the file at sharma.vijay1@gmail.com to look at.
~VijaySharma
I have mailed you the file. Please take a look. Thanks 🙂
I really am intrigued by this article, however I keep crashing the program when I save it. I tried the solution from Jose and am still getting the same errors. The errors are below:
Your changes could not be saved to ‘Excel_As Database-demo-v1.xlsm” because of a sharing violation. Try saving to a different file.
When I try to save it to another file, I get the message: “The file you are trying to open, ‘791CF000’,is in a different format than specified by the file extension. Verify that the file is not corrupted and is from a trusted source before opening the file. Do you want to open the file now?”
I saved it as a new workbook and the same errors appear.
Any thoughts would be greatly appreciated.
Thanks in advance for your help
Hello Jim and Vijay,
I have the same problem. I have downloaded the demo file. When i change something in the data sheet and just click on the update dropdown button. It’s not possible to save the file any more.
Its give me the same error Your changes could not be saved to ‘Excel_As Database-demo-v1.xlsm” because of a sharing violation. Try saving to a different file.
Is there already a sollution for this problem.
try this
cnn.ConnectionString = “Driver={Microsoft Excel Driver (*.xls, *.xlsx, *.xlsm, *.xlsb)};DBQ=” & _
ActiveWorkbook.Path & Application.PathSeparator & ActiveWorkbook.Name & “;ReadOnly=false;”
Hi Vijay,
I was wondering if you can help me. I tried to use a variable on my sql statement and it keeps getting an error.
Can you help figure out the problem.
Dim xtype As String
‘this is the invoice type
xtype = “I”
closeRS
OpenDB
strSQL = “SELECT * FROM [data$] WHERE [data$].[Type] = ” & xtype _
& ” and [data$].[Cust #]='” & cmbcustno.Text & “‘”
closeRS
‘this is the connrection
OpenDB
‘this is the error
rs.Open strSQL, cnn, adOpenKeyset, adLockOptimistic
Thanks a lot.
Conrad
strSQL = “SELECT * FROM [data$] WHERE [data$].[Type] = ” & xtype _
& ” and [data$].[Cust #]='” & cmbcustno.Text & “‘”
you probably need to encase the xtype variable in single quotes
try….
WHERE [data$].[Type] = ‘” & xtype _
& “‘ and
Technically this provides database like query facilities. It’s not providing database capability in excel, as a spreadsheet is incapable of being a database. A spreadsheet has no concept (or ability to represent) tuples and relationships between data with primary indexes. But then most people at work don’t see any difference at all, and call a spreadsheet a database and vice-versa…happily introducing data anomalies along the way. It has been estimated that 95% of spreadsheets in workplaces contain errors…so treating a spreadsheet as a database is just one more problem of technology in hands of the litte trained.
I must say i’ve seen some doozy formulas and spreadsheets, both the WTF kind and the kind where an inordinate amount of time and money was spent to create a spreadsheet, where something else would be much better and way more efficient. spreadsheets are not scripting languages and herendous formulas get created when scripting language should be used instead. but never mind.
keep up the good work people, teaching the good stuff.
Agreed,
However, you are assuming that, when a DB is needed, one is actually available to the user. Many times this is not the case, and the data for the spreadsheet is actually required to be contained in the spreadsheet itself. I happen to be in this boat. I would much rather use proper tools for the job, they just aren’t available. This is much better than just “well, can’t be done.” Even more so, this is more like using a Ball Peen hammer when what you really need is a framing hammer. Rather than say, using a pipe wrench. At least is’t in the same family. It won’t be as effective, but it’s not a complete hack (like many of the examples you cite)
Excel to Database now supports MySQL as well as SQL Server and Access.
The tool allows you to pre-validate data and quickly upload from Excel to database -and even send data to a stored procedure!
Well worth a look!
http://leansoftware.net/Forum/default.aspx?g=topics&f=4
People…check out Microsoft’s addin for Excel called “PowerPivot”.
PowerPivot for Excel is an add-in to Excel 2010 that provides the foundation to import and combine source data from any location for massive data analysis on the desktop, including relational databases, multidimensional sources, cloud services, data feeds, Excel files, text files, and data from the Web.
The data that you add to the workbook is stored internally, as an embedded PowerPivot database inside the .xlsx file.
From a user perspective, key points are:
It allows data people to quickly create mashups of disparate data source on the fly – including web data, text files, datawarehouse files, and excel tables – and serve it up as a pivottable.
It extends the capability of Excel 2010 so that users can crunch, filter, sort millions of records with very low overhead, as well as incorporate both relational and non-relational data sources easily into analysis, using an interface they are already familiar with.
It can be programmed with SQL or DAX, but users don’t need to write SQL or DAX queries in order to use it (although they can if they want). Behind the scenes, Powerpivot creates OLAP cubes, and draws heavily on components of SQL Server to do this, but no istall of SQL Server is required.
This addin extends the capability of Excel so much that it might well remove the organisational need for some of the other apps in some cases (such as SAS) and make their licencing costs disappear.
Given Excel would be most organisation’s most widely used/deployed tool, and that this free add-in is the most significant advancement in Excel in the last decade, I think this would raise the bar on what your average analyst could do, and lower the total cost of doing it.
Further benefits of the add-in listed at http://msdn.microsoft.com/en-us/library/ee210644.aspx
Yes, I’ve been eyeing the PP plugin for some time now. Our corp won’t be migrating users to 2010 for some time though….sigh. At least it gets us time to req an sql server though. basically this technique will allow me to get much of the dev work framed before the sql server goes up, then eventually replace it with the pp plugin.
My computer doesn’t have Microsoft Activex Data ovjects 6.0 Library so how to get this
Hello Umesh,
What is the operating system installed on your system. This version is available from Windows Vista onwards.
Vijay Sharma
Now, if I could just get an example of “filtering” data, without using a pivot table, that supports multi-select filters. Vijay? got a slick solution? right now I am copying filter settings via vba to multiple pivot table, and it’s crap, slow, and more crap. I did something with some named ranges and checked boxes…it was okish
Jay – can you elaborate a bit more about what you are trying to do? I’m developing an add-in so that users can very easily filter any existing pivottable QUICKLY based on a named range i.e. “Filter pivottable A based on all the entries in range B”. I’m doing this because i’ve noticed that users spend significant amounts of time manualy filtering pivottables so that they match items in another data set.
One problem with filtering pivottables is there might be tens of thousands of pivotitems in any one field, so iterating through them can take significant time. That said, I’ve found a very smart way to iterate through them, plus am developing another approach where I don’t have to iterate through the collection at all.
However, for pivotfields with tens of thousands of items, filtering them with SQL will always be quicker.
@Jay
In addition to Jeff’s comments I often will do a pre-filter first using an Advanced Filter to get rid of the bulk of non-important data
Then run the Pivot table on the filtered data
yes, the problem is: I have a large set data sets (say that fast five times!) with about 8 common fields. The powers that be want to be able to filter on about 6 of those at any given time. MOST of the filters are restricted to about a dozen or so, however there are a few that number closer to 100. and of course, they want:Ability to multi-select, all pivot filters linked to a master filter. I’ve used a variety of vb and other techniques to link the filters, but of course copying those 100ish items to 6-10 other pivot tables ultimately is time consuming. I’d much rather use this sql technique, but I don’t know how to support the multi-select. I have done it in the past by using the pivot_change event, duping all the filter settings to a table, then using a formula in the data for each table to set “in scope”. that filter setting is pre-set to “true” for all pivots, and hidden. its better, but not good. The most efficient i have done is to put the data for each of the “100ish” into separate tabs, use sum-ifs on the main page, and move “out of scope” tabs outside the sum-if tab range, again a kludge (but surprisingly the fastest method) I think I could apply this method using a tree-view control as the input(s) rather than a select box… In reality, we shouldn’t be using excel as our presentation layer, but alas, we are!
@Jay they want [the] ability to multi-select, all pivot filters linked to a master filter. If they have Excel 2010, then slicers are a damn easy way to do this – assuming all pivots run off the same cache. (That said, there’s a way around that that I want to try out). Otherwise, Debra has some code at http://blog.contextures.com/archives/2012/01/03/change-all-pivot-tables-with-one-selection/ that may help (although it might take significant time to iterate through each pivottable and each pivot field, and each pivotitem)
I don’t know how to support the multi-select Sound’s like a simple WHERE IN clause would do the trick.
Can you post a sample spreadsheet somewhere for me to have a look at?
Yes, I’d love for them to move to 2010, then I’d go with the Power Pivot plugin and move the data to an sql server that we should be getting soonish. I have used the code you linked, or a variant. It’s slow, but works. I actually use a different “hack” I have found a little faster for large filter sets, but it’s not pretty. I have been looking at this method. I like it, since 2 of the large filters are interdependant (depending on what is set on 1, I can reduce the second filter choices significantly) I just need to figure out an elegant way to do multi-select. I think I have. I can, in theory use a TreeView control. The ListBox control with mulit-select also might work well, particularly for the “non-interdependent” filters. Then build up the SQL, probably with an “Apply” button. I’ll let you know if I get it to work well.
HI,
I am a novice on excel vba, i used to complete the task whatever assigned to me by searching google, on searching i found this link and it is very very useful. The query which i got was in the attachment attached in this post the product field got some product related information but if i put Date in its place it didn’t filtered out!!. can you please advice how can it be achieved?? and also advice us how can we proceed the above function with only one key say date field alone(in this tutorial u used 3 keys).
Hi,
i am completely untouched by programming (if you dont count in some classes many years ago), and my goal is to create stock database. For filtering of what i have in stock (and movements) i can use yours tutorial to filter out data i need to see, but what about adding new rows to data sheet? It is possible to do it in some kind of dialogue box?
Thanks for help.
@Bee_Boo, perhaps you could take advantage of Excel-to-database to insert new rows?
http://leansoftware.net/en-us/productsdownloads/exceltodatabase.aspx
Vijay Sir
Like jim said on 24-04-2012 I am also getting same errors repeatedly with some Alphanumeric Name generated excel file… Is this due to using excel as database??
2) Will the data be lost if we use this code & will there be any problem to our computer for same….
Why this type of errors are coming ?? Please Clarify
Hello Vrunda,
Kindly share your workbook with me at sharma.vijay1@gmail.com to look at and figure out what is going wrong.
~VijaySharma
I have the same problem. I have downloaded the demo file. When i change something in the data sheet and just click on the update dropdown button. It’s not possible to save the file any more.
Its give me the same error Your changes could not be saved to ‘Excel_As Database-demo-v1.xlsm” because of a sharing violation. Try saving to a different file.
Also the problem when you change something in the data sheet. click reset and click update dropdown button. than choose products and show data. Its giving me the old data. The database is not been reset or reloaded.
I found a workaround: Update the data sheet with your query than save close the file open the file and than update drop down.
Now you have the full functionality
Hi Vijay,
Can you provide me the VBA code to read from multilpe excel files to a single excel sheet
Thanks,
Binu
Hi Vijay,
Thanks for sharing this work with us novices.
I have modifed the combo box names to suit my data table but get run-time error, type mismatch when update dropdowns button is pressed.
Private Sub cmdUpdateDropDowns_Click()
strSQL = “Select Distinct [Card] From [data$] Order by [Card]”
closeRS
OpenDB
cmbCard.Clear
rs.Open strSQL, cnn, adOpenKeyset, adLockOptimistic
If rs.RecordCount > 0 Then
Do While Not rs.EOF
cmbCard.AddItem rs.Fields(0)
rs.MoveNext
Loop
Else
MsgBox “I was not able to find any unique Card.”, vbCritical + vbOKOnly
Exit Sub
End If
Dear Vijay,
Really helps me a lot with this.
Could you help me how to add code for Manipulating Headings of Data.
What I was trying to achieve is aside from the sample data$ (say sheet1), I need to display datas from sheet2. The content and headings are not exactly the same.
In shot I need code to manipulate Headings from data that I was trying to view.
A new version of Excel Database Tasks V2 has been released : please see blog
http://leansoftware.net/forum/en-us/blog.aspx
Regards
Thank You very very very very very very very very very very very very very Muchhhhhhhhhhhhhhhhhhhhhhhhhhhhhhhhhhhhhhhhhh
its really excellent
You are the best. I get so much out of your examples and explanations. I plan on signing up for your training in the next few months. But first I need some help for I project I a m working on. I have data tables in different tabs within the same workbook. How do I use VBA or other tools to get them to export the tabs as Access tables without leaving Excel? Assume no Access tables exist and that I have two scenarios for storing the Access tables:
1) I do this every month and want to keep the monthly access tables seperate.
2) I do this every month and want to update the same table.
Thanks.
Hi Jijay,
I have learn so much from your demo file- Excel as Datase. I have motified the vba code to fit my dataset for my work. However, I run to the problem when I try to save the file after clicking the “Show Data” button. Its give me the same error “Your changes could not be saved to ‘Excel_As Database-demo-v1.xlsm” because of a sharing violation. Try saving to a different file. ” I have seen other viewers post the same issue but have not found a solution be posted yet. Please advise how I can fix the problem? Thank you.
Hello everyone,
Thank you for this method!
Any answer regarding Louis’s issue (posted on Sept 9th 2012).
I encounter the same pb (run time error 13 – type mismatch).
Best regards
@Cho07tom and Louis, Please look for blank records in the column that you are getting as a result of the SQL query, this is causing the issue. Please try the below code
    strSQL = "Select Distinct [Product] From [data$] Order by [Product]"

    closeRS

    OpenDB

    cmbProducts.Clear


    rs.Open strSQL, cnn, adOpenKeyset, adLockOptimistic

    If rs.RecordCount > 0 Then

        Do While Not rs.EOF

            If Not IsNull(rs.Fields(0)) Then cmbProducts.AddItem rs.Fields(0)

            rs.MoveNext

        Loop

    Else

        MsgBox "I was not able to find any unique Products.", vbCritical + vbOKOnly

        Exit Sub

    End If
Let me know if you need any further assistance.
~VijaySharma
Hello Vijay,
It perfectly works!
Many thanks for your help.
Regards,
cho7tom
I keep getting the error ODBC does not support the requested parametes error -2147217887 at the line
rs.Open strSQL, cnn, adOpenKeyset, adLockOptimistic
Am trying to use this method in my workbook.
The example book works fine.
When I change to my own book, however, I get a 446 when it is executing the cnn.ConnectionString line in the OPENDB sub.
I have selected the activeX library in the references.
Any ideas ?
Please ignore the post I made – it is resolved now.
Using SQL in Excel – how do I address the columns in a sheet without giving each column a name ?
For example, I need to select the 3rd and 4th columns of a sheet and do not want to give them a name ( as the sheets are from read-only work books which do not have named columns )
I have tried “Select c,d…” which does not work.
@Old Fogey,
In that case the first row is treated as column headings.
~VijaySharma
I see a lot of people saying Excel shouldn’t be used as a DB yet they never say why. To me, it seems they just want to keep DB administration so complex that it becomes necessary to keep a DB admin on staff. Excel, is understood by a larger group of people and is more approachable.
Access sometimes creates unnecessary duplication with multiple references spread out on multiple tables whereas with Excel, a simple common reference allows for a leaner DB.
So, good on you Vijay to put forward that Excel can be used as a DB. As long as you can archive rarely used data and then have ability to retreive it, there shouldn’t be a problem.
Well, one reason to use Excel as a database is when your “user” bought a Home and Student version of Office. They don’t have Access to use as a database because it’s not included. I can’t tell someone to buy Access because they may not have the financial means to do so. So for a very, very simple and small database system (about 1500 records) Excel will do. It’s not as convenient as Access, but nevertheless useful….
I am a non-computer background, am doing a research in medical(microbiology), i need a simple database with excel back end, can u send the details… my requirement is receiving sample and entering to the database with id number & date, oftenly i have to check with id number whether the id number received or not.
Sounds like you meant to say a simple database with excel Front End.
that said, if you have a small data set, you could just use an excel table (let’s call it TableMyMicrobeData to hold the data, and your charts or whatever (pivot tables?) would use as the source.
Otherwise, since it sounds like you have office, you could use an access database and a data connection via MSQuery in excel. both have enough “visual” tools, you could complete your database-excel report without writing any code at all.
Please Vijay,
can u be a little more step by step, as like in other tutorials on this site.
i am totally new to this SQL thing and whenever u try to make new database, as u did, or modify ur database, i am getting errors.
jst need steps as how to modify basic names and if some1 want to add 1 more filter/search box
thank you.
Hi,
just to let you know Excel-to-database has become ‘Excel Database Task’s (EDT) and allows very easy Data Edit of a database Table from Excel.
Please see blog for new features:
http://leansoftware.net/forum/en-us/blog.aspx
Shortly to include drop down lists for relational data.
Thank you for the interest
Hi Chandoo,
I am new to totally new to VBA or any programming for that matter,
I am using Excel to do my Quotes and Invoices. In the same workbook, I want to start a database to show a history of quotes for the month/year, without losing any data. I would also like to possibly add a macro for when I print my quote, to only save the Quotation worksheet and not the whole file, but also update the database automatically.
The Database could also be used to pull information for invoicing purposes.
Would you require me to send through my workbook so you can get a better understanding of what I am talking about.
How would I go about doing this?
Your help will really be appreciated, Thanks.
Can i buy a template for this ss?
I have tried to create it, starting on the VBA and Macros stuff but couldnt even make a cell go red for some reason.
Thanks
Awesome Job. I have question.
in View sheet.
When it putts data on sheet starting from row 12.
What is the easiest way to Sort by column I then G.
Thanks a lot for sharing.
Hi
My English is not my database. And therefore all its characters? Appear. What can I do?
plz
help me….
My English is not my database. And therefore all its characters? Appear. What can I do?
Is there any way to handle nulls within a SQL statement in Excel VBA ? It does not recognize the nz() function
Love this! In many of our systems and reports, we work with an OLAP database called Cognos TM1. Excel and TM1 Excel formulas are really the most common interface to that database.
Because of that and the fact that most of our work ends up being in Excel pages itself anyway, I can really see using this Excel as a Database functionality becoming really useful for so many posibilities. This also will finally allow us not to bring in yet a third application platform like Access or Oracle in our Excel Datamarts.
I undersood the logic of connecting the sheets but i didnt understand how to build the second sheet i.e. view sheet…….
Please help me in building the second sheet…….. i have written the code as you said in this post but unable to get the file as u r showing in thi spost…
how to get the view part…….
Thanks for this nice tutorial.
Hope you don’t mind if I make some remarks.
I would highly recommend:
1. NO need of a module and above all NO PUBLIC variables, if there is another workbook with the same variables you’ll get an error!
Move your code from ‘module1’ to the sheet ‘View’ and declare the variable like this:
Option Explicit
Dim cnn As ADODB.Connection’ or Private…
Dim rs As ADODB.Recordset
Dim strSQL As String ‘ could be repeated at Procedure level…
2.Other changes:
Private Sub OpenDB()
Set cnn = New ADODB.Connection
Private Sub cmdShowData_Click()
Set rs = New ADODB.Recordset
Each time you open a recordset, disconnect it. How many instances of the connection do you create???
rs.Open strSQL, cnn, adOpenKeyset, adLockOptimistic
Set cnn = Nothing ‘ disconnect the recordset and dispose the connection
At each place where you exit a sub, dispose the recordset!
Set rs = Nothing ‘dispose the recordset
Exit Sub
Start using a discipline in programming that follows the OOP rules…
Hope it helps,
Best Wishes,
Bernard
Another point:
You will see that the format is not the same, no $ sign after a few rows, different alignment…
This will help:
‘Now putting the data on the sheet
ActiveCell.CopyFromRecordset rs
‘Add this to have the same format
With Range(“dataSet”)
.Select
.Copy
End With
Range(Selection, Selection.End(xlDown)).PasteSpecial (xlPasteFormats)
Application.CutCopyMode = False’ clear the clipboard
Range(“dataSet”).Select
Best Wishes,
Garouda.
Well, I fear some people may get confused. I prefer to give the whole code here.
remark: remove module1
Option ExplicitDim cnn As ADODB.Connection
Dim rs As ADODB.Recordset
Dim strSQL As String
Private Sub OpenDB()
Set cnn = New ADODB.Connection
If cnn.State = adStateOpen Then cnn.Close
cnn.ConnectionString = "Driver={Microsoft Excel Driver (*.xls, *.xlsx, *.xlsm, *.xlsb)};DBQ=" & _
ActiveWorkbook.Path & Application.PathSeparator & ActiveWorkbook.Name
cnn.Open
End Sub
Private Sub cmdReset_Click()
'clear the data
cmbProducts.Clear
cmbCustomerType.Clear
cmbRegion.Clear
Sheets("View").Visible = True
Sheets("View").Select
Range("dataSet").Select
Range(Selection, Selection.End(xlDown)).ClearContents
End Sub
Private Sub cmdShowData_Click()
Set rs = New ADODB.Recordset
'populate data
strSQL = "SELECT * FROM [data$] WHERE "
If cmbProducts.Text "" Then
strSQL = strSQL & " [Product]='" & cmbProducts.Text & "'"
End If
If cmbRegion.Text "" Then
If cmbProducts.Text "" Then
strSQL = strSQL & " AND [Region]='" & cmbRegion.Text & "'"
Else
strSQL = strSQL & " [Region]='" & cmbRegion.Text & "'"
End If
End If
If cmbCustomerType.Text "" Then
If cmbProducts.Text "" Or cmbRegion.Text "" Then
strSQL = strSQL & " AND [Customer Type]='" & cmbCustomerType.Text & "'"
Else
strSQL = strSQL & " [Customer Type]='" & cmbCustomerType.Text & "'"
End If
End If
If cmbProducts.Text "" Or cmbRegion.Text "" Or cmbCustomerType.Text "" Then
'now extract data
OpenDB
rs.Open strSQL, cnn, adOpenKeyset, adLockOptimistic
Set cnn = Nothing
If rs.RecordCount > 0 Then
Sheets("View").Visible = True
Sheets("View").Select
Range("dataSet").Select
Range(Selection, Selection.End(xlDown)).ClearContents
'Now putting the data on the sheet
ActiveCell.CopyFromRecordset rs
With Range("dataSet")
.Select
.Copy
End With
Range(Selection, Selection.End(xlDown)).PasteSpecial (xlPasteFormats)
Application.CutCopyMode = False
Range("dataSet").Select
Else
MsgBox "I was not able to find any matching records.", vbExclamation + vbOKOnly
Set rs = Nothing
Exit Sub
End If
'Now getting the totals using Query
If cmbProducts.Text "" And cmbRegion.Text "" And cmbCustomerType.Text "" Then
strSQL = "SELECT Count([data$].[Call ID]) AS [CountOfCall ID], [data$].[Resolved] " & _
" FROM [Data$] WHERE ((([Data$].[Product]) = '" & cmbProducts.Text & "' ) And " & _
" (([Data$].[Region]) = '" & cmbRegion.Text & "' ) And (([Data$].[Customer Type]) = '" & cmbCustomerType.Text & "' )) " & _
" GROUP BY [data$].[Resolved];"
OpenDB
rs.Close
rs.Open strSQL, cnn, adOpenKeyset, adLockOptimistic
Set cnn = Nothing
If rs.RecordCount > 0 Then
Range("L6").CopyFromRecordset rs
Else
Range("L6:M7").Clear
MsgBox "There was some issue getting the totals.", vbExclamation + vbOKOnly
Set rs = Nothing
Exit Sub
End If
End If
End If
rs.Close
Set rs = Nothing
End Sub
Private Sub cmdUpdateDropDowns_Click()
strSQL = "Select Distinct [Product] From [data$] Order by [Product]"
OpenDB
cmbProducts.Clear
Set rs = New ADODB.Recordset
rs.Open strSQL, cnn, adOpenKeyset, adLockOptimistic
Set cnn = Nothing
If rs.RecordCount > 0 Then
Do While Not rs.EOF
cmbProducts.AddItem rs.Fields(0)
rs.MoveNext
Loop
Else
MsgBox "I was not able to find any unique Products.", vbCritical + vbOKOnly
Set rs = Nothing
Exit Sub
End If
'----------------------------
strSQL = "Select Distinct [Region] From [data$] Order by [Region]"
OpenDB
cmbRegion.Clear
rs.Close
rs.Open strSQL, cnn, adOpenKeyset, adLockOptimistic
Set cnn = Nothing
If rs.RecordCount > 0 Then
Do While Not rs.EOF
cmbRegion.AddItem rs.Fields(0)
rs.MoveNext
Loop
Else
MsgBox "I was not able to find any unique Region(s).", vbCritical + vbOKOnly
Set rs = Nothing
Exit Sub
End If
'----------------------
strSQL = "Select Distinct [Customer Type] From [data$] Order by [Customer Type]"
OpenDB
cmbCustomerType.Clear
rs.Close
rs.Open strSQL, cnn, adOpenKeyset, adLockOptimistic
Set cnn = Nothing
If rs.RecordCount > 0 Then
Do While Not rs.EOF
cmbCustomerType.AddItem rs.Fields(0)
rs.MoveNext
Loop
Else
MsgBox "I was not able to find any unique Customer Type(s).", vbCritical + vbOKOnly
Set rs = Nothing
Exit Sub
End If
rs.Close
Set rs = Nothing
End Sub
Best Wishes,
Garouda
I noticed another potential issue.
The combo boxes are set as 0-fmStyleDropDownCombo.
Look at Properties, Style, in Design Mode…
This enables the user to add some item in the combo.
I would rewrite the Reset code like this:
Private Sub cmdReset_Click()'clear the data
cmbProducts.Clear
cmbProducts.Text = vbNullString' in case a user wrote something
cmbCustomerType.Clear
cmbCustomerType.Text = vbNullString
cmbRegion.Clear
cmbRegion.Text = vbNullString
Sheets("View").Visible = True
Sheets("View").Select
Range("dataSet").Select
Range(Selection, Selection.End(xlDown)).ClearContents
Me.[C4].Select ' no visible selection
End Sub
Best Wishes,
Garouda
Hey Garouda Hanouman ,
Would you please please explain as to what is ME.[C4].SELECT
Thanks a lot in advance
Is there a way to solve the issue that prevents saving. I get a sharing violation if I try to save the file after making changes. Should I implement the database based on the comments from Garouda?
Garouda, your code worked and I can now save the file.
Thanks for posting it.
Hi Colin,
One possible reason is that the file is ‘read only’. What you have to do is to save it under another name.
!One little change in the code: to avoid any problem, it would be better to replace
rs.close
by
If rs.State = adStateOpen Then rs.Close
at the end of the procedure
cmdShowData_Click
Indeed, if you do not select anything and click on the command button Show Data, it’ll generate an error.
Basically the program should have some safety features to prevent this.
I’ll made some changes in order to take that into account…
Another remark, I never declare variables at module level if I can avoid it. Declare them at procedure level each time you can. You will see that I send the connection to the OpenDB procedure By Reference ByRef.
There are two possibilities: ByVal or ByRef, ByRef is the default value in VBA and VB6, not in VB.Net anymore. In this case, only ByRef is possible. ByVal sends a copy of the variable to a procedure or a function where ByRef works like a pointer in C or C++. ByRef tells the programme where to find the object in the computer memory…
I’m going to copy the whole modified code again in a next post.
Try to click on ‘Show Data’ in my previous code, without selecting anything, and try it with the new code.
Cheers,
Garouda
Here the modified code, more bullet proof…
Cheers,
Garouda
Do not forget to remove Module1 and replace the code in the sheet ‘View’ with this one:
Option ExplicitDim niFlag As Integer
Private Sub OpenDB(ByRef cnn As ADODB.Connection)
'note the change between brackets ByRef cnn As...
cnn.ConnectionString = "Driver={Microsoft Excel Driver (*.xls, *.xlsx, *.xlsm, *.xlsb)};DBQ=" & _
ActiveWorkbook.Path & Application.PathSeparator & ActiveWorkbook.Name
cnn.Open
End Sub
Private Sub cmdReset_Click()
'clear the data
cmbProducts.Clear
cmbProducts.Text = vbNullString
cmbCustomerType.Clear
cmbCustomerType.Text = vbNullString
cmbRegion.Clear
cmbRegion.Text = vbNullString
Sheets("View").Visible = True
Sheets("View").Select
Range("dataSet").Select
Range(Selection, Selection.End(xlDown)).ClearContents
Me.[C4].Select ' more professional: the active cell is hidden...
niFlag = 0
End Sub
Private Sub cmdShowData_Click()
'it's always better to declare such variables at procedure level
Dim strSQL As String
Dim cnn As ADODB.Connection
Dim rs As ADODB.Recordset
If niFlag = 0 Then
MsgBox "Please populate the lists first - click on Update Drop Downs!", vbOKOnly + vbExclamation, "Excel and ADODB"
Exit Sub
End If
If cmbProducts.Text = vbNullString And cmbCustomerType.Text = vbNullString And cmbRegion = vbNullString Then
MsgBox "Select at least one item!", vbOKOnly + vbExclamation, "Excel and ADODB"
Exit Sub
End If
Application.ScreenUpdating = False
'create a new instance of the recordset
Set rs = New ADODB.Recordset
'populate data
strSQL = "SELECT * FROM [data$] WHERE "
If cmbProducts.Text "" Then
strSQL = strSQL & " [Product]='" & cmbProducts.Text & "'"
End If
If cmbRegion.Text "" Then
If cmbProducts.Text "" Then
strSQL = strSQL & " AND [Region]='" & cmbRegion.Text & "'"
Else
strSQL = strSQL & " [Region]='" & cmbRegion.Text & "'"
End If
End If
If cmbCustomerType.Text "" Then
If cmbProducts.Text "" Or cmbRegion.Text "" Then
strSQL = strSQL & " AND [Customer Type]='" & cmbCustomerType.Text & "'"
Else
strSQL = strSQL & " [Customer Type]='" & cmbCustomerType.Text & "'"
End If
End If
If cmbProducts.Text "" Or cmbRegion.Text "" Or cmbCustomerType.Text "" Then
'now extract data
'create a new instance of the connection
Set cnn = New ADODB.Connection
'note that we have to add cnn
OpenDB cnn
'create the recordset
rs.Open strSQL, cnn, adOpenKeyset, adLockOptimistic
'dispose the connection and disconnect the recordset
Set cnn = Nothing
'DO NOT close the connection here as it'll close the recordset as well
If rs.RecordCount > 0 Then
Sheets("View").Visible = True
Sheets("View").Select
Range("dataSet").Select
Range(Selection, Selection.End(xlDown)).ClearContents
'Now putting the data on the sheet
ActiveCell.CopyFromRecordset rs
With Range("dataSet")
.Select
.Copy
End With
Range(Selection, Selection.End(xlDown)).PasteSpecial (xlPasteFormats)
Application.CutCopyMode = False
Me.[C4].Select
Else
MsgBox "I was not able to find any matching records.", vbExclamation + vbOKOnly
Set rs = Nothing
Exit Sub
End If
'Now getting the totals using Query
If cmbProducts.Text "" And cmbRegion.Text "" And cmbCustomerType.Text "" Then
strSQL = "SELECT Count([data$].[Call ID]) AS [CountOfCall ID], [data$].[Resolved] " & _
" FROM [Data$] WHERE ((([Data$].[Product]) = '" & cmbProducts.Text & "' ) And " & _
" (([Data$].[Region]) = '" & cmbRegion.Text & "' ) And (([Data$].[Customer Type]) = '" & cmbCustomerType.Text & "' )) " & _
" GROUP BY [data$].[Resolved];"
Set cnn = New ADODB.Connection
OpenDB cnn
rs.Close
rs.Open strSQL, cnn, adOpenKeyset, adLockOptimistic
Set cnn = Nothing
If rs.RecordCount > 0 Then
Range("L6").CopyFromRecordset rs
Else
Range("L6:M7").Clear
MsgBox "There was some issue getting the totals.", vbExclamation + vbOKOnly
Set rs = Nothing
Exit Sub
End If
End If
End If
rs.Close
Set rs = Nothing
Application.ScreenUpdating = True
End Sub
Private Sub cmdUpdateDropDowns_Click()
Dim strSQL As String
Dim cnn As ADODB.Connection
Dim rs As ADODB.Recordset
niFlag = 1
strSQL = "Select Distinct [Product] From [data$] Order by [Product]"
Set cnn = New ADODB.Connection
OpenDB cnn
cmbProducts.Clear
Set rs = New ADODB.Recordset
rs.Open strSQL, cnn, adOpenKeyset, adLockOptimistic
Set cnn = Nothing
If rs.RecordCount > 0 Then
Do While Not rs.EOF
cmbProducts.AddItem rs.Fields(0)
rs.MoveNext
Loop
Else
MsgBox "I was not able to find any unique Products.", vbCritical + vbOKOnly
Set rs = Nothing
Exit Sub
End If
strSQL = "Select Distinct [Region] From [data$] Order by [Region]"
Set cnn = New ADODB.Connection
OpenDB cnn
cmbRegion.Clear
rs.Close
rs.Open strSQL, cnn, adOpenKeyset, adLockOptimistic
Set cnn = Nothing
If rs.RecordCount > 0 Then
Do While Not rs.EOF
cmbRegion.AddItem rs.Fields(0)
rs.MoveNext
Loop
Else
MsgBox "I was not able to find any unique Region(s).", vbCritical + vbOKOnly
Set rs = Nothing
Exit Sub
End If
'----------------------
strSQL = "Select Distinct [Customer Type] From [data$] Order by [Customer Type]"
Set cnn = New ADODB.Connection
OpenDB cnn
cmbCustomerType.Clear
rs.Close
rs.Open strSQL, cnn, adOpenKeyset, adLockOptimistic
Set cnn = Nothing
If rs.RecordCount > 0 Then
Do While Not rs.EOF
cmbCustomerType.AddItem rs.Fields(0)
rs.MoveNext
Loop
Else
MsgBox "I was not able to find any unique Customer Type(s).", vbCritical + vbOKOnly
Set rs = Nothing
Exit Sub
End If
If rs.State = adStateOpen Then rs.Close
Set rs = Nothing
End Sub
Garouda, Vijay, et al…
Funtionality with “bullet proof” code mod works great with updating multiple combo boxes with independent criteria. Unfortunately, I’m having a bit of dificulty trying to use the base code to sequentially update the combo boxes using criteria from the previously updated box.
My code:
‘———————————————–
Option Explicit

Dim niFlag As Integer
Private Sub OpenDB(ByRef cnn As ADODB.Connection)
cnn.ConnectionString = “Driver={Microsoft Excel Driver (*.xls, *.xlsx, *.xlsm, *.xlsb)};DBQ=” & _
ActiveWorkbook.Path & Application.PathSeparator & ActiveWorkbook.Name
cnn.Open
End Sub
Private Sub Worksheet_SelectionChange(ByVal Target As Range)
End Sub
Private Sub Worksheet_Activate()
Dim strSQL As String
Dim cnn As ADODB.Connection
Dim rs As ADODB.Recordset
niFlag = 1
strSQL = “Select Distinct [CMD] From [data$] Order by [CMD]”
Set cnn = New ADODB.Connection
OpenDB cnn
Me.Cmb_CMD.Clear
Set rs = New ADODB.Recordset
rs.Open strSQL, cnn, adOpenKeyset, adLockOptimistic
Set cnn = Nothing
If rs.RecordCount > 0 Then
Do While Not rs.EOF
Me.Cmb_CMD.AddItem rs.Fields(0)
rs.MoveNext
Loop
Else
MsgBox “I was not able to identify Regional Medical Commands.”, vbCritical + vbOKOnly
Set rs = Nothing
Exit Sub
End If
End Sub
Private Sub Cmb_CMD_Change()
Dim strSQL As String
Dim cnn As ADODB.Connection
Dim rs As ADODB.Recordset
niFlag = 1
strSQL = “Select Distinct [MTF] From [data$] Where [CMD] = ‘” & Cmb_CMD.Text & “‘ Order by [MTF]”
Set cnn = New ADODB.Connection
OpenDB cnn
Me.Cmb_MTF.Clear
Set rs = New ADODB.Recordset
rs.Open strSQL, cnn, adOpenKeyset, adLockOptimistic
Set cnn = Nothing
If rs.RecordCount > 0 Then
Do While Not rs.EOF
Me.Cmb_MTF.AddItem rs.Fields(0)
rs.MoveNext
Loop
Else
MsgBox “I was not able to identify Parent MTF(s).”, vbCritical + vbOKOnly
Set rs = Nothing
Exit Sub
End If
End Sub
‘——————————————-
The “Private Sub Worksheet_Activate()” operation is flawless. When I make a selection in the “Cmb_CMD” box, the “Private Sub Cmb_CMD_Change()” operation errors out with a “Run-time error ‘-2147217887 (80040e21)’: ODBC driver does not support the requested properties.” on the “rs.Open strSQL, cnn, adOpenKeyset, adLockOptimistic” line.
¿Qué pasa con eso?
Michael did you got any solution to this code/Run-time error, if yes could you pls share it to me.
Hi Amit,
I am stuck in combine two tables ” TableA and TableB”
I am trying select * from [TableA$] A,[TableB] B where A.id=B.id
Is this a right way..?
Needs to make littlle correction in source in case if you need to see all data: strSQL = “SELECT * FROM [data$] WHERE ” instead use
strSQL = “SELECT * FROM [data$]” and move where to if statement
change.
Plus it adds no value to excel filter.
This may be used when OR,Join functionality is needed from database.but MSquery muchmore dynamic and less cumbersome.
Exactly what part of the if statement does the WHERE go.
This is a great article as always and I think it could really help with a regular report I need to setup in work. Could you help by telling me how I could add a second table and link both using a unique identifier?
hi Chandoo,
Many thanks for your efforts.
i use this cods in my project but i got a error when want to update combo boxes value Type mismatch as below:
Private Sub cmdUpdate_Click()
‘—————————-Updating Consignee Filds
strSQL = “Select Distinct [Client] From [data$] Order by [Client]”
closeRS
OpenDB
cmbConsignee.Clear
rs.Open strSQL, cnn, adOpenKeyset, adLockOptimistic
If rs.RecordCount > 0 Then
Do While Not rs.EOF
cmbConsignee.AddItem rs.Fields(0) ==> type mismatche
rs.MoveNext
Loop
Else
MsgBox “I was not able to find any unique Consignee.”, vbCritical + vbOKOnly
Exit Sub
End If
.
.
.
dear Garouda Hanouman ,
your last Cod don’t work i got error for line:
If cmbProducts.Text “” Then”
compiler error
syntax error
pls advise…
Fantastic tutorial
@Garouda Hanouman
I also have the same error with your alternative code when populating data:
If cmbProducts.Text “” Then
I fixed it….
Code was missing operators. It should read….
If cmbProducts.Text “” Then
I still have an error when populating data:
If cmbProducts.Text “” Then
again me!!
i just received below error can anyone help me to sorted it out?
[Microsoft][ODBC Excel Drive] the connection for viewing your linked Microsoft Excel worksheet was lost.
thanks.
hi guys
all my last problem was sorted out now just have a question:
how we could show some of data on dataset on sheet view not all of data?
Hey Mohammad ,
could you please tell me , how did you manage to solve the Update dropdown problem ?
HI ALL
please help me how i could chose data between 2 date or after a date or before a date ?
thanks
strSQL = “SELECT * FROM [data$] WHERE [Date Time] BETWEEN DateValue(‘” & sDate1 & “‘)” & ” AND DateValue(‘” & sDate2 & “‘) AND [Product]='” & Me.cmbProducts.Text & “‘ AND [Region]='” & Me.cmbRegion.Text & “‘” AND [Customer Type]='” & Me.cmbCustomerType.Text & “‘;”
Hi,
I still find no difference between this demo of filtering and the normal filtering in excel, DATA > Filter. you get the same results, just in a different worksheet.
Can somone explain this to me please?
anybody can resolve my problem. i have a sheet and use filter on 6 rows out of 15 rows. in column a use some formula. but when i open the filter A cells amount will change .
my query is how to copy the filterd cell data and paste in same cells.
column A formula used subtotal(3,b$2:b2)
A B C
no. id count if
1 IN-1000048 1
2 IN-1000055 1
IN-1000056 3
IN-1000056 2
5 IN-1000056 1
IN-1000057 2
7 IN-1000057 1
8 IN-1000103 1
IN-1000157 3
IN-1000157 2
11 IN-1000157 1
IN-1000164 3
IN-1000164 2
14 IN-1000164 1
IN-1000182 2
16 IN-1000182 1
IN-1000215 2
18 IN-1000215 1
IN-1000240 2
20 IN-1000240 1
AFTER FILTER
A B C
no. id count if
1 IN-1000048 1
2 IN-1000055 1
3 IN-1000056 1
4 IN-1000057 1
5 IN-1000103 1
6 IN-1000157 1
7 IN-1000164 1
8 IN-1000182 1
9 IN-1000215 1
10 IN-1000240 1
PLEASE RESOLVE MY QUERY THANKS
Hi.
I’m having some problems with the code, I think it’s because i’m sitting on a Windows Server (2003). When i’m trying to update the Drop Down list i get this Error code (Can’t find project or library)
I also found out that i’m missig the:
Microsoft ActiveX Data Objects 6.0 Library, the latest version i have is
Microsoft ActiveX Data Objects 2.7 Library.
is it possible to make the code work?
I solved it.
i forgot to uncheck the:
MISSING: Microsoft ActiveX Data Objects 6.0 Library
before i checked the
Microsoft ActiveX Data Objects 2.7 Library.
When I open the document to play around, it says that there is an error and needs to be de-bugged. Anyone know why the link is not working or what could be done to fix it?
Thanks!
HI.
how is ADOB , Delet ,update , insert support ?
Vijay,
Just ran across your article and found it interesting. A few months back I had a situation that forced me to “learn by trying” the same basic technique. I have data in spreadsheets (very large – on the order of 90,000 rows). Needed to do some data conversions on some of the columns via a separate lookup spreadsheet (e.g. lookup ‘Business Unit’ in the big spreadsheet and create a column called ‘Dashboard Org’ based on a lookup table).
Because the source data has so many rows, using an excel formula (actually several as there were multiple lookup tables involved) caused the spreadsheet recalc time to go through the roof.
Solved the problem using the ODBC Excel driver and some basic SQL. Yes, you can use SQL against an Excel workbook. In fact, you can do all kinds of good things via the ODBC driver – outer joins against multiple workbooks, using SQL’s scalar functions, etc.
Here is an example of SQL that joins data from 5 different workbooks into a single worksheet:
SELECT IMDATA.*,
BU.[Dashboard Org],
BU.[New CU] AS “Customer Unit”,
BU.[New Business Unit] AS “Business Unit”,
AG.[Reporting Group]
FROM (( SELECT IM.*,
FORMAT(IM.[Create Date/Time], ‘YYYY-MM’) AS “Month Opened”,
FORMAT(IM.[Service Restored Date/Time], ‘YYYY-MM’) AS “Month Service Restored”,
IIF(IM.[Service Restored Date/Time] IS NULL, NULL,
DATEDIFF(‘s’, IM.[Create Date/Time], IM.[Service Restored Date/Time])/3600.0)
AS “Hrs To Service Restored”,
IIF(IM.[Service Restored Date/Time] IS NULL, NULL,
IM.[Total Duration Hours]-
IIF(IM.[Service Restored Hours] IS NULL, 0, IM.[Service Restored Hours])-
IIF(IM.[Suspend Hours] IS NULL, 0, IM.[Suspend Hours]))
AS “SLA Hours”,
LOCTBL.[New Business Unit] AS “Location BU”,
SEV1.BU AS “Sev 1 BU”,
SEV1.[Responsible Party],
SEV1.[Service Area],
SEV1.[WK Cause Code],
SEV1.[ProblemShortDescription],
IIF(SEV1.BU IS NULL,
IIF(IM.[CI BU] IS NULL,
IIF(LOCTBL.[New Business Unit] IS NULL,
‘Unknown’,
LOCTBL.[New Business Unit]),
IM.[CI BU]),
SEV1.BU)
AS “Selected BU”
FROM (( `C:\Users\DickByrne\Documents\ITO Customer Service\BU Metrics\BU Reports\2013-08\Source Data\Incidents – ODBC v2.xlsx`.`Incidents$` AS IM
LEFT OUTER JOIN `C:\Users\DickByrne\Documents\ITO Customer Service\BU Metrics\BU Reports\2013-08\Sev 1 3 year Trend Analysis.xlsm`.`Data$` AS SEV1
ON IM.[Incident ID] = SEV1.[Incident ID] )
LEFT OUTER JOIN `C:\Users\DickByrne\Documents\ITO Customer Service\BU Metrics\References\Div-CU-BU-Loc Name Mapping for 2013.xlsx`.`’Dell Location Codes$’` AS LOCTBL
ON IM.Location = LOCTBL.[Location-Name-+] )
) AS IMDATA
LEFT OUTER JOIN `C:\Users\DickByrne\Documents\ITO Customer Service\BU Metrics\References\Div-CU-BU-Loc Name Mapping for 2013.xlsx`.`’BU Lookup$’` AS BU
ON IMDATA.[Selected BU] = BU.[Original Business Unit] )
LEFT OUTER JOIN `C:\Users\DickByrne\Documents\ITO Customer Service\BU Metrics\References\Assignee Group Alignment.xlsx`.`’Assignee Group Mapping$’` AS AG
ON IMDATA.[Assignee Group] = AG.AssigneeGroup
WHERE (IMDATA.[Affected Item Name] NOT LIKE ‘Update%’) AND (IMDATA.[Severity Number] <= 4)
Pretty cool stuff!
Hello Vijay,
Thanks for posting this article. After reading this article, I successfully developed an excel based tool using ADO to analyse customer issues. I very much appreciate your time and efforts in writing the article and more importantly sharing the code in the Excel file.
This site is great. Great work! keep it up!!
Anand
After looking at this article I have pondered the idea of storing the data in Access as a table then using Excel to extract the data as selected instead of building queries and reports in Access.
I already have a macro that pulls data from Access and places it into Excel. All I would have to do is modify a little.
Thoughts, ideas?
hi
I received below error:
Run-time error ‘-2 147217906 (80040e0e)’:
[Microsoft] [ODBC Excel Driver]Invalid bookmark
and below line be highlighted:
ActiveCell.CopyFromRecordset rs
pls anyone help me to fix it.
This is an awsome article. This has solved many problems with out using access.
Thanks a lot
Hi, I have gone through your code and application, it is really a great help!
I am trying to develop a application using the sql query where I need to execute the update query, but I am unable to execute the query,
My query is like as below,
strSQL = “UPDATE location_details$ SET [location_details$].[SCANR_ID]='” & scanr_id & “‘, [location_details$].[SCAN_CAPACTY]='” & scanr_capacty & “‘ WHERE location_details$.[LOC_ID]='” & locId & “‘ AND location_details$.[REG_ID]='” & region & “‘”
But I am getting some error like,
a) syntax error in UPDATE statement
b) How I will execute the update or insert query
please help me.
Thanks in Advance
I tried this and am getting a (run time error) the below error on line
Range(“dataSet”).Select
not sure what i am missing. any help will be much apreciated
can one of you help me resolve this?
Run-time error ‘1004’
method ‘Range’of object’_Worksheet’ failed
Cheers
Chris
I used your code, but modified the OpenDB function to read from a separate data file workbook. Code worked great BUT…..
After the code runs, i close the connections (by calling the cnn and rs Close() functions) and then set both variables to nothing.
After that, if I go to the data file and try to open it, i get the ‘File In Use’ message and it says i can only open s Read Only. It appears that Excel thinks the data file is still in use, even though I’ve closed the connections.
Any thoughts or help?
can you give an example of writing to the database (eg. using UPDATE sql command)??
Hi there,
We have created a new How-To page that explains in detail how to import data from Excel spreadsheets using the most robust technique in world!
http://leansoftware.net/forum/en-us/help/excel-database-tasks/worked-examples/how-to-import-excel-spreadsheet-to-sql-server-data.aspx
Richard
I have question here is with two columns one is Product and another is region and as far as data in both columns is concerned is basically Region and Product. For e.g. In Product column i have country names like Accessories, Desktop, Laptop and Misc and against same Product names I have region as East in Region column.
What I want : In combo box I want to populate region names (which is already done and works fine) and in 2nd combo box I want to populate Product names on the basis of region selection. for e.g. If I select region as East in my Combo box then my 2 combo box should get populated with only Product .i.e Desktop, Laptop, Misc.
Dear Vijay,
I encountered some errors. When i click “Update Dropdown List”, error message pops up saying: “[Microsoft][ODBC Excel Driver] Too few parameters. Expected 1” and highlighted (rs.Open strSQL, cnn, adOpenKeyset, adLockOptimistic). Please help me with this problem. Here is my code.
strSQL = “Select Distinct [Classification] From [BookDatabase$] Order by [Classification]”
closeRS
OpenDB
cboSearch.Clear
rs.Open strSQL, cnn, adOpenKeyset, adLockOptimistic
If rs.RecordCount > 0 Then
Do While Not rs.EOF
cboSearch.AddItem rs.Fields(0)
rs.MoveNext
Loop
Else
MsgBox “Can’t find unique classification.”, vbCritical + vbOKOnly
Exit Sub
End If
I also had the sharing violation error on my Windows 7 64 bit, but I have solved it by changing the database reference from MSDASQL to Jet:
‘ NEW WAY to connect:
Public Sub open_db()
close_db
Set cn = New ADODB.Connection
With cn
.Provider = “Microsoft.Jet.OLEDB.4.0”
.ConnectionString = “Data Source=” & ActiveWorkbook.FullName & “;Extended Properties=Excel 8.0;”
.Open
End With
End Sub
‘ BELOW IS THE *OLD* WAY (which generated the sharing violation)
Dim cn as ADODB.Connection
Set cn = New ADODB.Connection
With cn
.Provider = “MSDASQL”
.ConnectionString = “Driver={Microsoft Excel Driver (*.xls)};” & _
“DBQ=C:\MyFolder\MyWorkbook.xls; ReadOnly=False;”
.Open
End With
Hello,
I am new in VB, I can understand your program perfectly. I could not understand this dataset, could you please explain it to me?
Range(“dataSet”).Select
Thank you,
Raymond
Hi,
i work with this amazing feature now for a while. but to make things work even better i do bitwise searches on marked categories. however, i can not get this to work in excel..
the where part hangs:
“WHERE CAST([group_desc$].[category_id1] as UNSIGNED INTEGER) & 1 0;”
Any idea anyone? or is it just excel that does not like this.
Regards,
Rene
sorry,
missing the there..
Hi all,
Love the database. Was able to moody it to suit my needs, but the workbook bloated into 33MB file size and runs slow, any suggestions?
Public cnn As New ADODB.Connection
You can use excel as front end application and as well as Database.
Inserting new records, updating existing new records and data query as done from an application is very well possible in excel with vba and sql combined commands.
I have created very good Data entry applications using excel as frontend and database
Regards
Sakthi
I wonder if someone could help me.
I am using SQL to query an Excel table to produce another table. Everything is fine, except there are two columns that have data, but will always be empty in the result set. One of the columns is text, the other has a value from a Data Validation list. There are several other columns with these characteristics that are returned just fine in the record set.
Any help would be greatly appreciated.
Thank you,
Rod
This is a perfect example. I will look at this sample. Thanks for a good work. This is what I have been looking for.
I keep getting the error ODBC does not support the requested parametes error -2147217887 at the line excel
rs.Open strSQL, cnn, adOpenKeyset, adLockOptimistic
I keep getting the error ODBC does not support the requested parametes error -2147217887 at line
rs.Open strSQL, cnn, adOpenKeyset, adLockOptimistic
the full code is
Private Sub cmdReset_Click()
‘clear the data
cmbProducts.Clear
cmbCustomerType.Clear
cmbRegion.Clear
Sheets(“View”).Visible = True
Sheets(“View”).Select
Range(“dataSet”).Select
Range(Selection, Selection.End(xlDown)).ClearContents
End Sub
Private Sub cmdShowData_Click()
‘populate data
strSQL = “SELECT * FROM [data$] WHERE ”
If cmbProducts.Text “” Then
strSQL = strSQL & ” [Product]='” & cmbProducts.Text & “‘”
End If
If cmbRegion.Text “” Then
If cmbProducts.Text “” Then
strSQL = strSQL & ” AND [Region]='” & cmbRegion.Text & “‘”
Else
strSQL = strSQL & ” [Region]='” & cmbRegion.Text & “‘”
End If
End If
If cmbCustomerType.Text “” Then
If cmbProducts.Text “” Or cmbRegion.Text “” Then
strSQL = strSQL & ” AND [Customer Type]='” & cmbCustomerType.Text & “‘”
Else
strSQL = strSQL & ” [Customer Type]='” & cmbCustomerType.Text & “‘”
End If
End If
If cmbProducts.Text “” Or cmbRegion.Text “” Or cmbCustomerType.Text “” Then
‘now extract data
closeRS
OpenDB
rs.Open strSQL, cnn, adOpenKeyset, adLockOptimistic
If rs.RecordCount > 0 Then
Sheets(“View”).Visible = True
Sheets(“View”).Select
Range(“dataSet”).Select
Range(Selection, Selection.End(xlDown)).ClearContents
‘Now putting the data on the sheet
ActiveCell.CopyFromRecordset rs
Else
MsgBox “I was not able to find any matching records.”, vbExclamation + vbOKOnly
Exit Sub
End If
‘Now getting the totals using Query
If cmbProducts.Text “” And cmbRegion.Text “” And cmbCustomerType.Text “” Then
strSQL = “SELECT Count([data$].[Call ID]) AS [CountOfCall ID], [data$].[Resolved] ” & _
” FROM [Data$] WHERE ((([Data$].[Product]) = ‘” & cmbProducts.Text & “‘ ) And ” & _
” (([Data$].[Region]) = ‘” & cmbRegion.Text & “‘ ) And (([Data$].[Customer Type]) = ‘” & cmbCustomerType.Text & “‘ )) ” & _
” GROUP BY [data$].[Resolved];”
closeRS
OpenDB
rs.Open strSQL, cnn, adOpenKeyset, adLockOptimistic
If rs.RecordCount > 0 Then
Range(“L6”).CopyFromRecordset rs
Else
Range(“L6:M7”).Clear
MsgBox “There was some issue getting the totals.”, vbExclamation + vbOKOnly
Exit Sub
End If
End If
End If
End Sub
Private Sub cmdUpdateDropDowns_Click()
strSQL = “Select Distinct [Product] From [data$] Order by [Product]”
closeRS
OpenDB
cmbProducts.Clear
rs.Open strSQL, cnn, adOpenKeyset, adLockOptimistic
If rs.RecordCount > 0 Then
Do While Not rs.EOF
If Not IsNull(rs.Fields(0)) Then cmbProducts.AddItem rs.Fields(0)
rs.MoveNext
Loop
Else
MsgBox “I was not able to find any unique Products.”, vbCritical + vbOKOnly
Exit Sub
End If
‘—————————-
strSQL = “Select Distinct [Region] From [data$] Order by [Region]”
closeRS
OpenDB
cmbRegion.Clear
rs.Open strSQL, cnn, adOpenKeyset, adLockOptimistic
If rs.RecordCount > 0 Then
Do While Not rs.EOF
If Not IsNull(rs.Fields(0)) Then cmbRegion.AddItem rs.Fields(0)
rs.MoveNext
Loop
Else
MsgBox “I was not able to find any unique Region(s).”, vbCritical + vbOKOnly
Exit Sub
End If
‘———————-
strSQL = “Select Distinct [Customer Type] From [data$] Order by [Customer Type]”
closeRS
OpenDB
cmbCustomerType.Clear
rs.Open strSQL, cnn, adOpenKeyset, adLockOptimistic
If rs.RecordCount > 0 Then
Do While Not rs.EOF
cmbCustomerType.AddItem rs.Fields(0)
rs.MoveNext
Loop
Else
MsgBox “I was not able to find any unique Customer Type(s).”, vbCritical + vbOKOnly
Exit Sub
End If
End Sub
Hello! I Wonder if there is a posibility to make the comboboxes dependent of each other. If you choose from the combobox Products, only Regions related to Products would show up in the combobox Regions and so on?
Hi! I think i’m wondering about the same thing as John. Is there a way of making the drop down boxes dependent of each other? For instance, when i choose a Region in the drop Down, only Products related to that region will show in the Products drop Down. If anybody had any ideas on how to do this, please share.
Best regards, a vba novice
Hi ,
this is awesome , i love this site.. lots of information.. mine is a very simple question , its probably answered , but I cannot find a direct resource..
I use Excel as a DB by creating query’s with ADO vba and pulling from the Dbase.
i am pretty new to access but familiar with EXCEL vba..
is there a way i can use the same query’s and transfer the data to a new database i want to create in ACESS. how do i go about it? can someone advise or forward somewhere i can refer this ?
I have a column in excel with values as number as well as string. The SQL query is somehow not fetching all the distinct records.. Can you help?
Select Distinct [Model] From [QueryData$] WHERE [Model] IS NOT NULL Order by [Model]
Thanks,
Thanks Vijay! I also want to use Excel as a database for users who do not have a separate database program available to them. Can you please read the following scenario and give me your thoughts? I want to write a COM Add-In which will be installed on each user’s machine and is used to read from and write to the single database workbook (which resides on the server). The add-in will contain a user form. When the user form is filled out, I click the “Add” button which invokes the code to copy the user form data, activate the database, add the record to the database, update my workbook from the database (adding my new record and all other changes since I last updated my workbook), and close the database. It should only take a few seconds, but what happens if two or more users try to add a record at the same time? Sharing is not an option. Can my add-in contain a contingency that tells it “if the database workbook is being accessed by another user, stop the process but keep trying to access it until it becomes available, then open it and continue the process”? Maybe replace the message box “Database.xlsx is locked for editing by another user” with “Updating Database”? In my scenario, the database workbook is the only element on the server. It will only be used for data storage and retrieval, with the results being displayed and manipulated in each user’s personal version of the workbook (residing on their own machine). Is this doable?
I guess I’m the only one. Well, in the future, if anyone else is trying to create an excel “database” on a shared drive, check out http://www.cpearson.com/excel/WaitForFileClose.htm
If someone else is accessing your “database” on the shared drive, this code keeps checking until the file to closed, then opens it, adds or retrieves data, saves and closes it. I found it very helpful.
“…this code keeps checking until the file IS closed…”
Hello Vijay,
i cant get this line of code to work.
I love this article that you wrote and am testing it.
Option Explicit
Public cnn As New ADODB.Connection
Public rs As New ADODB.Recordset
Public strSQL As String
Public Sub OpenDB()
If cnn.State = adStateOpen Then cnn.Close
cnn.ConnectionString = “Driver={Microsoft Excel Driver (*.xls, *.xlsx, *.xlsm, *.xlsb)};DBQ=” & _
ActiveWorkbook.Path & Application.PathSeparator & ActiveWorkbook.Name
cnn.Open
End Sub
Public Sub closeRS()
If rs.State = adStateOpen Then rs.Close
rs.CursorLocation = adUseClient
End Sub
Private Sub cmbtest_Click()
xcustno = Sheets(“View”).Range(“O14”).Value
closeRS
OpenDB
strSQL = “SELECT * FROM ([data$] WHERE [data$].[Cust #]).value = xcustno”
closeRS
‘this is the connrection
OpenDB
rs.Open strSQL, cnn, adOpenKeyset, adLockOptimistic
‘dispose the connection
Set cnn = Nothing
If rs.RecordCount > 0 Then
Sheets(“View”).Visible = True
Sheets(“View”).Select
Range(“dataSet”).Select
Range(Selection, Selection.End(xlDown)).ClearContents
‘Now putting the data on the sheet
ActiveCell.CopyFromRecordset rs
End If
‘dispose the recordeset
Set rs = Nothing
End Sub
I am copying 28000 rows with 8 columns using copyfromrecordset option. But it is taking lot of time to copy the data into excel more than 1 hour. I am not sure why this is running for this much time. Any one have any idea
Vijay,
I am using Excel as a database as you excellently show, but I am also trying to use temporary tables within the SQL code. I get an error. One suggestion I got was to put “SET NOCOUNT ON” and “SET NOCOUNT OFF” in the SQL statement but I now get the error:
‘Run-time error ‘-2147217900 (80040e14)’:
‘[Microsoft][ODBC Excel Driver] Invalid SQL statement; expected ‘DELETE’, ‘INSERT’, ‘PROCEDURE’, ‘WELECT’, or ‘UPDATE’
Any thoughts?
A simple way is to use the powerful inherent feature of Excel –
Advanced Filter. I have outlined a basic set of vba code below that can be used to query an excel list / database. You have to set up a criteria range on your spreadsheet and define YourRange (excel database) and YourCriteria (query criteria).
Sub Filter()
Dim List as Range
Dim Criteria as range
Set List = Range(YourRange)
Set Criteria = Range(YourCriteria)
With List
.AdvancedFilter Action:=xlFilterInPlace, CriteriaRange:=Criteria, Unique:=False
End With
End Sub
Thanks Vijay for sharing, great stuff.
Few years ago I had to create a portfolio selection interface, emulating Excel auto-filter. I used Advanced Filters with some code, but it was not as elegant as this (one sheet per dropdown + one control sheet).
It would be nice to have “communicating” dropdowns plus the (Select all) possibility (as in AutoFilter)
Hi,I have one doubt in above example.If the records in which the sql query is fetching is having special characters,then what would be the output.
For example,
i have 10 records in the database sheet like abd’s,aws’q,xza’,qaws,étc….like that 10-15 records.
So,My question is how to fetch these records if i give same value(for ex:abd’s) in dropdown control.
Even if we try using regex/wildcard characters one record will not be displayed.
Try this and help me out guys……..
Thanks in Advance.
I had the same problem. First I used a data connection in Excel to run the SQL but found compatibility issues with Excel 2010.
I am now back to use ADO(DB) but changed the connection string to:
“Provider=Microsoft.ACE.OLEDB.12.0;” & _
“Extended Properties=’Excel 8.0′;” & _
“Data Source=” & ThisWorkbook.FullName & “;”
This does require ACE to be available.
Alternatively JET can be used instead of ACE but this cannot handle as much data.
if I add picture in each data (hyperlink or comment), how to show that data with picture??
Where I work the government will not allow us to use MS Access due to some security reasons. We have had our only other database software available for us to use without paying a developer removed…I won’t go into the reason as it upsets me.
Anyway, we have operator logs that are now filled out on a Word document, and then they save each individual document. Well with 3 shifts a day this is a lot of documents and if you want to go back through them to find something, or trend data you have a lot of $&!+ to sort through….SO, I have made the document save the data in an Excel workbook using ADODB in VBA. Then the data is in a spreadsheet for us to query and trend to our hearts delight. If i want to go back to see a particular log I can then retrieve the desired data and populate the Word document.
No this is not ideal, but is a work around as it takes this place years to get around to giving us new software, or we have to pay a third party developer a load of money.
The only issue I have is in the comment fields. The recordset fields won’t allow for more than 255 characters. I’ve tried changing the datatype using the ALTER TABLE method, but no luck…so far.
Anyway, I am for the most part successfully using Excel as a database, and once I sort out how to deal with the richtext type fields with more than 255 characters it will be good enough.
Hi Chandoo,
Thanks for your excellent post. Just a question: I am working on exactly same thing with the exception of using text box instead of drop down boxes. Additionally I would like to have separate worksheet for adding data into the db. In total it would have three worksheet as data, add, view.
Could you help me for using text boxes?
Thanks a lot,
Dear Chandoo,
I’m very much naive at the technique if using Excel as your database, I saw the vba code after downloading the sample file , could you please please tell me where have the commands [data$] and product have come from and how have you designed combo boxes in this case.
Thanks a lot in advance
Hi. I’m using Excel as a database and populate the records in a multi colomn listbox in a userform in Word vba. I managed to do this.
I can even sort the different columns in the listbox.
But now I want to fill the textboxes in the userform with the values of the selected listbox item. The first column has an ID-no.
Can anyone tell me how to do that or is this a typical Word question?
Then I’m sorry I’ve put the question here.
Thank you.
Helma
Dear All,
I’m looking for VBA code for data import from website to excel!!
Requirement:- i have company website which we need to download data every time, need code for log-in website by credentials and download a data automatically by using VBA code.
Thanks for your support!
Madhu D N (HR)
Hi, Madhu,
I would suggest you to search the web. There are many websites about that. Take a look at:
http://www.wiseowl.co.uk/blog/s393/scraping-websites-vba.htm
I have a similar problem to get a table from a website that requires two dates and a click, but I did not solve the problem yet.
Hi, Madhu,
Again, you can get webdata directly from excel (without VBA Code).
See the link for more information:
http://www.howtogeek.com/howto/24285/use-online-data-in-excel-2010-spreadsheets/
VBA beginner here – How were the drop-down lists and buttons created in this database template? I’m having trouble figuring them out as there are no userforms shown in the VBA editor? Any help would be appreicated.
i do not know Nothing about VBA but still build this user form retrieve data from one worksheet to added into the other worksheet i think their gotta be a better way to do this if you could help i do not know where to Uoload my workbook so please let me know
as you are extracting data from the sheet I want it to be from a database.How is that possible?
Sadly, this no longer works on Office 2016 (Home and Student). I ran your example file without changing anything, and keep getting “microsoft excel is waiting for another application to complete an ole action”. Do you have a solution to this? Would really appreciate if you could help. Thanks.
@Norman
It sure does work in Excel 2016
Did you add the reference to the Active X data Library?
Did you save the file to a local drive?
Did you click on Update Drop Downs? (This is important)
If it still doesn’t work can you tell us what version of Excel and Windows you are using?
It doesn’t for me. I’ve uploaded a few screenshots to an album here: http://imgur.com/a/eDU6H
A reference to the ActiveX Data Library exists (as show in the screen shot).
The file is saved to a local dirve.
The error occurs after I click on the “Update Drop Downs” Button (included in the screen shot album)
One thing I’ve noticed, is that the Microsoft ActiveX Data Objects 6.0 Library references a “msado60.dll” in the example, whereas, it’s a “msado60.tlb” file in Excel 2016 (which I use).
Could this difference be causing the error?
Dear Vijay & Garouda,
Dear both thanks a lot to produced this artical but i have one problem i need only specific range from “data” to show in view tab i dont want to show all.
Can you please help me.
Regards,
Shahbaz Nawaz
I tried this and am getting a (run time error) the below error on line
If rs.RecordCount > 0 Then
Sheets(“View”).Visible = True
Sheets(“View”).Select
Range(“dataSet”).Select (this line)
Range(Selection, Selection.End(xlDown)).ClearContents
Not sure where it went wrong and any help will be much appreciated
It shows this error
Run-time error ‘1004’
method ‘Range’of object’_Worksheet’ failed
Cheers
Collin
@Collin
Is there a Named Range called dataSet already set up on the worksheet?
I’d recommend asking this in the Chandoo.org Forums
http://forum.chandoo.org/
Attach a sample file with some data if you can
Hi Vijay,
I need to update excel data using a Form not directly into sheet. Would appreciate if you can help, Since its a big excel designing a userform would be critical.
Regards
thanks a gazillion dude. this can convert to MySQL!!!..the syntax was same. you are the MAN!!!!..
Hi,
I am using excel as database and unabl to use Insert Into query to updete records excel database for date and floating point columns.
I have tried all the options list useing # before and after, Using Clang funciton. Nothing works. Am I missing anything
Regards,
Mahesh
This is how I update a “database” table(worksheet)
Sub ExpireOutOfDateContract()
If MsgBox(“This will expire all of the ” & vbCrLf & “out of date contracts – AreYou Sure?”, vbYesNo + vbQuestion, “Confirm Changes”) = vbNo Then
Exit Sub
End If
Dim s As Range, xRow As Long ‘reference range plus row number
Set s = ActiveSheet.Range(“A:A”)
xRow = 4 ‘start at row 4
Do While s.Cells(xRow, “a”) “”
xRow = xRow + 1 ‘move on a row
If s.Cells(xRow, “a”) = “” Then Exit Do ‘hit a blank and it must be the ‘end of data
If s.Cells(xRow, “x”) = 1 Then
strSQL = “update [contract$] set [open] = ‘N’ where [contract] = ‘” & s.Cells(xRow, “d”) & “‘”
cnn.Execute strSQL, , adExecuteNoRecords
End If
Loop
MsgBox “Contracts have been expired and will not appear on next refresh” & vbCrLf & vbCrLf & _
“If this was a mistake press the ‘Undo Contract Removal’ button” & vbCrLf & vbCrLf & “THIS IS THE ONLY CHANCE YOU HAVE TO UNDO YOUR CHANGES” & vbCrLf & vbCrLf & _
“After refresh, undo will not work”, vbInformation + vbOKOnly, “Update Complete – You CAN change your mind”
Set cnn = Nothing
frmOptions.Hide
End Sub
Hi
Just downloaded the Demo Database example (THANKS!) Noticed though that it downlaods as ‘.xls’ which Excel (mine is 2010) then has a problem opening… Changed the extension to ‘.xlsm’ and all was well with the world.
Thanks again
Ash
why doesn’t “call id” and “Date time” appear when i click “show data” ?
Help me please !!! 🙁
Can you show example of what you are trying to do please?
Best and very helpful. Keep sharing such article….
Hi,
I’ve downloaded the example template. I removed the data with my own data set and changed the headers/combo boxes in the view tab. I am able to pull all my data and the buttons all work; however, the last three columns of data are pulled in formatted as text. It is not formatted this way in the data tab so I am unsure why this continues to happen. *** I did add a few extra columns to the data tab in comparison to the original template. I’m not sure if that is the cause of the issue or how to go about resolving it. Any help would be appreciated!
Thanks!!!
I am crazeeeeeeee about this web site. Love it so much and I immediately described.
Very Good.
Inspiring me for explore more, please can give me an example another demo for excel database but with to another workbook. sorry for my bad english. thanks.
Hi,
It is a very good choice.
Thanks
Can anyone send me a simple database for me to use it in my service department in monitoring our medical equipments which we delivered and those units that are still in the warehouse. Including when it was installed and I need to have a preventive maintenance monitoring plus spare parts monitoring. Would somebody help me please.
Thank you.
Nino
I keep getting an error called, “External table is not in the expected format”
I’m using external workbook as a database.
Hi,
I am trying to learn to use excel as database on my own. I have gone through your program, but unable understand how “cmbProducts” is coming from. Can you please elaborate?
Thanks
Rajat
Chandoo, this is fantastic, you really saved my day…… absolutely unbelievable.
All of my years with Excel I never knew this was possible……
Really great!!!
Hi Chandoo!
I wonder how the Excel sample file you provided executing SQL like charm, quite soo fast in retreiving records.
I tried implementing that in my application and found running sooo stubbornly slow, like 30 seconds just to retreive a record of 40 lines while yours has 14,000 records.
Is there a secret in making it execute fast just like your sample Excel file .
Regards,
Salim T. S.
I want to change the Product, Region, CustomerType to other name to fit with my purpose but when i change it on vba code, it always show error 424. Object required. Can someone help me ?
Hi guys,
Recently i found Chandoo with so many good things can use for my daily works. Thank you so much for your goodness when sharing file for us. I am a newbie on Excel and VBA, i saw your demo file to use excel as database is very good with my work. I tried to change it to fit with mine but there are something cannot work:
Now i got issue when i insert my data to this file. It does not accept the data in merge format in Product, Region, Quotation columns and show error “Type mismatch”, could you give me help ?
Hi,
Thanks for sharing the feature. Have successfully modified the code and used it in many excel files at work. Can we connect another workbook to this database and extract/modify/update? records.
Regards
Rida Ali
Thank you for your advises,
I downloaded the demo, was working fine.
but I noticed that if you format the data sheet (example: adding blank cells above the first row and changing the fill color) without any changes to the code. the software doesn’t run correctly anymore and it will start giving odbc error just right here:
Private Sub cmdUpdateDropDowns_Click()
strSQL = “Select Distinct [Product] From [data$] Order by [Product]”
closeRS
OpenDB
cmbProducts.Clear
rs.Open strSQL, cnn, adOpenKeyset, adLockOptimistic
If rs.RecordCount > 0 Then
Do While Not rs.EOF
cmbProducts.AddItem rs.Fields(0)
rs.MoveNext
Loop
Else
MsgBox “I was not able to find any unique Products.”, vbCritical + vbOKOnly
Exit Sub
End If
Great and simple solution.
Thanks for sharing it.
Can I just suggest also one of the solutions that could people also use if the want to go further with the concept of Database in Excel, or maybe link Excel & MySQL (to store data in MySQL).
There is a simple tool that I have created for myself and now made it available to others. A tool called Virtual Forms for Excel that enables us to, without coding, create Data Entry Forms, Lookup Forms and also Master-Details forms for Excel. If you want to take a look, here is the link: https://www.virtual-forms.com
Davor
I have used Excel to create several database applications like POS (Point of Sale)application system for retail stores / supermarkets, Church / School administration/ management systems, financial house loans, savings and payments management systems without all the complications that I see described in various websites Including this.
I guess it all boils down to individual levels of understanding Excel but most importantly, how much Logical the individual can get. I’ve always told people, that your level of utilisation of Excel is largely dependent on much logic you can bring into your Excel problem solving solutions.
This is a 100% helpful article about the solution for common problems.
thanks
You are such a very helpful teacher. thank you for this
Love this wonderful method of teaching. Thank you very much sir. Long life
i have successfully modified the code and used it in many excel files at work. Can we connect another workbook to this database and extract/modify/update? records.
very happy. thanks, buddy for this helpful place. love
I just modified the code and used it in many excel files at work.
Thanks Vijay, I downloaded your Excel-As-Database-demo-v1 and started learning a lot from it. I will convert Sheet Data to an Excel Table and modify the SQL Select statement. Great !!!
I still use this solution to quickly and easily retrieve the correct results in my dataset. The functioning and end result are still very good. What I was wondering, are there perhaps better standard alternatives available in Excel in the meantime? The Filter formula is known to me, but becomes very complicated if you want to filter and sort in multiple columns (compare it with filtering in a standard table)