

Let us take a minute and bask in some glory, for, our little community at PHD had the most fantastic month ever.
That is right, January 2010 is so far the best month since I started blogging. We have broken all sorts of previous records on content, conversations, connections, traffic and revenue.
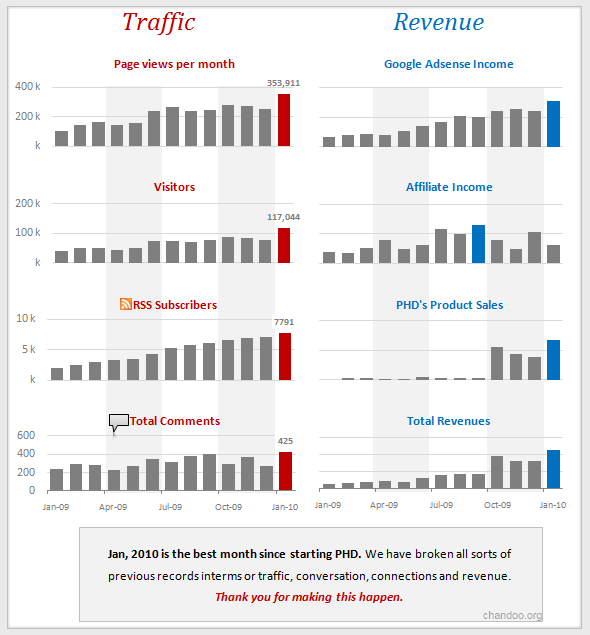
In January, we had 20 posts and 425 comments (highest ever). There were 117 thousand visitors reading 353 thousand pages. Our RSS subscriber base grew to 7790 (it was 2068 an year ago). January is the best month in terms of revenue too. We sold highest number of Project Management Templates and Formula E-books. The site even made more $s on Google Ads than it ever did.
Personally too, the month has been terrific. Jo and I celebrated our third marriage anniversary (we also finished 8 years since we started dating). I got promoted at work and Microsoft renewed my MVP award for one more year. Finally, I got my act together and started working on Excel School.
Awesome is the feeling that comes to my mind. I hope you started the new year with flying colors too.
The website success is all due to YOU. You have been kind enough to comment, e-mail, encourage, ask, share and learn. Without you, this milestone means very little to me. Thank you. Thank you very much.
To celebrate this little achievement, I have indulged in frivolous chart porn and made a small poster. See it below:
(I removed all numbers from revenue section. Lets just say, PHD has been keeping both my mind and pocket happy. 🙂 )
Bonus Charting Tip:
Of course, we dont want to waste a post with some frivolous navel gazing. So, let me share a cool charting trick with you. You can highlight Maximum value in a chart (like above) by,
- First format the entire series in a dull color (like above). To do this, just select the series, change the “fill color”
- Now, click on the series, and while series is selected, just click on the maximum item once again. Now, the maximum item alone will be selected.
- Just change the fill color of this item to some strong, contrasting color (like above).
- That is all… (learn more: using color, charting principles).
PS: Excel School registration opens on Monday. There will be a post announcing it in the next few hours.
PPS: If you are saying Excel What?!?, you should watch this.


21 Responses
Well done Chandoo. This is a fantastic site – lots of great information, and very, very well presented. It has certainly hepled me develop my skills, and will no doubt assist my professional progress.
Thanks for all your efforts.
Congrats on such an amazing month Chandoo. As a long time reader (I’m just slack on the comments), it’s really nice to see it going so well for you and your site!
Keep it up, you’re clearly appreciated by a lot of people. 🙂
While you have a Column, Bar or Line Chart Point selected and are changing colors of a single element, you can also try some what-ifs.
Grab the middle handle at the top of a Bar and Drag it Up or Down
A small dialogue will show you the changing value as you drag.
Let go at the value you want
Excel will now pop up a Goal Seek Dialogue, where you change a value of a precedent cell.
Congratulations Chandoo !
In terms of your chart, your suggestion works, but only if the data is not too dynamic.
If the MAX can change, then perhaps a better way is to set up two separate data series – one which automatically captures the MAX value, and no others, and another series which captures all values EXCEPT the MAX value. Format both series as required.
Hey Hui – that’s neat, I never knew that !
Chandoo? The chart above has a legend on the left, and with the appearance of the traffic and revenue charts being so similar, it makes it look like the legend applies to both. So is your AdSense income over $200k?
@JP… You didnt read the what I said (inside) brackets 😀
I removed all numbers from revenue section. It just so happened that the major grid lines aligned perfectly and are in same numbers as the left-side charts.
PS: thanks for the humor, $200k in adsense is good fodder for a Friday afternoon day dreams…
@Hui… if I am not wrong, the goal seek thru data point adjustment feature is removed in Excel 2007.
@Zak: Thanks for the love… 🙂 I am *very happy* you like our site.
@Brook: Thank you. I am glad to have long time readers like you. 🙂
@Gerald: I agree, if max changes often, you better use another series. But most often, highlighting is a one-off thing, so my tip is “quick-and-dirty”.
@Chandoo, Its also missing from 2010, sigh…
You got me. Guess you’re still keeping your day job?
@JP… I am in too much love with my day job. It is challenging and exciting. I will wait until end of this year before taking a call on moving to full time web business.
@Hui.. Sigh..
Hi Chandoo.
Congrats.
I think you should update the bonus about highlighting. Your wording makes it sound like the technique highlights the point with the MAX value. As you know the 2nd click allows for the independent formatting of any data point in a series, and that format is static.
Cheers,
Daniel Ferry
excelhero.com/blog
Congratulations Chandoo. I just found your site last month. Wish I had found it much earlier. Alas, I too was hoping they would put the Goal Seek /Chart feature back in 2010 – it is such a neat feature.
Hi Chandoo, I am one of you newbies.. so glad I found this site, I love your friendly, encouraging, and humorous approach. I am looking forward to Excel School and learning much more . Thanks
@Daniel: You are right. My technique is quick and dirty, not scalable.
@Patricia: Thank you and welcome to PHD.
@Catherine: Thanks for the love. I am happy you like my style and are having fun in our community. I am waiting to see you in excel school. 🙂
Congratulations with the site Chandoo. I learned a lot of tips and tricks here.
About the bonus charting tip: it’s too quick and dirty for me.
I like it a little bit less quick and dirty by adding a second series in a different color that only shows the maximum value, in front of the first series.
Example at http://www.charleybaak.nl/excel/ “Highlight_maximum_values.xls”
Your “Bonus Charting Tip” set me thinking… wouldn’t it be great if Excel would automatically highlight the max (or min) value for you? If you answered correctly “Yes, it would”, then here’s something I put together to do just that: http://www.box.net/shared/8cx5zqlu3l
It introduces some VBA charting topics which might set you thinking some more…
@DMurphy-
For the most part your coding sample was good. It was smart to grab all of the point values at once to minimize interaction with the series object in your routine.
I reworked it a little. I eliminated the magic numbers by using constants.
But most significantly, I changed how the code interacts with the points. Selecting anything (ranges, chart objects, etc.) from VBA is one of the slowest things that VBA can do. Always try to avoid this. For example there is no need to select a point just to change its color.
Also in an effort to minimize calls from the VBA engine to the presentation layer, my code sets the entire series to the neutral color in one call before looping to set the max point(s).
Even with this modest chart, the speed difference is noticeable. Significant dividends from these coding strategies can be realized in all situations.
Here is the revised workbook:
http://www.excelhero.com/blog/workbooks/HighlightMaxValue_excelhero.com.xls
Regards,
Daniel Ferry
excelhero.com/blog
@Daniel: Thanks for the feedback, especially the point about not having to select the item before applying the formatting.
@DMurphy-
You are welcome.
@Charley, Murphy and Daniel.. excellent stuff on the automatic highlights. Thanks for sharing your ideas and files with us. 🙂 donuts to all of you.