

This article is part of our VBA Crash Course. Please read the rest of the articles in this series by clicking below links.

- What is VBA & Writing your First VBA Macro in Excel
- Understanding Variables, Conditions & Loops in VBA
- Using Cells, Ranges & Other Objects in your Macros
- Putting it all together – Your First VBA Application using Excel
- My Top 10 Tips for Mastering VBA & Excel Macros
In part 4 of our VBA Crash Course, we are going to create our very first VBA application using what we learned so far.
Our first Application – What is it supposed to do anyway?
Remember the “We Are Nuts” example. We are back to it. This time, we will create a daily sales tracker application that makes your job a breeze. But saying words like breeze when defining your next VBA application is a dangerous thing. So lets list down all the things our little Excel VBA workbook should do.
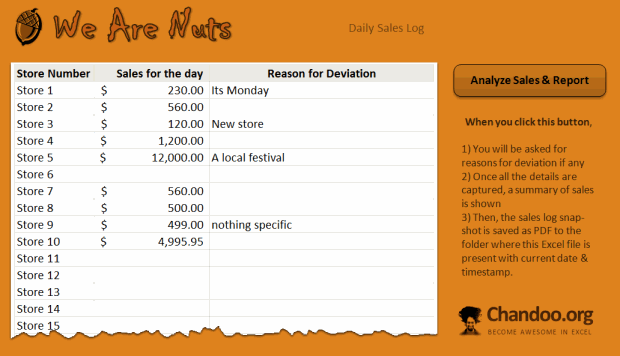
- The current method of using Inputboxes to capture 24 sale values and any reasons for deviation is tedious. So our application should instead process the values from already entered values and ask for reasons (thru inputbox) only when the sales are too low or too high.
- At the end of processing the sales, we want to see a short summary of how we did for the day. Something like this,

- Once we finish viewing the statistics a snapshot of the daily sales & along with summary statistics should be saved to current folder as PDF for later reference.
Designing our first VBA Application – Key Ingredients:
In this section, let us understand how our application should be designed and what goes in to it.
First, let us look at various things our application need to do, in a schematic. This types of diagrams are called as flow charts.

Key Ingredients of our Daily Sales Tracker Application:
Lets look at each area of our application and understand what VBA technique or statement helps us to do it.
- Process one store sale at a time: This is achieved with the FOR EACH statement [Related: What are VBA loops?]
- Capture reasons for deviation: Lets do InputBox() for this
- Calculate Summaries as we go: Some variables to calculate the summaries as we go. And a few IIF() formulas to help us update the values where needed. (PS: IIF is Inline IF Formula)
- Display Summary Statistics: We will use MessageBox() for this.
- Save a snapshot of the report: This is done by Range.ExportAsFixedFormat() method. [Related: understanding cells, ranges & other VBA objects]
Demo of our Daily Sales Tracker VBA Application
Here is a quick demo of our Daily Sales Tracker Application
Download our Daily Sales Tracker VBA Workbook:
Click here to download the Daily Sales Tracker VBA Workbook. Enable macros, enter some values and play with it.
If you just want to examine code, see this page.
What Next – My top 10 tips for using VBA
In final part of our VBA crash course, Learn my top 10 tips for mastering VBA.
If you have not read, please read the first 3 parts of this series,
- Introduction to Excel VBA – What is it & How to write your first VBA Macro.
- Understanding Variables, Conditions & Loops in VBA
- What are Excel VBA Objects and how to use them?
How do you like this VBA Application? How would you enhance it?
This application is one simple example of what you can do with VBA. Learning how to use Excel & VBA can enable you do several more awesome things at your work & life.
Do you like this application? How would you have designed it? Please share your ideas & tips using comments.
Join Our VBA Classes
We run an online VBA (Macros) Class to make you awesome. This class offers 20+ hours of video content on all aspects of VBA – right from basics to advanced stuff. You can watch the lessons anytime and learn at your own pace. Each lesson offers a download workbook with sample code. If you are interested to learn VBA and become a master in it, please consider joining this course.


29 Responses
hi chadoo,
Thanks for your wonderful articles on Excel.
I have a doubt on demo application file
where you are declaring values for inThisRange variable in checksales function
I’m getting an error code 438 on this line:
Range(“areaDailyLog”).ExportAsFixedFormat xlTypePDF, ThisWorkbook.Path & “\dailySalesLog-” & Format(Now, “ddmmyyyy-hhmm”) & “.pdf”
@Jomili
Not sure Format is a VBA command
so try Application.Worksheetfunction.Text
.
like:
Range(“areaDailyLog”).ExportAsFixedFormat xlTypePDF, ThisWorkbook.Path + ” \dailySalesLog – ” + trim(Application.WorksheetFunction.Text(Now, “ddmmyyyy – hhmm”)) + “.pdf”
I’ve played around with this code and understand how it works. I have a question regarding this line of code.
minSale = 999999#
I understand that this is just a placeholder until a value is assigned to minSale, but could you explain why you have written it with the hash symbol at the end.
I’ve tried it both with and without the hash and it seems to make no difference.
@Rob.. thanks for your comments. The # at the end indicates 999999 is a number. As you can see, it does not matter if you place a # or not at the end as we have declared minSale as number.
Hui,
I tried the alternative, got the same error code (438, Object doesn’t support this property or method). Could it be because I’m using 2003, and don’t have Adobe?
@Jomili
The Range method ExportasFixedFormat was only added in Excel 2007
http://msdn.microsoft.com/en-us/library/bb238907%28v=office.12%29.aspx
and so won’t be available in 2003
You could try using a free PDF printer
set it as default
Record a macro and print to it
look at the code and modify
@Chandoo,
i love the visualizations you put together. thank you.
@Jomili, Hui
for the PDF feature to work properly, you must first save the workbook to physical location on your computer, then the snippet ThisWorkbook.Path will tell the process where the PDF should be saved.
Ian,
The workbook IS saved to my hard drive. Opening it from the Hard Drive and running it still gives me the error code 438: Object Doesn’t Support this Property or Method.
I think Hui’s diagnosis is correct. Unfortunately I’m on a state-owned PC, so can’t use any PDF software other than the Adobe Reader.
Hi,
New to the website but i love it… Great Work..
I wrote a MACRO to mail out my report directly upon clicking a button without needing to open Outlook. My problem is that i am unable to change the signature as needed by different users. I tried the Application.Username method to get the name but wanted to know if there is any other method to attach signature to this… Thanks 🙂
I thought this crash course was to assume we have no VB background? I follow allong with what your doing but don’t know how to write visual basic code at all. Do you have any tuturials for actually learning VB/VBA? This code piece is way above my head.
@Rusty
Try doing a Google search for:
Learn Programming Online Free
There are lots of info and sites that should be able to help you
Hello ,
Can you help me
I am stuck at how to verify before inserting a new record, basically I want the user to validate the data using a textbox as input and when the user clicks on the verify button, vba should check if that record exist and if it exist it should prompt the user and vice versa
Thank you
Hi Chandu,
I need a help from u like,
i want to send multiple mails thro excel by dumping huge data and i need only selected data with a table for the selected. In that mail that includes suppliers database in the form of mail ids along with that it takes attachment from particular file where we put attachment files.
kindly reply
Hi All,
If you want the report to be saved as PDF, Kindly get the “Save as PDF or XPS” addin installed or else you will get the following error.
Visual Basic Runtime Error 5.
Invalid Call or Procedure.
Hi Chandoo or Followers of Chandoo Blog,
Where have we declared the variable “areaDailyLog” which is used along with the Range Object?
What is the point in using the following lines?
[valDailyLogTitle] = “Daily Sales Status – ” & Format(Now, “dddd, mmmm d, yyyy”)
[valDailyLogSummary] = message
[valDailyLogTitle] = “”
[valDailyLogSummary] = “”
@Vikram
[valDailyLogTitle] refers to a Named Formula called “valDailyLogTitle”
It isn’t defined in VBA it is defined in Excel, Formulas, Names
@ Hui,
Thanks a lot for the reply..
When do you decide that you will have to use “Named Formula” to get your task done?
I need to learn excel macros & vba programming in 3 weeks time. Is it possible? If yes what would be your suggestion?
@Vikram
There is no hard and fast rule, except that to say I use them more and more every day
They are faster, less corruptible than using cells
Although often for beginners they are harder to debug
You will only learn the basics of VBA in 3 weeks
VBA really requires application to real problems to learn
@Hui,
Thanks a lot sir..
Is there a way to print the value this named formula holds? What i did was to navigate to name manager & clicked on the particular named formula to find out the range of cell it holds? Just wanted to understand is there a better way to do it.
So here basically areaDailylog refers to the range of cell from A4:C38 so whatever fields & values are included in that particular range will be covered by areaDailylog variable.. Correct me if i’m wrong.
Any particular books you find handy, Chandoo had suggested few books as well or do you prefer learning online??
@Vikram
Yes, You can see what it is holding
Select an area which is big enough to hold all the values that the named Formula will hold
=NamedFormulaName Ctrl+_Shift+Enter
Excel will put the values into the cells
If you want to see individual values in the formula you can use
=Index(NamedFormulaName, x, y)
@Vikram
The Name Manager has limited Functionality
It only shows values for cells that are directly referenced.
To print values, you will need to so as I suggested
You may want to have a look at :
http://www.jkp-ads.com/officemarketplacenm-en.asp
I don’t use the product so can’t comment on it’s functionality or suitability to your tasks
I haven’t read an Excel book except the Excel 5 manual in 1994, so can’t comment on other Excel books
Hello,
I work as business analyst and I have one doubt in macro
I have written one coding for column matching in excel but I am getting an error could you pls suggest me correct coding for any kind of column matching in excel
for example
correct columns are RG SG FG HT TR and I have data wherein columns are ER TR RG SG FG HT TR FF DE and I want to exact match the columns with original one
I have written below coding
Sub Column_match()
Dim Orig_range As Range
Dim New_range1, new_range2 As Range
Dim Pointor, tomove As Range
Dim Finalrowold, finalrownew As Long
Dim Finalcolold, finalcolnew As Long
Dim WSD As Worksheet
Dim Cname As String
Set WSD = ActiveSheet
WSD.Cells(1, 1).Select
Finalcolold = WSD.Cells(1, Application.Columns.Count).End(xlToLeft).Column
finalcolnew = WSD.Cells(2, Application.Columns.Count).End(xlToLeft).Column
finalrownew = WSD.Cells(Application.Rows.Count, 1).End(xlUp).Row
Set Orig_range = Range(WSD.Cells(1, 1), WSD.Cells(1, Finalcolold))
Set Orig_range1 = Range(WSD.Cells(2, 1), WSD.Cells(2, finalcolnew))
For i = 1 To Finalcolold
Set orig_range2 = Range(WSD.Cells(2, 1), WSD.Cells(2, finalcolnew + i))
Cname = Orig_range.Cells(Finalcolold, i).Value
SetTo move = new_range2, Find(what:=Cname, LookIn:=xllvlue), lookAt: xlWhole , searchorder:=xlbycoulmn, MatchCase:=True
If tomove Is Nohing Then
Newrange_2.Cells(1, i).Resize(finalrownew – 1, 1).Select
Selection.Insert shift:=xlToRight
Else: ifnottomove.Column = ithen
tomove.Resize(finalrownew – 1, 1).Select
Selection.Cut
new_range2.Cells(1, i).Select
Selection.Insert shift:=xlToRight
End If
Next i
End Sub
i am a new learner of macros.
i want to add a button and when i will click on it it should go up.
suppose i have put two button one is up and another is down .
suppose if i will click on up it should go one roe up. same for down,
could you please assist me.
Thanks
I’m not sure how useful a macro to go up or down only one row is, since you can do the same thing using your up or down arrows on your keyboard. However, I do have twin macros I use to jump to the top or the bottom of my sheet, and my buttons have arrows just as you describe. Here’s the code for each.
Sub GotoA1()
‘In QAT
On Error Resume Next
Application.Goto Reference:=Range(“A1”), Scroll:=True
On Error GoTo 0
End Sub
Sub GotoBottom()
‘In QAT
Dim LastRow As Long
LastRow = Range(“A” & Rows.Count).End(xlUp).Row
On Error GoTo Bailout
Application.Goto Reference:=Range(“A” & LastRow).Offset(-4, 0), Scroll:=True
On Error GoTo 0
Exit Sub
Bailout:
Selection.EntireColumn.Select
Selection(Rows.Count).End(xlUp).Select
End Sub
I am getting Runtime error: 424 Object Required on this line of code.
[valDailyLogTitle] = “Daily Sales Status – ” & Format(Now, “dddd, mmmm d, yyyy”)
[valDailyLogSummary] = message
[valDailyLogTitle] = “”
[valDailyLogSummary] = “”