

VLOOKUP may not make you tall, rich and famous, but learning it can certainly give you wings. It makes you to connect two different tabular lists and saves a ton of time. In my opinion understanding VLOOKUP, INDEX and MATCH worksheet formulas can transform you from normal excel user to a data processing beast.
Today, lets understand how to use these formulas better.
What is the syntax for Match, Vlookup and INDEX?
Here is the syntax for these three very powerful functions in plain English:

What are vlookup () and match () ?
VLOOKUP and MATCH are your way of asking excel to find a needle in haystack. Imagine you have all your customer contact information in one sheet in the range A1:D5000 in the format phone number, name, city and date of birth. Now you need to find out which customer has the phone number “936-174-5910”. How do you do it?
You guessed it right, you use VLOOKUP and summon excel to do the search and return with customer name.
While VLOOKUP is used to fetch value a based on what you are looking for, MATCH is used to fetch the position of the value you are looking for.
See this illustration to understand :

What does VLOOKUP really do?
Imagine you have a list of data like this:
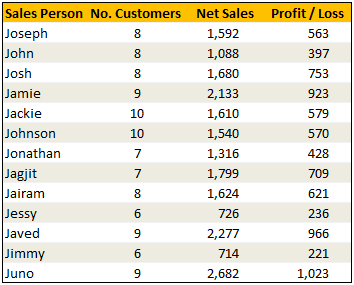
Now, how do you answer the question – “How many sales did Jimmy make?“
Yes, your guess is right. VLOOKUP is one of the formulas you can use to answer questions like this.
VLOOKUP searches a list for a value in left most column and returns corresponding value from adjacent columns.
So, in our case, we need VLOOKUP to search for Jimmy and return the amount of sales he made from column 3.
VLOOKUP Syntax & Examples:
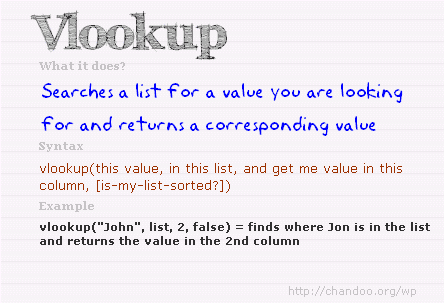
The syntax of VLOOKUP is simple:
=VLOOKUP( this value, your data table, column number, optional is your table sorted?)
Here is an example to get you started:
Learn more about VLOOKUP Formula with examples
Please check out this page for 10+ examples of VLOOKUP and how to use it to solve real world problems.
VLOOKUP Examples & Homework
I have made a small excel file detailing 4 VLOOKUP formula examples. The file also contains some home work so that you can practice this formula.
Download VLOOKUP Example Workbook
[NEW] XLOOKUP replaces VLOOKUP in Excel 365
If you are using Excel 365, you can use the new & improved XLOOKUP function. It offers a shorter & more versatile syntax for performing lookups.
For ex: the same lookup as above will be done with XLOOKUP like below:
=XLOOKUP(“Jimmy”, A2:A14, C2:C14) will lookup “Jimmy” in column A and return sales amount from Column C.
Click here to learn more about XLOOKUP.
So what is INDEX() then?
INDEX function is your way of telling excel to fetch a value from large range of values. Since MATCH() function can tell us where the data is found, you can then use INDEX() function to extract corresponding data from another column. In this case, we can use MATCH() to find out which row has net sales 1,799 and INDEX() to return the name of the person. Like this:
Find the position of 1,799 in sales: =MATCH(1799, $C$2:$C$14, 0)
The answer will be 8.
To find the 8th person in names list, we can use INDEX() function like this:
=INDEX($A$2:$A$14, 8)
The answer will be Jagjit.
Related: Learn more about INDEX Formula.
So how are INDEX() and MATCH() linked to each other?
Since MATCH returns the position of the item you are looking for in a list, you can then use this position in INDEX to fetch values surrounding the searched value.
So, we can combine both functions like this:
=INDEX($A$2:$A$14, MATCH(1799, $C$2:$C$14, 0))
This combination is called as INDEX+MATCH formulas.
Related: Using INDEX + MATCH functions & INDEX+MATCH Video
Finally
Remember, both VLOOKUP and MATCH throw a fail error of #N/A if the value you are looking for is not there. If you want to stop seeing the error, use IFERROR function.
Just use them with some dummy data, play around with arguments and see how you can say “oh yeah, I can do that in few minutes” to your boss next time.
VLOOKUP tutorial – video
Please watch this quick video tutorial to understand all these concepts and how to write VLOOKUP formulas easily.
INDEX MATCH Tutorial – Video
Want to Learn More Formulas? Get my VLOOKUP book
If you want to learn VLOOKUP and other Excel lookup functions, then consider getting my VLOOKUP book.
 |
Comprehensive and easy to understand
This is a book for everyone who uses Vlookup. Most of us think… Oh.. I already know the function. But this book will open your eyes to some brilliant techniques. – By Dr. Nitin Paranjape Solid introduction to lookup functions
This books does a wonderful job of taking each of the lookup functions available in Excel, breaking them down to a simple, easy-to-understand level. – by Lucas Moraga |


253 Responses
@Chandoo : Also, add HLOOKUP here . VLOOKUP : vertical look up i.e. work in rows.. where HLOOKUP : horizintal look up i.e. work in Columns…
These are very useful to fetch the data from other data base. Also, very useful in auditing and linking the data to take a business decision.
How to prepare a dashboard with remaining day left for delivery & each Project manager will have different sheet, so that they a look the status in what stage exactly.
I use these all the time – they’re *that* useful when trying to find the proverbial needle in a haystack.
Well done for gathering these functions into a simple tutorial – now I really can say to my boss “Oh yeah, I can do that in a few minutes” 😉 Keep up the great work Chandoo
Dont use VLOOKUP or HLOOKUP, instead use INDEX/MATCH
Name, Amt, Region
Index(Region,Match(WhatToMatch, Name, 0))
Sam
Index and Match is usefull, but it gets complicated too quickly. Its almost easier to simply move the key in a large data table all the way to left and just do a vlookup.
Sometimes, if what I’m searching for is a moving target across the page, meaning the column I’m returning from will change from day to day, I will use a and Index & Match function, or even a vlookup/match combo.
I use the vlookup all the time. I find a lot of times I need to use it when I know the item might not be in the list. As mentioned above, if the item isn’t there, you get a “#NA”, which keeps you from summing or doing anything else useful with the collected information you’ve built.
So I use the following combination of formulas:
IF(ISERROR(VLOOKUP(what, where, return_what, [mylist is sorted])), 0, VLOOKUP(what, where, return_what,[my list is sorted]))
Based on the write-up above, that breaks down like this:
IF(try this, if it works do this, if it doesn’t work do this)
ISERROR(tell me if there’s an error here)
VLOOKUP(as above)
So basically, it runs the vlookup to see if it finds anything. If it doesn’t find anything it returns an error. If it returns an error the ISERROR is true, so it puts a zero in the cell. If the first VLOOKUP returns a value, it runs the VLOOKUP again and puts the value in the cell.
You can certainly replace the zero with “” to put nothing in the cell or just about anything else. I’ve put in strings like “No” that I use to sort the info later, etc.
I’m sure there’s more efficient ways to do this (maybe using match to verify the item is there), but this has worked very well for me for about 7 or 8 years without fail. I’ve used it in some very large project planning workbooks, commision calculations for sales, as well as a couple of different financial models and never had a problem with it slowing down Excel.
=IFERROR(VLOOKUP(what, where, return_what, [mylist is sorted])), 0) returns the same
Great Stuff!!! I think these comments just saved me hours of resorting and deleting! I always used to make a new coloumn at the beginning called “sort”, number it 1,2,3,etc so I could then sort the entire sheet by the vlookup vlaues and delete the #’s. I’m pretty happy to stop doing that now 🙂
I love your way of explaining things by the way Chandoo. Thanx
what is the meaning of [mylist is sorted] ??/
@Ketan: Thank you so much for suggesting HLOOKUP(). I deliberately left out hlookup(), index() few other formulas as I wanted to keep this post short and digestible. I agree that hlookup is as useful as vlookup and you should choose these functions based on the situation.
@Sam1 : thank you so much for the words.
@Sam2:I guess there are multiple ways to solve same problem and we should choose what is best for us. I feel comfortable using vlookup, you might prefer index and match combo.
@Dustin: Awesome stuff… It is so nice that you have explained basic error handling to everyone 🙂
I use error handling to ensure that those ugly #xxx! messages are gone. Another thing I try often is to use conditional formatting to de-emphasize or highlight errors so that I can nail them down. This is useful when I am cleaning data as there is no place for #values! here..
check this out: http://chandoo.org/wp/2008/03/13/want-to-be-an-excel-conditional-formatting-rock-star-read-this/
Both VLookup and Hlookup have the following limitations
1. Vlookup can look only to the right not to the left, Hlookup can look down not up
Index/Match does not have these limitation
2. Vlookup can only find the closest match on the lower side not on the higher side
Match has 3 type – Exact(Unsorted) Next Lower(Ascending), Next Higher(Descending)
3. Vlookup can only look based on a single criteria, Index/Match – array entered can lookup on multiple conditions
4. A Vlookup formula cant be dragged across unless you have a helper row or the Column function nested inside it
1. V&H lookup is easier to both type and pick from the forumula helper than the combination of Index and Match (Not as many fields to fill out). Plus, you can just move your column index to the far left or far top, or simply add filters and sort your data and they will work fine.
Sometimes its great to have a huge brain that can think up all the combinations of rows columns you could be looking for, but sometimes you just need something quick and dirty.
2. I agree with this point
3. I agree with this point as well
For 4 this is not true. At least in that respect its no different than Index/Match as you can also do a Vlookup/Match.
But it is still limited by the other the other factors you mentioned above.
Both V&H lookup are used for simple solutions that don’t require you to brainstorm much but each one of them can combine easily with ‘if’ for some specific situations that Index can’t. Index can be considered as a combination of V&H lookup with great help from match to go through the limitations of the fomer but it has another limitation. It only can use in combo with match
Love your site Chandoo. Came here from Lifehacker and Im just amazed how great is the material. Expert, medium or basic users can learn many thing from this site.
Best thing is that you don’t focused on VBA so one can explain this techniques to non programmer guys to improve productivy and the quality of work.
Keep the good work!!! Your site is excelent.
P.S. Could you post some excel color palletes or show us a way to mimic the colors combos used by Excel 2007.
Great stuff…I use vlookup, hlookup extensively but while I know quite a bit of the tips and hints you provide, I still love getting your emails. I almost always learn something from you or one of your readers posts PLEASE don’t ever let my name be deleted from you send list!
By the way, thanks Dustin, I had used your formula before but had forgotten how I did it and just yesterday I was trying to remember how to eliminate the #NA error. You must be psychic and you must have known I needed your help!
@Sam: Agree 🙂
There are various limitations to vlookup/hlookup. Put in another way, MS has designed these functions with particular need in mind. A one formula solution for lists organized based on one key column on the left and several attribute columns on the right.
I am glad you started this discussion as there are sizeable chunk of readers looking for more powerful options to search / lookup of lists. I may write another post in the coming weeks to discuss using index, match based solution as well.
@Phil: It is certainly a great feeling to wake up and read a comment like this. I feel very happy and thrilled 🙂
someone said, “the best blog posts start where comments begin” and I totally agree with it. There is so much I have learned through this blog and I owe it to commenters all over the world.
Thanks a lot
this so easy and nice illustration for there very useful function
keep up the good work
hi,
I am new to VBA, looking for great stuff’s in VBA.
this site looks fresh in ideas. like to some advices on VBA
bon,
Antoi.
Great Article!!!
I have a stupid question. If the data in my array is not sorted, how does the match function behaves if we put the “how?”= 1 and “how?”=-1. Does it sorts the data in ascending/descending order and then displays the position? As we use =INDEX(A:A,MATCH(9.99999999999999E307,A:A, 1)) to find the last value in a column.
Thanks for the help.
@Anthony, Social Wonders: thank you. Sure I will cover few VBA ideas in the coming weeks. As a rule we try to avoid VBA for its complexity to understand and implement.
@Kartikeya: Usually match assumes your data is sorted and returns the first value less than or more than the match value you are looking for. Thus the result will be wrong.
Btw, your formula =INDEX(A:A,MATCH(9.99999999999999E307,A:A, 1)) returns the last value in a column because 9.99999999999999 * 10^307 is technically the largest value possible in excel. So Match returns last value in the range A:A. You can replace 9.9999… with max(A:A) and the formula still works (although does one additional calculation)
Also, if you want to sort numbers use small() and large() functions. See more here: http://chandoo.org/wp/2008/08/13/15-microsoft-excel-formulas/
VLOOKUP works great, but I have another challenge.
I need to match 2 cells by looking at a three letter code.
Example; I have in my main sheet the code Pabc123 and want to match this with code abcx1000-1 in another sheet.
So I need to match the abc from the first code with the abc of the second code.
My data has multipe codes so I need to use wildcards for this.
So I need a formula which does not hus the lettercode abc, but instead looks for matching the 2nd, 3rd and 4th positions of the first code with the first 3 potitions of the second code.
So does someone know if this is possible?
HI Rob,
As an example I have put the letters abc for the purpose of lookup in cols B and C and tried the formula. You edit the fomula and use it inyour look-up or one can wild card abc and use it instead using the wild character at the end of letters abc e.g.abc*
=IF(MID(B13,1,3)=”abc”,VLOOKUP(B13,B13:C21,2,0),)
Hi, I am a new user and I am very happy to read all the comments posted here. I have a basic question that needs help from you please.
I have 2 sets of accounting data to check, one from the bank statement, and the other is my internal company financial statement. Both sets use different different formats to present the financial data. When doing bank recon, I need to check a specific amount that appeared in the bank statement, its corresponding location (ie same amount etc) that appear in our internal company financial statement. May I know what is the most most efficient way to do this? Currently, I do manual check. I was told that I can do vlook or match, but I do not know how to do it. I am not good that excel functions. I am just a basic beginner excel user. Thanks.
I have an issue wondering if you can help, I want a range of cells in % value to be matched against the customer name in another range of cells then to put this value in a top 4 column for instance
Can post the file if it helps
@QualityGuru: Welcome to PHD and thanks for asking your question.
You can use MATCH() to match a value in a range, as showed above, it returns, the location # of the match in the range. You can then use this to get the corresponding element in the other range, using OFFSET().
Does this answer your question ? If not, please post another comment detailing where I misunderstood. I will try to answer it.
for ROB –> if you are sure that the information you need is always the 2nd, 3rd and 4rd positions within the code, you can put on a column on the side of the code column a MID formula referring to it, such as
=MID(cell you refer to, 2, 3)
where 2 = the 1st position you recuperate and 3 = the total number of positions from there that you recuperate. This will isolate the 3 positions you want.
Same thing for getting the 1st 3 positions of the second code – or for this one use the formula LEFT(cell you refer to, 3) for same result.
Then you can do Vlookup formula on these intermediary columns which contain the 3 positions sample. It adds columns but saves time!
Hi,
Can someone answer a question about the MATCH() command, for me, please?
I have been trying to replace various vlookup() commands with index()/match() combinations. These work fine until I try to reference an array which is on a different workbook. Then I get a #N/A error.
Can match() handle accessing data from a remote workbook or am I limited to local data only?
Regards,
Mark
Mark,
as far as I know, MATCH is working fine with references to other (even closed) workbooks, as long as the array is a reference to another other workbook. But MATCH does not work if the search value is a reference to another workbook.
@Mark: as Robert suggested, the match should work when you refer to other workbooks. Often when the other workbook is closed, you may need to change the formulas to reflect the complete path (this is usually done automatically by excel).
Long back I used this and a User Defined Function to consolidate a bunch of reports. I had to use the UDF since one of the functions wouldnt work with remote workbooks (I dont remember which one it is, but I guess it is indirect() …)
Anyways, if you find a workaround for this, please feel free to share with us all and you will get a donut. That is our policy 🙂
Thanks, guys. I found the problem with the MATCH() referencing an external workbook. Let’s just say the keys were too small for the fingers punching them. 😉
Now all I need to do is work out if I can access these functions programatically from withing VBA. Then I can make prettier sheet function calls rather than have calls that are about six or eight lines (screen width in length).
I’ll let you know how I get on.
Dear Excel Guru.
Good Day.
In excel spead sheet i have data in sheets. The data of salaries of 50 employees, for every month one one sheet is prepared. The names basic sal, da, hra, gross & total ded and net total are the same in every sheet. My question is How can i sum up in the summary in 13th sheet (for one month one sheet so 12 sheet and 13 is summary) if i want sum up in summary sheet. Function has to verify the name and add from all the sheets ie basic put value in 13th sheet. Kindly help me how to do this. thanks in advance
Srinivas,
I honestly can’t tell exactly what you’re trying to do. While we talked about match/vlookup/etc above, it sounds like you are looking to do something that will more likely require SUM or SUMIF.
You can use many formulas is a “three-dimensional” way in Excel. That is, you can run them not only across a range of cells, but also across a range of sheets. For example, “=SUM(Sheet1:Sheet3!A1:E1)” will give you the sum of all cells in the range A1 to E1, on sheets Shet1, Sheet2, and Sheet3.
Anyone know if SUMIF works across sheets? I don’t have anything handy to test it.
Will one of those work for you?
@Srinivas: Welcome to PHD and thanks for asking a question. Here is how you can solve the problem if the employees are in the same rows in each sheet. Assuming the salary information is C2 for employee “srinivas”, you can write a formula like =SUM(Sheet1:Sheet12!c2) to sum up all the values across the sheets.
Unfortunately this technique doesnt work with formulas like COUNTIF, SUMIF, SUMPRODUCT or array formulas. So, if the employees are not in the same rows in each sheet, you may need to use excel’s consolidation features to summarize the data.
@Dustin: As you can probably understand from above, the SUMIF, COUNTIF and countless other formulas dont work with 3d references. Even when you define named ranges with 3d refs, they dont work.
Chandoo’s comment on consolidation features got me thinking you may be much better off to just put all the data into one worksheet and then build a pivot table from that sheet. If you’re comfortable with pivot tables, go for that. It should take all of 3 minutes tops.
Hi Chandoo, – after spending hours searching the web, I came across your site, and am very impressed with how you explain how to use the various formulas. I have a query and am not sure if it can be solved at all. I am a cyclist and when we get race results, they come in an excel spreadsheet, with up to several hundred entrants. I also have a list of all our club members – about 120, – on a second spreadsheet. I then go thru the results spreadsheet and highlight all members that appear (not all members race) which takes me forever, – so that I can forward the results to each member. I have looked at arrays, conditional formatting and the lookup formulas, but haven’t had much success! Can you please help!!! 🙂
@Dave… thanks for asking a question. I am surprised you said you have tried conditional formatting but didnot succeed. You can do this using conditional formatting. Here is how:
1. define the club members list as a named range say, “club-members”
2. In the main sheet, select all the cyclists participating in the race and go to conditional formatting. Select formula as the type of condition and then write something like =countif(club-members, B1)
3. Set the desired highlight format
4. hit OK.
This should work pretty straight forward as long as you do not make any errors.
Please read this article to learn more about conditional formatting.
http://chandoo.org/wp/2008/03/13/want-to-be-an-excel-conditional-formatting-rock-star-read-this/
Hi Chandoo, – so simple ………….when you know how!!!! – THANKS very much!!! works like a charm! – by the way congrats on your multiplying cells!
i required a excel formula to match 3column data and refer another 3column daat together and find higher number in the 3column
This is an incredibly useful site. But I have a question about VLOOKUP that I don’t see answered here. I will be handed a table with a very long list of part numbers, and will need to pull cost from a corresponding row. The issue is that there will be four identical rows for each part number. Will this cause an exact match VLOOKUP to fail, or will it just happily report the first match it comes to?
Thanks!
@Rj… Welcome to PHD…
You almost guessed answer for your question. Vlookup works find and gets you the first occurrence of the part number as long as there is one. Go give it a try.
I just wanted to say your article illustrations are pretty cool. in this world gone digital a little taste of good old handwriting is always welcome
@Jerome… Thank you 🙂
Awesome site, I am so glad I stumbled upon it. I do have a question I have been unable to solve looking around and was originally thiking some combination of Vlookup and Offset would work.
I have two columns of data on one tab which reprsents a 1 to many relationship (column a has a primary key column b then has the sub keys associated with each primary key)
i.e. Column A
i.e.
Column A Column B
Order 1 Part 1
Order 1 Part 2
Order 1 Part 3
Order 2 Part 4
Order 2 Part 5
Order 2 Part 6
Then I was hoping to be able to use a combination of Vlookup and Validation on another worksheet tab where they would select a drop down list in column a which would be the options in column A here, once select column B would have a drop down list of only the column b which match the column A value Selected
Drop Down A chosen Order 1, Column B Drop Down lets you select Part 1, Part 2, or Part 2
@Wrecking Crew: Welcome to PHD and thanks for the love.
You can do this by using named ranges and offset formula. here is a tutorial: http://chandoo.org/wp/2008/11/25/advanced-data-validation-techniques-in-excel-spreadcheats/
Let me know if you have more questions.
can anyone please explain me the difference between v look up and pivots.
Vlookup is generally used to lookup a single value from a list which may contain several fields of data
Pivots are used for displaying summations of large sets of data, where there is many rows of same data, ie: date, salesman etc
Pivots allow you to interactively drag new fields in/out to rearrange your summation requirements. Pivots also allow for limited drawdown into the data to extract the individual records that make up a particular summation.
@Aishwarya… Also checkout this article to understand what pivot tables are all about.
http://chandoo.org/wp/2009/08/19/excel-pivot-tables-tutorial/
@Hui.. thank you 🙂
Hi
I have been following your posts closely and must admit that I gained a lot out of it.
Need your help in trying to figure out the following.
In one sheet I have the list of all the pharma companies in USA. In a separate sheet (same workbook), I have the list of major pharma companies across the globe.
Is there any function where I can quickly check whether “company A” mentioned in sheet 1 is also there in “sheet 2”? I tried match function but without success.
@Niladri.. thanks for your compliments. Welcome to PHD…
Assuming the list of companies across globe is a named range “globalPharmaCompanies”
in the sheet where you have companies in USA, insert a new column next to company name and write
=countif(globalPharmaCompanies, a1)
and drag the formula along.
I am assuming column A has the companies in USA.
You can also use conditional formatting to highlight the companies that are present in both lists – see here for more help on that – http://chandoo.org/wp/2008/03/13/want-to-be-an-excel-conditional-formatting-rock-star-read-this/
Hi, I wonder if someone can help me.
I have a master listing of names and these people work in groups.
I receive a report which details which days of the month they have worked.
I receive the report in a differing order to my master listing so I match it up in the same way as my master by just cutting and pasting into the same order.
What I want to do is be able to match up the days from 1 to 31 against each employee in a quick way, but the only way I’ve managed via Vlookup is by having to enter a formulae individuallly into each cell?
I’m thinking there must be an easier way to do this – can anyone help and save me the time so that its a simple process each month to match up the new monthly data with each individual?
Thanks in advance for any assistance.
@Jaron… Are you typing manually because each column (or row) requires a new date (ie vlookup(1,range,x,false), vlookup(2,range,x,false)… etc.?
If so, you can use COLUMNS() or ROWS() formula. See this example to get an idea.
http://chandoo.org/wp/2009/08/17/rows-and-columns-excel-formulas/
Hi Chandoo,
Thank you for your quick response.
Please note that the formula I’m currently using is =VLOOKUP($A$5,’Monthly Timesheet’!$1:$65536,5,FALSE). I tried to copy the formula along, but the “,5,” doesn’t increase therefore I had to update it in each cell? To select the row’s formula would i need to insert this to replace the 5 above as in Rows(‘Monthly Timesheet’!E1:E31) ?
Thanks in advance again!
Regards
Jaron
@Jaron: You have to keep one part of the ROWS static using $. For eg. this will work,
=VLOOKUP($A$5,’Monthly Timesheet’!$1:$65536,4+ROWS(’Monthly Timesheet’!$E$1:E1),FALSE)
You can learn more about the usage of $ and how it works here: http://chandoo.org/wp/2008/11/04/relative-absolute-references-in-formulas/
Thanks Chandoo, but its the 5 in the formula before false that is not increasing by one “=VLOOKUP($A$5,’Monthly Timesheet’!$1:$65536,5,FALSE)”. The formula just takes the same cell from the same column when I drag the formula along rather than copying the same information from the other spreadsheet in the next column but on the same row?
Looking forward to your response, many thanks.
Jaron, I’ve solved that before by adding a reference to the area that I’m dragging across.
So if your formula resides in B1:B10, in A1 I’d add a “=1”, and in A2 “=A1+1”. Copy the formula from A2 into A3:A10.
Your formula in B1 then changes to “=VLOOKUP($A$5,’Monthly Timesheet’!$1:$65536,A1,FALSE)”, and you can drag or copy into B2:B10.
There’s also formulas that can find what column or row the current cell is in, you could probably use those is its not appropriate to have a counter in the spreadsheet somewhere. But generally I find there’s a column or row somewhere that I can use for this.
Hope this helps.
@Jaron… you can replace ROWS(’Monthly Timesheet’!$E$1:E1) with COLUMNS(’Monthly Timesheet’!$E$1:E1) and drag sideways.
I am not sure if I am helping you as it is difficult for me to visualize your problem…
Wow thanks, I think I’m just about there with the below forumla:
=VLOOKUP($A5,’Monthly Timesheet’!$1:$65536,COLUMNS(‘Monthly Timesheet’!$E$1:E1),FALSE)
The only problem I have now is that it pulls in the data from Columns A to D from the spreadsheet of data I’m copying into the master. In my master i have the Columns A to D fixed in the order that they need to be, when I use the above forumlar it takes that data from the other sheet but includes the columns A to D, when I only want it to match the Data from E to AI against the data in columns A to D in my master.
I hope that makes sense and you are able to assist – the alternative I guess could be to hide those columns on the master? once the action is carried out?
Thanks again for all your help so far!
Another question on this one, I use find and replace to format repetitive cells in my original sheet – but once that is copied to my master using the Vlookup function, the find and replace doesn’t work as it doesn’t find the outcome of the forumla only the formula I guess if that makes sense?
So is there a way when using Vlookup to get it to take the exact cell format along with the data within it when copying it into another sheet, or is there another way to format cells which have differing formulas within, but giving the same outcome showing in the cell. For your info, the cells which I’m trying to format all have ‘NR’ within them.
Chandoo,
I’ve discovered conditional formatting from your site, which I’ve used the formula is equal to NR to get the cells with the same value in the same colour! Excellent!.
A slightly more difficult one though is I want it to highlight in yellow any cell with more than NR i.e. NR/TRAIN, NR/STNDBY etc – will always be NR/ then something – but I’m unsure what formulae to type in? Any ideas/tricks?
THanks in advance! Again!
@Jaron.. I guess your earlier questions were answered by conditional formatting.
You can use CF to define rules based on condition like “NR/TRAIN” etc.
Select all the cells, go to conditional formatting, define a new rule that says
cell contains “NR/” and adjust formatting. Make sure this rule is above the rule that says “NR”. That is all.
You can see some very good examples here: http://chandoo.org/wp/tag/conditional-formatting/
Hello, looking for some introductory assistance here.
Is there any way to do a validation (list) using information from workbook_1 on workbook_2 without having to pull that information onto workbook_2 and hiding the cells to make the list? Any assistance would be greatly appreciated.
Thanks!!
Eric
First of all Chandoo, wanted to let you know that I love your site and it has already helped me extensively with everything I am trying to do!!! Thank you!
I have a different question though and not certain if it can be resolved with vlookup’s or if it needs to be a combination of different ones. Any help would be wonderful!
What I would like to do with the information that I have put together on a different workbook is to reference an Agent (column A), and a time range (Date is in colum D) and then copy the row from A to I for each occurance during that range of dates so we can see how many and what errors have occured during any range of dates selected. (I will have different people inputting errors at different times so the dates will not be sorted unless they have to be). I am new at this so I don’t know if this can be done with vlookup’s or if you would need to use another function.
Chandoo, many thanks for that – i’ve managed to work it out – amazing – saves me such a lot of time!
Many thanks and keep going with the site – its so useful and have only just recently come across it but will be recommending it to my friends!
Take care
@Eric 1: You can try using named ranges….
@Eric 2: Thanks for the love. I am very happy you enjoy PHD.
You may want to use data filters for something like this. They are simple and intuitive.
@Jaron… 🙂 glad to help.
I have used vlookup and hlookup extensively, including many nested uses of them. What I am trying to do is write a vlookup that will reference not only the first column but also the second.
So for example (to keep this simple, but note I am not using dates)
Column one can be month (jan, feb, mar) and column two can be dates (1,2,3) and I need to reference feb 2 (aka column a will say feb and column b will say 2).
With vlookup either of these would be easy, but I need to now reference both at the same time.
Any help would be greatly welcomed.
Hi I really find your sites very helpful and interesting, i can’t imagine that there many things you can do in excel. but my question is how did you make those comments although its not quite related to excel. Do you use any software for your call-outs in the images. I mean those blue arrows and colorful notes. thanks. i’m glad i found this site.
baynoli
philippines
Usingh this formula:-
LARGE($O$13:$O$2012,ROW()-ROW($BG$13)+1
Show the value in Desending Order.
I also want to show the other particulars of large number as so on.
I have a question I am trying to retrieve information from a Three Dim-Problem.
SheetA Contains
ColA = Branch info (e.g LNC)
ColB = Part info (e.g exrt)
ColD = Has a date title (Aug sales) Which will be from Inventory Movement (Sheet B)
All three Cols are part of the criteria to populate ColD from Inventory Movement
Any Ideas
@Mike… I am not sure I understood your problem. Can you tell me what is the structure of Sheet B and what information you want to fetch? If you want the sum of values meeting a certain criteria use either SUMPRODUCT or SUMIFS. Examples here:
http://chandoo.org/wp/2009/11/10/excel-sumproduct-formula/
http://chandoo.org/wp/2010/04/20/introduction-to-excel-sumifs-formula/
Hi!!
Could you please explain about “double lookup” by using Index/Match functions?
@Baynoli, Mabuhay
The Font is Akbar http://www.wobblymusic.com/groening/akbar.html
The arrows are from either Excel or Paint.net http://www.getpaint.net/
@Ramki
The Index,Match combination is often used to do a 2 dimensional lookup, where you are looking up a value in a data table and either know the Row or Column (1 dimensional) or don’t know either the row or column 2 dimensional)
You can also use the Offset, Match combination to return a similar result.
Have a read of
http://chandoo.org/wp/2008/11/19/vlookup-match-and-offset-explained-in-plain-english-spreadcheats/
I follow the logic but why not add a worked example especially offset where it is not really obvious why you would use it
@John
Offset returns a range as a result and so unless the range is only 1 cell, will never give an answer by itself, so it has to be used with something like a Sum, Min, Max, etc to convert the range to an answer.
Index is great for looking up individual cells within a Range
Match is used with either Offset or Index to determine the locations within a range or from a Reference point to the point you want.
I have put a few example of both uses in the attached file:
http://rapidshare.com/files/410294277/Offset___Index_Examples.xlsx.html
Once you think you have got your head around them, have a read of:
http://chandoo.org/forums/topic/uni-assingment-help-matching-prices-for-shopping-items
How to become an Excel Guru in 31 Days :
I want to be part of the course , Please advice.
I am a dummy and i have been given a task of learning excel in just 60 days.
Regards
Venu
Hi All
Not quite sure how this is done, but pretty sure it’s with offset, hence the message!
I want to calculate the variance between two columns for a monthly report (i.e the weekly variance), short of changing the calculation manually, I’m not sure of the best way to “automate” this…
So: Week 1 var = Week 1 – Prior End of Month, Week 2 Var = Week 2 – Week 1 and so on…
Any ideas would be greatly appreciated!!!!
Pete
Hi Chandoo,
Great explanation!
I found a fun analogy to explain what a Vlookup function is…
Vlookup = your index finger
Why?
Imagine you are looking for “Susan Wilson” phone number. So you open the city phone directory and start searching (looking up).
Here is the correspondence of the Vlookup arguments with reality
lookup_value= “Susan Wilson”
table_array= the phone listing page
index_col_num= the column to the right with all the phone numbers
range_lookup= the fact that you are looking for “Susan Wilson” and not “Susan William”, “Sue Wilson”, etc
Vlookup result= “Susan Wilson” phone number
Just to add to my comment above.
I uploaded a video that may help:
http://www.youtube.com/watch?v=leICQIRQDTc
Hi!! Chandu!!
This is Ramki again! My concern as follows….
I have two sheets of data… Sheet 1 as follows.
Order No. Item code Item Qty.
123 544 Jam 55
456 645 Sauce 24
678 234 Soaps 12
In sheet 2
Ord.No. Item Code Item Qty. Alloc.Qty
123 544 Jam 55 32
456 358 Shampoo 24 16
678 266 Skin Cream 12 6
I have to get alloc.qty in Sheet1 with ref.to sheet2 by considering two look up values Viz. Ord No. and Item code…
Pls help…
@Ramki
If I read you right you want to get the value 32 from Sheet 2 and put it besides 55 in Sheet1!E2
if so try
C2: =SUMPRODUCT(1*(Sheet2!$A$2:$A$20=Sheet1!A2)*(Sheet2!$B$2:$B$20=Sheet1!B2)*(Sheet2!$E$2:$E$20))
And copy down
Change $20 to suit your data ranges
If I haven’t read you correctly please explain again
Great posts! I would like to also point you to some great references regarding VLOOKUP: http://www.squidoo.com/best-excel-2007-vlookup-references
Hope this help some people here!
I just stumbled upon your site and signed up for your emails. From what I’ve seen your site is very complete with straight forward explanations and examples.
Question, I use Vlookup and IF statements to fill a form/report on a different worksheet. We add comments to some cells in the record worksheet. Is there a way to show those comments in the form on the other worksheet?
Keep up the good work, and thank you.
Good morning! We currently use a vlookup to go between 2 workbooks. for the first workbook we use =VLOOKUP($A3,’2011 UMTS Master Tracker.xlsx’!Table1,108,FALSE)
the 2nd workbook has the values and works great until the PM decided to put If formulas to figure out dates in the cells.
So column 108 has this formula in it: =IF(DW8>0,DW8,IF(DJ8>0,DJ8+3,DI8+3)) but it displays the date 03/15/2010
becuase of this fomula we cannot get the vlookup to populate the 03/15/2010 on the first workbook cell.
Do you have any clue why it works if we have hard coded dates in the columns but when the IF formula is in the culomns we get
Need some help! As I am new in Insurance Dept. I want my work to be easier in anyways.
I am now handling more than 60,000 employees and we are using employee no. for logging employee with insurance. In 1-60,000 list i have we have to delete 5,000 employees. Now any formula to highlight the 5,000 employee in 60,000 list i have? Thanks
Hi Chandoo,
I have data in three columns: A,B,C and I want to get the average of the closest two values out of three in each row. Could you help me with a formula for this?
many thanks in advance!
@Luis.. see http://chandoo.org/wp/2010/06/17/compare-2-lists-in-excel/ for some ideas
@Lonel: I could solve this problem with one helper column that shows the value of first column. See the example file: http://img.chandoo.org/playground/average-of-2-closest-numbers.xls
Chandoo,
Your solution for Ionel is almost exactly what I was looking for. My dilemma is the inclusion of multiple 0’s in the data and the comparison is down a column rather than across rows.
My attempt to modify your example formula: AVERAGE(OFFSET($B3,,MATCH(MIN(ABS(B3:D3-C3:E3)),ABS(B3:D3-C3:E3),0)-1,1,2)) became: AVERAGE(OFFSET($E32,,MATCH(MIN(ABS(if(E32:E44>0,E32:E44)-if(E33:E45>0,e33:e45)),ABS(if(E32:E44>0,E32:E44)-if(E33:E45>0,e33:e45),0)-1,1,2)))).
I got a “too many arguments” message.
*Instead of adding another column as you did in the example I copied the first entry in a new row at the bottom of the column.
Any help is greatly appreciated!
Best regards,
Scott
Hi Chandoo,
I am also looking for something similar. I have five rows with data in many categories in the columns. I wish to identify the three rows that have the closest data to each other in as many columns as possible or the two rows that are outliers. Do you have any suggestions on how to approach this? I was thinking of identifying the interquartile range or finding the smallest differences in each column but I am not sure how to automatically identify the best rows. Thank you!
Dear Chandoo,
This is really great help and I appreciate it very much!
Very best wishes,
Ionel
HI,
I need a help with this data : columns are as follows:
salesman, brand, month, sales
ABC b1 Jan 120
ABC b2 Jan 130
Now I have an obligation to use Vlookup and the challenge is to calculate total sales of salesman ABC in the month of Jan.
Please help!!!
@ Newexcell-or
If your really hung up on using VLookup have a read of:
http://chandoo.org/wp/2010/11/02/multi-condition-lookup/
But for Total sales I’d be using Sumproduct or Sumifs for your problem
I have spent most of the day searching for an answer to what seems to me like an easy question. You seem to have some of the best answers for the questions listed and (kudos to you!) seem to be prompt as well.
I have a large worksheet 7,708 rows columns A through AQ. Column B is a four digit number used to designate a district – there are usually 15-25 rows with the same district code and different store numbers.
I have six employees reporting to me that I pull out the data for the districts to get totals, averages, etc for each of the columns. As an example employee Smith is responsible for districts 1234,1235, 1236, 1237 and 1238. I want to know total products sold for all of his stores in those districts. I’m using an auto filter with subtotal formulas (designated 101 and 109 for sums and averages to ignore the hidden values.)
What I need to be able to do is find each of the districts that Smith is responsible for and replace it with his name in every occurence. The find and replace function works just fine for this except….. I want to do them all at once. It’s very time consuming to find 6-8 district codes for 6 different employees and replace with their name – and I have to do it for additional worksheets just like that coming through on a daily basis.
So I was hoping there’s a way to type in multiple values into the find/replace function – separated with a comma, colon, semicolon, etc doesn’t seem to work. Maybe it’s impossible, but there’s no way to know with out asking…
I’m using 2003.
I used the following to solve Lonel’s Average of Closest Numbers issue:
Data Stored in cells B3:D18
E3 = IF(ABS(B3-C3)=Min,(B3+C3)/2,IF(ABS(B3-D3)=Min,(B3+D3)/2,(C3+D3)/2))
Min = MIN(ABS($B4-$C4),ABS($B4-$D4),ABS($C4-$D4))
This is the formula I came up with….
case-1:: if you need average of closest (first 2 MIN numbers) of a series:
=AVERAGE(MIN(D1:D12),SMALL(D1:D12,2)) where D1:D12 represent the series
case-2:: if you need average of closest (first 2 MAX numbers) of a series:
=AVERAGE(MAX(D1:D12),LARGE(D1:D12,2)) where D1:D12 represent the series
regards,
naveen
Ops…
E3 = IF(ABS(B3-C3)=Min,(B3+C3)/2,IF(ABS(B3-D3)=Min,(B3+D3)/2,(C3+D3)/2))
Min = MIN(ABS($B3-$C3),ABS($B3-$D3),ABS($C3-$D3))
To get the average of two closest numbers, copy the following formula and paste in D2
=IF(MIN(ABS(A2-B2),ABS(A2-C2),ABS(B2-C2))= ABS(A2-B2),AVERAGE(A2:B2), IF(MIN(ABS(A2-B2),ABS(A2-C2), ABS(B2-C2))=ABS(A2-C2), AVERAGE(A2,C2), AVERAGE(B2:C2)))
Solution for “Find the Average of Closest 2 Numbers out of 3 [formula challenge]”
In D2 I wrote the following formula:
=IF(SMALL(A1:C1;2)-SMALL(A1:C1;1)
Hi Chandoo,
Here is another issues I am facing right now, I have the data with state and sales. I want to use VBA here and want to create a button which when clicked should split the sheet state wise in different sheets. Example : all data is in sheet 1 and when the button is clicked the data for Madhya Pradesh should be in sheet 2 and Andhra in Sheet 3..similarly…I am able to create new sheets using VBA but this splitting is a problem!!
Could you help me ??
Thanks in advance 🙂
Two possible solutions, admittedly written without too many bells and whistles.
First solution:
=IF(MAX(A2:C2)-MEDIAN(A2:C2)MEDIAN(A2:C2)-MIN(A2:C2),SUM((MIN(A2:C2)+MEDIAN(A2:C2))/2),”XX”))
Because there are only three numbers, Max, Min and Median will return them all. “XX” would be where there is equal “closeness”, so (e.g. 6, 8, 10). You could always replace the “XX” by using CONCATENATE with both possible TRUE answers from the 2 IF functions, plus an ‘ or ‘ between them (e.g. “7 or 9”).
Second solution: (probably what the post by Emil started)
=IF(SMALL(A2:C2,2)-SMALL(A2:C2,1)
For some reason, not all the post I wrote has appeared (and ‘coincidentally’ it has cut it off at the same point as Emil’s). Very odd. SO the second formula is incomplete.
And so’s the first – it hasn’t all appeared. What am I doing wrong?
One more try – 1st solution:
=IF(MAX(A2:C2)-MEDIAN(A2:C2)MEDIAN(A2:C2)-MIN(A2:C2),
SUM((MIN(A2:C2)+MEDIAN(A2:C2))/2),”XX”))
2nd solution:
=IF(SMALL(A2:C2,2)-SMALL(A2:C2,1)
Hi Lonel,
You could try the following formula in cell D2 assuming your input data is in cells A2:C2 :
=IF(MEDIAN(A2:C2)-MIN(A2:C2)
=SUM(MIN(A1:C1)*((MAX(A1:C1)-MEDIAN(A1:C1))>(MEDIAN(A1:C1)-MIN(A1:C1))),MEDIAN(A1:C1),MAX(A1:C1)*((MAX(A1:C1)-MEDIAN(A1:C1))(MEDIAN(A1:C1)-MIN(A1:C1)),(MAX(A1:C1)-MEDIAN(A1:C1))
OK – why was formula cropped?
=+SUM(MIN(A1:C1)*((MAX(A1:C1)-MEDIAN(A1:C1))>(MEDIAN(A1:C1)-MIN(A1:C1))),MEDIAN(A1:C1),MAX(A1:C1)*((MAX(A1:C1)-MEDIAN(A1:C1))(MEDIAN(A1:C1)-MIN(A1:C1)),(MAX(A1:C1)-MEDIAN(A1:C1))
=AVERAGE(SUM(A1:C1)-SUM(MIN(A1:C1),MAX(A1:C1)),IF(ABS(SUM(A1:C1)-SUM(MIN(A1:C1),MAX(A1:C1))-MAX(A1:C1))>ABS(SUM(A1:C1)-SUM(MIN(A1:C1),MAX(A1:C1))-MIN(A1:C1)),MIN(A1:C1),MAX(A1:C1)))
Dear Chandoo,
Greetings for the day! I have read the answers asked by visitors are very impressive. I have also a question. hope you will get it cleared me.
I want to use a filter from one sheet to another sheet by the name of Brach. As I use filter in 1st sheet, only that branch’s data should be reflect in 1st sheet from 2nd sheet. Kindly help.
hi – i need some help with a vlookup – i have a column that is a vlookup on a result. then I have the following column with =VLOOKUP($BD2,curve,4,FALSE)*Z2 – this cell is to take the result from the column BD (which itself is a vlookup) then match this result to a certain outcome that will be multiplied by a number.
I’m wondering if the problem is that the vlookup is form a cell with a vlookup??
hoping you have a solution!!
@Alison
What your trying is quite possible
Does the value your lookup up from BD2 exist in the Curve Named Range
What is the Curve Named Range?
What Formula’s are in Column 1 of Curve?
Can you post some of the data or your file ?
I think i solved it – not sure if it’s the most “elegant” of solutions – =VLOOKUP((VALUE(LEFT(BD2,4))),curve,3,FALSE)*Z2
i think then i am converting the formula cell into a value in order to do a vlookup
and the formula in BD2 is – =VLOOKUP(M2,SLMresult,4,FALSE) – it’s a different table
Chandoo, I have had a hard time wrapping my head around match and offset, so I really appreciate all you’ve put together here; it’s helped me a great deal.
However, I believe I’ve found an error in the offset range where you say, “…OFFSET (A1, 3,4, 5,6) would return 5×6 cell range from E4 (A+4 columns, 1+3 rows = E4) thus: E4:J9”
–>> Starting the range at E4… 5 rows = rows 4, 5, 6, 7, 8, so E8 is the bottom left cell in the range. 6 columns = E, F, G, H, I, J, so J8 is the bottom right cell in the range, hence, the range should actually be E4:J8.
@Angi
OFFSET (A1, 3,4, 5,6) = E4:J8
is correct
How to use Index & Match functions with Multiple criteria in excel?
@Santz
Have a read of: http://chandoo.org/wp/2010/11/02/multi-condition-lookup/
Can anyone please tell which function to be used and how
when I write Apple: I should get the result beside apple as fruit
Dog:I should get result as Animal
Pencil:I should get result as Thing
@prat if you have your table in A1:B4,
Use some Cell D3 to enter Apple, Dog, or Pencil
Your formula should be =VLOOKUP(D3,A2:B4,2,TRUE)
Depending upon what You enter in D3 you will get appropriate answers
@Prat
You can use a VLookup or an Index/Match or Ofset/Match function
You will need a list of the Item and Group in two columns
This is probably a great spot to start:
http://chandoo.org/wp/2008/11/19/vlookup-match-and-offset-explained-in-plain-english-spreadcheats/
gr8 it works
Hii chandooo….
day by day im becoming proficient in excel just because of you….
I ahve one question…i think u can help me on this…how to embed a calender in a cell….also explain if we can do it for multiple cells….i’m waiting…..
Hi
Can u pls tell me how can I calculate autocorrelation function for a data series in excel,
i need to check the seasonality factor in data series of sale points since there r lots of such data seires, I do not wanna use graph n use autocorrelation. Pls help
Hey man, this is great! Very informative and fun to read. Thanks alot!
Thanks a lot mate! Loved the simple approach!
I just ran into an issue using INDEX(MATCH) – MATCH returns the number of the row its in, not its relative position in your defined array. But INDEX then applies that value in reference to its array.
So when I wrote this formula: =INDEX(A2:J50,MATCH(F2,E:E,0),9),0) it returned the value for the row directly below the one that I wanted! It took a while to sort that out, believe me. Writing it as =INDEX($A$1:$J$5000,MATCH($F2,E:E,0),9),0) put them back in alignment.
tl;dr -When using INDEX(MATCH) always start your reference in row 1!
I know this is old, but I just wanted to reply. Your conclusion is incorrect. index match does not need to start on row 1! Rather, the first row in the match needs to be equivalent to the first row in the index!
In other words, your formula is wrong. It should have been:
=INDEX(A2:J50,MATCH(F2,E2:E50,0),9),0)
Notice how match and index both cover the range of rows 2 – 50.
Dear mr.chandoo
hi,
can u plz give me u r contact mail add in case if I want to have solution for excel sheets.
Regards.
Hi all,How to avoid spaces in dynamic generation of data?
@Vinod
Can you give us an example?
Hi Chandoo,
I am the begginner for for excel. Currently I am focusing on learning formulas…I am feeling difficult in understanding….Kindly let me know how do I learn these formulas and become an expert…and also I would like to know how to combine the formula’s when ever required
Thank you in advance
Regards
Anitha
Hello Guys,
I read and re-reread the topic on OFFSET but I still dont get.
Van someone explain in plain layman english with concrete example?
When is it used and how to check if the formular is correct.
What formula would you use if you want to pull out everything that has a matched code? For example, a database of location codes and names. I want to list all names that match the location I’m looking up.
@Sandy
Have a read of : http://chandoo.org/wp/2011/11/18/formula-forensics-003/
dear sir, can you give me the different between vlookup and hlookup and its purpose
hello,
please help me to find what formula should I use to solve my problem.
basic table of my file is below, I want to find the last date of activity marked with X according to each person.
Name Surname
1-Jun
2-Jun
3-Jun
4-Jun
5-Jun
RESULT
A
X
X
2-Jun
B
X
X
1-Jun
C
X
X
3-Jun
D
X
X
4-Jun
What formula should I write in column RESULT to find that values???
thank you in advance
sorry, I think table is broken, table simply is below:
Name Surname | 1 Jun | 2 Jun | 3 Jun | 4 Jun | RESULT
A | X | X | | | 2 Jun
B | X | | | X | 4 Jun
C | X | | X | | 3 Jun
D | | X | | X | 4 Jun
In your example of Area / Project, I want to select an area as ‘Marketing’ and then I want all marketing projects to appear in the next column as:
Marketing | Hoziron
Cosmos
Spring
Could you please guice me how I can do that?
Regards
Annie
I need help with a formula to look in a spreadsheet, and do the following.
line 4 is always the date but can range from K:Z
Line 6 – 40 can have different qty’s in and will contain spaces
on the same line but in cell D it will have a description of the product.
I need it to if i put a date in A1 it will look down down the correct column and then put the qty and description into another spreedsheet in the same workbook. I can email the workbook if needed
Leigh, please forword your workbook to:
rbe2windhoekcc.org.na
or
264811223921@mtcmobile.com.na
so that i can have a look and try to come up with a solution.
Regards
Bonthond
@Quora
Have a read of:
http://chandoo.org/wp/2010/05/06/data-tables-monte-carlo-simulations-in-excel-a-comprehensive-guide/
WOw! SUper. I love you! EXACTLY what I needed. THANKS!
hi
any help would be gladly appreciated
I need to find designated OM for each supervisor in any given month with same ID below is the table
Roster Reference
Month
ID
Supervisor
OM
September
625222
Gina
Karen
October
625222
Gina
Thomas
November
625222
Gina
Terry
December
625222
Gina
Carl
September
654466
Cole
Carl
October
654466
Cole
Terry
November
654466
Cole
TJ
December
654466
Cole
Karen
Actual Table
I tried using this formula =INDEX($D$3:$D$10,MATCH(A16,$A$3:$A$10,0)), however im only getting correct OM match for Gina.
is another formula i can use so i can include the supervisor’s ID as reference aside from month?
Month
ID
Supervisor
OM
Sale
September
625222
Cole
Karen
1
September
625222
Cole
Karen
2
October
625222
Cole
Thomas
3
December
625222
Cole
Carl
4
October
625222
Cole
Thomas
5
November
625222
Cole
Terry
6
October
625222
Cole
Thomas
7
November
625222
Cole
Terry
8
November
625222
Cole
Terry
9
October
625222
Cole
Thomas
10
November
625222
Cole
Terry
11
October
625222
Cole
Thomas
12
September
654466
Gina
Karen
16
October
654466
Gina
Thomas
15
November
654466
Gina
Terry
14
December
654466
Gina
Carl
13
Many Thanks
Kurt
hi Sir Chandoo
i apologize on my first post. I need to find designated OM for each supervisor in any given month with same ID below is the table
Roster Reference Table
Month, ID, Supervisor, Karen
September, 625222, Gina, Karen
October 625222 Gina, Thomas
November 625222 Gina, Terry
December 625222 Gina, Carl
September 654466 Cole, Carl
October 654466 Cole, Terry
November 654466 Cole, TJ
December 654466 Cole, Karen
Actual Table (OM not included)
I tried using this formula =INDEX($D$3:$D$10,MATCH(A16,$A$3:$A$10,0)), however im only getting correct OM match for Gina.
is it possible to use both Month and ID as reference at the same time so i can get the correct OM for Sup? which should i use
Month ID Coach OM Sale
September 625222 Cole 1
September 625222 Cole 2
October 625222 Cole 3
December 625222 Cole 4
October 625222 Cole 5
November 625222 Cole 6
October 625222 Cole 7
November 625222 Cole 8
November 625222 Cole 9
October 625222 Cole 10
November 625222 Cole 11
October 625222 Cole 12
September 654466 Gina 16
November 654466 Gina 14
October 654466 Gina 15
December 654466 Gina 13
Hi Chandoo,
I need your help, we have one Data base application, it contains 2 fields, year & instrument no & subbmit button. I have yr and instrument data in excel sheet. i use to enter manually one by one. instead of how can i enter large data all at a time Using VBA or macto or any other formula.
A1 has 2010 year, B1 has 2546 instrument No.
i used this =CONCATENATE(A1,B1,
how to write for submit
Hi,
I would like to know if I can use excel to have a cell to work as a calculator, example: add an amount $235.00 once this amount is entered I want the cell come back blank ready for the next amount and the amounts entered in that particular cell need to be sent to another cell named total.
Is this possible and how?
Thanks in advance,
ML
@ML
It could be done but would require VBA to do it
You would also need a C button to clear/reset I assume
The following VBA code will do what you want
Add the code to the Worksheet module of the Worksheet you want to use
Change the addresses to suit
Link then Reset code to a Shape or Button as appropriate
Private Sub Worksheet_Change(ByVal Target As Range)If Target.Address = "$C$3" Then
Application.EnableEvents = False
[C5] = [C5] + [C3]
[C3] = 0
Range("C3").Select
Application.EnableEvents = True
End If
End Sub
Private Sub Reset()Application.EnableEvents = False
[C5] = 0
[C3] = 0
Range("C3").Select
Application.EnableEvents = True
End Sub
@ML
I changed the code so that a Single routine now does all the work
Enter values as normal in C3
they are accumulated in C5
Enter a C or c in C3 and it clears C5 and resets C3 to 0
Private Sub Worksheet_Change(ByVal Target As Range)

  On Error GoTo err

  If Target.Address = "$C$3" Then

    Application.EnableEvents = False

    If UCase([C3].Text) = "C" Then

      [C3] = 0

      [C5] = 0

    Else

      [C5] = [C5] + [C3]

      [C3] = 0

    End If

    Application.EnableEvents = True

  End If
err:
Application.EnableEvents = True
End Sub
Hi Hui !
thanks for the reply. I want to ask you or tell you, that I want C5 to show the total amount entered in C3, but the trick is to have C3 blank after clicking onto the (+) sign. Then those amounts entered in C3 will show its total into C5, does this make sense?
thanks a lot,
ML
Hi HUI,
Maybe i can send you my work sheet to your email and show you what exactly want to do, will this be possible?
thanks in advance!
@ML
Click Hui… above
Email add is at bottom of the page
I don’t understand what you mean by “but the trick is to have C3 blank after clicking onto the (+) sign”
There is no need for a + sign ?
Please elaborate
Hi Hui,
I will explain more:
I have my worksheet where i am going to add my expenses like gasoline, medical etc etc.
gasoline ($30.00 + $70.00) but after entering each amount, i want the (entry cell) to be blank, so when i enter the first amount what should i do in order for that (entry cell) to turn back empty cell ready to receive next amount? How the program has to be written?
in the (total cell) i want the Total add up amount that I had entered on the (entry cell)
Medical (entry cell) (total cell)
entertainment (entry cell) (total cell)
on the entry cell is where i want to add the amounts, one after other and have it added up inside the total cell.
Does this make sense?
Help! I need to match case type numbers to its corresponding case name. The problem for me is that some of the case type numbers have more than one case name that goes with it. A vlookup only works when the case number only has one case name associated with it. How can I get the formula to return the case names if there is more than one? Thanks anyone for any help on this.
Cris
Hi,
I’m abit of an Excel Newbie and have been having real trouble figuring this out. Let me explain the problem:
I have data in 3 columns of data each of 2 sheets of a workbook.
Column Headers are:
ID, Name, Amount
What I need:
When ID AND Name match between book1 and book2, ID,Name & are printed into Book3 and Book1 Amount is deducted from Book2 Amount.
i.e. First I am asking for ID’s to match, if they match, then I ask for Names to match, when they also match, I am asking for Amount1 to be deducted from Amount2.
Matching ID, Name and ‘Difference’ will be output into Book3.
Hope you can help, vlookups, IF(ISERROR have had no success so far.
I need to merge the 4 excel 2010 sheets in 5th sheet as a Monthly fault type with the value of Fault type can u help?
Im just trying to set my excel sheet so when the date hits, itll turn red. I believe i got it so its yellow when within 90 days but now i need the dates that are passed to be red. Any help would be great!
I have a worksheet containing rows and rows of data. I would like to extract the data to a second worksheet based off of the date and certain type. I think this requires a combination of an If statement and a vlookup. I am not sure how to put the formula together. Can you help?
@Steven Woods
So we can see your requirements
Can you post a sample of your data here or a link to a file
Here is a link to to a pdf. print out of the two worksheets. The information will be on the first page. I want to sort the data on the second page by date and the variety.
https://drive.google.com/file/d/0B7mu7qzKZWJdWFRyYVNvXzhndm8/edit?usp=sharing
Hi
I need to drag the vlook up results on main sheet horizontly earlier used to add $ to make the cell reference freeze an only output cell would increse while dragging. kindly help in recollecting the exact syntax
@Sampann
Can you post your formula here and tell us what it is doing right and what it is doing wrong?
=VLOOKUP($C15$,Thermal!$A3$:$W22$,14,0)
Iam trying to keep the refrence cell freezed and want to drag down the formula to show results on seperate sheet for marks of students in report card format
sc
maths
history
but when i drag the cell values change and i have to manually enter the changes in formula bar .. I did this function long time back in 2006 but not able to recollect i think iused $ sign to freeze the range lookup
Yes, use the $ sign to freeze a reference. Use it in front of the row to freeze the row, and the column to freeze the column.
If you click on the range (which puts you in edit mode) and press the F4 key, you’ll see that it applies the $ sign to the row and column in the range. Press it again and watch what happens. Press again. And one more time. It changes where the $ sign is placed. It’s a handy shortcut.
I need to validate data on 2 points. First, it must be in a range, Second, it must be greater than the value in the cell next to it, while still in the range. My fields are T_Start, L_Start, L_End, and T_End. T_Start can have any value from the named range Times. L_Start can have any value from named range Times greater than T_Start. L_End must be greater than L_Start, and T_End must be greater than L_End, all while still in the range. The validation for T_Start would only include a reference to the named range, but the validation for L_Start must examine T_Start first, and only allow values from the range Times that are after T_Start. Can anyone offer any advice?
thanx chandoo for your info
I have a doubt, I have 100 associates who have entered the amount of work done for 30 days, now I want to list out all the associates who have entered less than 8 hrs of work a day along with the date which they have entered less than 8 hrs a day, how is that possible, do we have any formula’s or I just have to conditional formatting for each individual. please explain
Hi-
Have issue that doesn’t seem to be answered:
Have lookup data in Col A:A; there are multiple templates copied there, each with a Header in A:A: but the data I need to (offset(match) is 4 rows down and 10 col over, consistently from each occurrence of the Headers…
Offset doesn’t seem to like my substituting a Match function for the “Reference” portion of the Offset argument, even though the Match function, by itself, produces the proper Nth row down, (from which I want to go 4 more down, and 10 over, to get the data I need…:-) for every new Lookup I’m searching for…
=Offset(Match(lookup,in A:A,0),4,10) keeps getting me ‘value” message…
AAARRGGHHHH!
Very good help matters
The questions asked in the example was very much helpful in practicing VLOOKUP .
Dear all, for the Homework, are these results right, please?
Thanks in advance
Massimiliano
Homework
Questions Your Answer
1. How many sales for the person in cell G17? 1.316
2. Who made more sales – Jamie or Jackie? 2.133 1.610 Jamie
3. What is the sale per customer for Jagjit? 257
4. What is the profit % for person in G17? 4,64%
Jonathan
Could please put the formula….
Sir,
We would like to prepare a excel for the display view of other team which picks the data based on a reference no entered by other team. The excel database it is referring is a continuous sheet appended every day. Do we have a formula to source the nth data based on the reference no. As vlookup returns only the 1st data we cant able to complete. Need your help. Thanks in Advance.
can someone please help me. i tried following the instructions on this but i am not getting it for some reason. the day i learn this my dreams will come true. i have a scorecard that contains YTD data including different months in one column, and different vendors in another column and I would like to select one of those months, and one of those vendors and get the data located in other columns.
as an example, just picture a table with 5 columns, with the following headers:
Column 1 = vendors
column 2 = Months
column 3 = score
column 4 = invoice amount
column 5 = penalty amount
If i want the score for vendor “michael” for the month of March. what formula will get me this? thanks so much in advance!!
@Nabil
Can you post the question in the Chandoo.org Forums
Please attach a sample file with some data
http://chandoo.org/forum/
Also state whether there are multiple entries per month per vendor or just a single entry
Once again, no idea what any of this means. I can only follow so far then I get completely and totally lost.
Hi Chandoo, thanks for this excellent post.
Am a medical researcher in Australia, and am looking for a function with powers very similar to this. I have two datasets; one lists patients by ID number, and their In/ out time from hospital;
e.g (ID) 123456 (time in) 04/02/12 09:45 (time out) 04/02/12 18:02.
Many patients present repeatedly.
The other dataset is of a certain lab test, organised by patients ID number, time taken and the test value.
e.g. (ID) 126599 (time taken) 12/10/12 00:04 (value) 29
Most patients get more than one test, and I am only interested in the highest value per patient.
Hence, I am after a function that for each patient presentation, looks up the lab test table, matches the ID, matches the time, and of multiple possible lab results that meet these criteria, returns only the highest value.
A little complicated, eh?
Thanks in advance.
Is there any way that we can vlook 2 or more sheets at a time
Please! You are hurting my eyes. “For eg.” is NOT correct! The abbreviation, “e.g.” (never with only ONE period!) is an abbreviation of the Latin exemplia gratia, or “for the sake of example.”
To say, “For eg.” is redundant!
The correct usage is simply, “E.g., OFFSET (A1, 3,4, 5,6) would …”
Thank you John for teaching this. I am not a native speaker of English. So I don’t know many things. I will keep this in mind when writing future articles.
Great tutorial Chandoo. I love your teaching style and your website is very helpful. I have seen many people use Excel as an electronic card-ex and search for data manually by scanning through the cells with their eyes ! It is hard to believe but it is so common to actually abuse Excel through lack of knowledge, time and ignorance or all three.
Your website is showing people that Excel can be their best friend in business not the villain.
Hi Guys
i Work of incident management so i track incidents on XLS and have to prepare reports ..i need to get 1,2,3 Tickets from A Cloumn which are mentioned in single row as this row consists of 4.5,6 which i want to exculde, i tried vlookup function but failed.. please help me with vlookup
What’s wrong with Crtl+F to find the information you’re looking for?
e.g. Instead of finding an empty cell and then laboriously typing =VLOOKUP(“936-174-5910”,D5:G21,2,FALSE), I can just do Ctrl+F, and type in 936-174-5910. You may not even have to do the whole number to find it that way.
Also, If I’m looking for several numbers I’d have to either copy and paste the formula or edit it multiple times.
The only thing I can thank of, is if you have a formula in your sheet referencing a value in another sheet, trying to Ctrl+F for that value does not return any results. I have just tested this for VLOOKUP but the formula is also unable to locate the value.
So I dont really understand the point in VLOOKUP, or why it is so important?
The point is that I may need to use it in a formula. Formula’s can’t use Crtl+F.
Say for instance I’m running an ecommerce website and I’ve downloaded a list of transactions. This list tells me what products were purchased, but doesn’t tell me the price paid by the users (dumb system, I know, but it’s just an example). Now say that I have another table somewhere in my workbook that lists the price for each product. I can use vLookup on my downloaded list to append the price of each product without having to manually type it in each time.
i have a table as below named table1, i need to make table2 and table3
somebody can help me?
table1
REF IDA IDB lvl
1 105 102 1
2 103 108 1
3 101 102 2
4 107 104 2
5 101 112 1
6 109 108 1
7 111 106 2
8 103 104 1
9 107 102 1
10 109 106 1
table2 table3
IDA REF IDB REF
101 3,5 102 1,3,9
103 2,8 104 4,8
105 1 106 7,10
107 4,9 108 2,6
109 6,1 110
111 7 112 5
Hi chandoo
with reference to your home work on v lookup.
have i entered the formulas correct?
for
1Q: =VLOOKUP(G17,B5:E17,3,FALSE)
2Q:=VLOOKUP(IF(OR(D8>D9),”jamie”,”jackie”),B5:E17,3,FALSE)
3Q:=VLOOKUP(“jagjit”,B5:E17,3,FALSE)/(C12)
4Q:=VLOOKUP(G17,B5:E17,4,FALSE)/SUM(E5:E17)*(100)
thanks
Hi,
Q2 you can use max (Vlookup(B8,B5:E17,3,false),Vlookup(B9,B5:E17,3,false)), but this and the IF Or formula you use will summon the value 2133 not Jamie.
best
Muataz
Great, We were doing this manually till now. You just saved our hours of time
There it is, this article saved me a lot of time. I rarely used VLOOKUP() in my day activities because of its complexity and you explained it very well.
please try to solve my problem
attached in this link
http://www.mrexcel.com/forum/excel-questions/937355-matching-two-range-value.html#post4502811
hi how can i partially hide a Email ID i need to keep private
example like abcdefgh@gmail.com to ab****gh@gmail.com
Loan amount is 500000.
interest per Annam 36%
I have made loan Daily Calculation schedule
As per my schedule sheet it showed 180000 interest after one year
My requirement is after one year the interest amount 180000 should be capitalized automatic i.e now the total loan is 500000+180000=680000.
And if the borrower repaid the amount of the loan, first it must be settled capitalized amount(i.e. 180000) then settled interest than settled original Principal(500000).
Please help to solve the problem in excel or if provided me the formula set excel, it’s far better.
Thank you
Hi Chandoo,
I just found your site ( 2 days ago) and have read many of your post, first of all thanks for all the great info!
I have a question and hope you could help me.
I have a territory code which can be seen by different sales rep (SR)(depending of the pillar). So a single territory code, let’s say “terr1” could be seen by SR 1, from pillar A, SR 2, from pillar B, and so on.
Some of these SR are not yet hired, so I have a column with the values “on board” and “TBH”.
The first table has 3 columns, column A “Territory”, column b “SR Name Pillar A”, Column c “SR Name Pillar B”. I need to get column b and c (the names).
The second table has 4 columns. Each sales rep is in individual rows. The column A “Territory”, Column b “SR Name”, column c “Pillar”, Column d “Hire status”.
I have to make a conditional look up, but I am not quite sure of how. I need to look for the Territory code, then to ensure the Pillar that I am searching, and after that, ensuring that the SR is “on board”, after all of before is true, I need the SR name (e.g. Joe).
I tried a formula like this:
=IF(AND(Hired_status=”on board”, pilar=”A”),Vlookup(territory,data,2,0)
but it ony works in certain cases.
Could you help me with this?
I hope I made myself clear 🙂
Thanks a lot
Nicolas
@Nicholas
Can you post the question at the Chandoo.org Forums
http://forum.chandoo.org/
please attach a file and you will get a more targeted response
The article is very informative.
Thank you
Its easy to understand…thanks to shared this educational article..
hello,
need answer for your homework workbook.
Hello,
Need answer for Homework Workbook.
Best regards,
Ghaz Hassan
Why It is from D5 from G21???could some body plaese tell me?
Hello Sir,
Please give me soluation about following query.
How to calculate one column daily count without change previous count.
For example:
District Total Count Approved Pending Rejected
Dhule 50 20 30 0
I need solution total count 50+Approved +Pending+Rejected
count without changing 50+ daily count added in 50 (App+Pending+Rejected)
Sir please tell me vookup formula in your example
2. Who made more sales – Jamie or Jackie?
Hi!
I use VLOOKUP all of the time and it’s great! My question is, I have this formula in a macro. Unfortunately, the # of rows changes daily for the data I receive.
Question – How can I do a vlookup and have the formula always go to the last data in the row, instead of me having to look and inputting that end cell into the vlookup formula before running my macro – thanks!
Brad
@Brad: if possible, set up your data as a table (using Ctrl+T). This way you don’t have to change the formula everytime your data grows/shrinks. See this links for a tutorial – Excel Tables | Structural References
Thanks for the advice and quick reply – love your site.
Brad
Thank you for this wonderful blog.
I have a little problem and I believe you can help me.
I have a list of company fleet with Fleet Numbers and Registration numbers.
All that I want to do is make excel be able to reference from the fleet and registration numbers table anytime I type a fleet number in a different worksheet. Please note the fleet and registration numbers are also on another sheet. I cannot go on repeating fleet numbers and registration. I was able to use vlookup to reference one fleet number and registration and it seems i have to change it anytime i change a fleet number It has made me really slow and your help will be more than a relief. You can use my email if you desired. Thank you once again.
in the homework i could not answer fourth question can anybody help me and show the exact formula
I have a typical query. Given in sequence
1. I have one unique ID for VLOOKUP.
2. Against this Unique ID, there are multiple IDs available and multiple values in text.
3. For example, Unique ID 123456 (Customer Code), there are one more terminals provided with different Merchant ID. Out of this Merchant ID under a single Unique ID, there are various values available like “Approved”, “Active”, “Hotlisted”.
4. Now for a single Unique ID, as explained in 3 above, there are multiple values.
5. I need to consolidate the above with a formula. How to go about and what are the formulae to adopt.
Thank you.
Hi Jagannathan.. thanks for your question. You can use either the newly introduced FILTER formula or vlookup multiple matches trick. See below links for both.
– Filter formula – Dynamic array functions in Excel
– VLOOKUP multiple items
I have students information like
students section maths english science
xxxx – A – 100 – 70 – 30
pls help me for this
i want to index,match formula to get student name tobe listed, section to be listed, and subject to be listed, in that if i select an particular name and particular section and particular subject i need an output
how to put index,match formula to get these result.
If A2 matches with any of A103:A252 AND B1 matches with B103:Al252 then I need to have display of all column header of matched column.
Is it possible ? Can you share formula ?
Hi Chandoo,
Your blog posts are the best!
I am currently having a challenge with a calculation.
There is CustID wise Sales bracket-wise (Tiers) commission rate which is to be multiplied with Sales figure to arrive at the final number.
I tried working with multiple Index & Match formula but not yet working.
Can you suggest something? It would be great help.
Regards,
Amit
Hi Chandoo,
Your blog posts are the best!
I am currently having a challenge with a calculation.
There is CustID wise Sales bracket-wise (Tiers) commission rate which is to be multiplied with Sales figure to arrive at the final number.
I tried working with multiple Index & Match formula but not yet working.
Can you suggest something? It would be great help.
Regards,
Amit
I’m having issues with these advanced formulas and thank you for your website. I’m trying to do the following, any help would be appreciated. Thank you, LisaMarie
I need look up the manufacturer and model that reside on the tab FW.Model, in a tab within the same workbook called Page 1 and return a value from Page 1, back on the tab FW.Model. Must be exact matches.
Sheet named: FW.Model
Column: AA (manufacturer) and AB (model)
Rows: 5 to 766
Sheet named: Page 1
Column: B (manufacturer) and C (model)
Rows: 2 to 357
Return value in column E
Thank you again for any assistance.
This was so brilliant!!! Thanks so much. Now I have an issue with sorting static and dynamic data on a tab. Could you please do a tutorial on this as well?
useless = you/no-one addresses multiple columns, for example:
Match ($A2, $D$2:$W$10000,0) = doesn’t work
Then go be useful instead of commenting with unnecessary critic.
Is there any formula in Excel that can find the district from the address and output it to another Excel column?
Yes, you can use the UNIQUE() for this. For example, go to the othersheet and type =UNIQUE(your_data)
Using IFNA is a better option than using IFERROR since IFNA only reacts to an #N/A error, which is the only naturally occurring error from a failed lookup. Whereas IFERROR will react to any error that’s caused by anything, including something as silly as a misspelled function name.
Great point David. I have been using IFNA() in my newer files whenever I couldn’t use XLOOKUP.
Thank you for sharing such valuable insights on VLOOKUP, INDEX, and MATCH functions! Your explanations make it easy to understand how these tools can enhance data processing skills in Excel. I appreciate the examples and resources provided for further learning!