

In early February Sujit asked a question at Chandoo.org, original post.
I require a formula stating criteria [0%-25% output will be 0, 26%-50% output will be 0.1, 51%-75% output will be 0.2, 76%-100% output will be 0.3 & 100% + output will be 0.4]
Kyle, responded with a neat Sumproduct formula
=SUMPRODUCT((B3>{0.25,0.5,0.75,1})*0.1)
I think it is so neat that it is worthy of sharing and detailing here at Formula Forensics:
So today we will pull Kyle’s answer apart to see what’s inside.
Kyle’s Formula
As usual we will work through this formula using a sample file for you to follow along. Download Here.
Kyle’s formula is a Sumproduct based formula
=SUMPRODUCT((B3>{0.25,0.5,0.75,1})*0.1)
Lets look at cell C3 as our example.
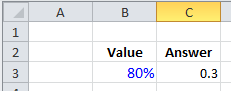 ;
;
In C3 we see the formula: =SUMPRODUCT((B3>{0.25,0.5,0.75,1})*0.1)
Which consists of a Sumproduct function and a formula inside the sumproduct.
We know from Formula Forensics 007 that Sumproduct, Sums the Product of the Arrays, and that when there is only 1 array it simply sums the array elements.
In this case the Sumproduct only has a single array as an element
=SUMPRODUCT((B3>{0.25,0.5,0.75,1})*0.1)
and so the (B3>{0.25,0.5,0.75,1})*0.1 component must return an Array of elements for the Sumproduct to sum.
If we now look at the (B3>{0.25,0.5,0.75,1})*0.1 component.
We can see that it consists of a comparison B3>{0.25,0.5,0.75,1}
The result of the comparison is Multiplied by 0.1.
Sujit’s orginal question asked: 0%-25% output will be 0, 26%-50% output will be 0.1, 51%-75% output will be 0.2, 76%-100% output will be 0.3 & 100% + output will be 0.4
And Kyles formula is using B3>{0.25,0.5,0.75,1} to work out which category the value in B3 belongs to.
We can see this if in a blank cell say C5: we enter the following:
= B3>{0.25,0.5,0.75,1} press F9 not Enter.
Excel will respond with ={TRUE,TRUE,TRUE,FALSE}
This is showing us that the 1st, 2nd and 3rd elements in the formula: B3>{0.25,0.5,0.75,1}, are True
In our example the value in B3 is 80% which is 0.8 which is Greater than 0.25 and Greater than 0.5 and Greater than 0.75, but Not Greater than 1.0.
The next part of Kyle’s formula is (B3>{0.25,0.5,0.75,1})*0.1
In a blank cell say C7: enter the following:
= B3>{0.25,0.5,0.75,1}*0.1 press F9 not Enter.
Excel will respond with ={0.1,0.1,0.1,0}
This is showing us the result of
=(B3>{0.25,0.5,0.75,1})*0.1
={TRUE,TRUE,TRUE,FALSE} *0.1
={0.1,0.1,0.1,0}
Sumproduct now only has to add up the Array
=Sumproduct({0.1,0.1,0.1,0})
Which it does returning 0.3.
The Neat Part
The neat part of this is that Kyle has used the 0.1 Multiplier to Force the array to an array of Numbers for Sumproduct to sum.
Had Kyle used: =SUMPRODUCT((B3>{0.25,0.5,0.75,1}))*0.1
Excel would have returned an answer of 0
This is because as we saw in Formula Forensics 007, Sumproduct doesn’t know what to do with the array of True/False, they need to be converted to numerical equivalents for Sumproduct to operate on.
In a spare cell, say C9, enter: =SUMPRODUCT((B9>{0.25,0.5,0.75,1}))*0.1
Excel will respond with 0
Of course that can be fixed by using a double degative of a 1* inside the formula
In a spare cell, say C10, enter either:
=SUMPRODUCT(1*(B9>{0.25,0.5,0.75,1}))*0.1
or
=SUMPRODUCT(- -(B9>{0.25,0.5,0.75,1}))*0.1
Excel will respond with 0.3 as it should
Except that the formula is longer and now has to do 1 more multiplication.
Download
You can download a copy of the above file and follow along, Download Here.
Formula Forensics “The Series”
You can learn more about how to pull Excel Formulas apart in the following posts
We Need Your Help
I have received a few more ideas since last week and these will feature in coming weeks.
I do need more ideas though and so I need your help.
If you have a neat formula that you would like to share and explain, try putting pen to paper and draft up a Post like above or;
If you have a formula that you would like explained but don’t want to write a post also send it to Chandoo or Hui.


20 Responses
Clever. But…
How stable are those inputs and outputs? Is some boss going to change the input percentages to 20%, 40%, etc?
It’s never a great idea to hard code magic numbers in formulas, because changes to these numbers are hard to propagate reliably (did I get them all?). A less elegant but way more maintainable approach is a simple lookup table.
if planning for this type of situation, you can replace the hard values (.25, .05, .075, 1) with Cell references that will contain whatever values you wish to set (either manually or automatically–depending on your choosing/needs) Ex:=SUMPRODUCT((B3>={D1,E1,F1,G1})*0.1). Then, you would just enter whichever percentages one wants to use instead of changing the formula.
the Senario feature could be useful as well if wanting to compare various possible ‘senarios’…
i personaly would have used an nested if function….but only because i understand that more than sumproduct & arrays
Really interesting. Thanks.
I had no idea about using F9. That will help loads.
Thanks
AP
100% will still return 0.3 and not 0.4
Should the formula not be:
=SUMPRODUCT((B3>={0.25,0.5,0.75,1})*0.1)
@Jelle-Jeroen
Good pickup, it is actually the question which is ambiguous/inconsistent on the treatment of 100%
Because it can’t be “76%-100% output will be 0.3 & 100% +“
I’m using Excel 2007 and encounter a problem using Jason’s formula. for some reason I’m getting an error message.
I can’t replace, say, 0.25 with a cell reference. Why is that?
Hi Fred,
Jason’s formula is incorrect in that he is putting cell references in an array of constants. { } require hard-keyed numbers.
Assuming .25, .5, .75, 1 are in D1:G1, use this:
=SUMPRODUCT((B3>D1:G1)*0.1)
Thanks, Kyle!
@Jason, If the input thresholds change you can certainly adjust the array, but what if the value requirements change, say from {0.0;0.1;0.2;0.3;0.4} to {0.0;0.15;0.2;0.5;1.8} ?
For my money, this is a perfect example of when the VLOOKUP with [range lookup] parameter set to TRUE will shine though. It is at once easy to interpret the intent, and modify thresholds & return values.
Enter this little helper table somewhere and name the range “MyLookup”.
Output Level Value
0 0
0.26 0.15
0.51 0.2
0.76 0.5
1.01 1.8
The final solution is accomplished with this simple formula:
=VLOOKUP(B3,MyLookup,2,TRUE)
@Jon, Kyle & All
I appreciate your comments on the inflexibility of using fixed values in the array, however there are many many times where fixed values are used, eg Quartiles, Months etc
However it is a possible to redirect a range into an array and using my example as an example the following formula will do just that:
=SUMPRODUCT(- -(B9> COLUMN(OFFSET(Sheet1!$A$1,,,4))*F1:I1)))*0.1Where F1:I1 have the values 0.25, 0.50, 0.75, 1.00
Just another possible use of this function:
If your required outputs are not liner (such as 0.1, 0.5, 0.75, 1.2; or text or other values), you can combine this function with the choose function:
=CHOOSE(SUMPRODUCT((B4>{0.25,0.5,0.75,1})*1),”A”,”B”,”C”,”D”)
This can be done to rank a list of values with A – D labels.
Or is there a simpler way to do this?
Hello Chandoo – Hui, and All.
Hui
Taking you at your word, I am hoping that the forum may be able to resolve a formula anomaly that I am unable to resolve,
In short I have produced a survey table where manual inputs of data are summarised based on months,
For the purpose of this posting I have named this table as table “A”
Table “B”
Is where I have included the formula which refers to table “A” and conditionally formatted the cells to which everything works as required, “GREAT” well sort of,
THE PROBLEM?
It was more by chance due to the fact that I had toiled for ages to make the formula work as I was wanting, I had read up and tried all sorts of variations and then at last success, –
Until I tried to replicate the formula again in a different location, to which all I get is the error value message, I have checked the formula over and over, its identical and refers to all the right cells in table 1 – But the formula will just not work – as shown as table “C”
To govern table “B” there are two drop down cell’s which are A21& B21, Selecting A allow you to select type of survey and B21 = month.
I have included a link for the excel file:
https://skydrive.live.com/redir.aspx?cid=5534829d252ed4d0&resid=5534829D252ED4D0!370&parid=5534829D252ED4D0!369
What would be great would be a well explained understanding as to why this should be happening,
Thank you in advance and Very Best Regards to All.
Peter.
@Peter
The problem exists in that you cannot use ranges in that configuration
Effectively it only works as the Table B rows are the Same as Table A rows. If you had even shifted Table B down 1 row the results would be wrong
For Table C, I would look at restructuring the formula along the following lines
M25: =IF(AND($L25=$A$21,$B$21=M$24),C10,””)
Also as a Notre try and be consistent in your use of Dates
If specifying months I always use 1 Feb 2011 as the date. In your case you have a mix of 27 Feb 2011 and months as Text eg: Feb
The problem is AND is not doing what you think it should: It is not doing an array comparison. If you look at how the formula evaluates (formula ribbon | evaluate formula), you will see it is actually only checking the cell in column A of /whatever row the formula happens to be on/, not the entire range $A$10:$A$17. If you cut (not copy) and paste Table B one row lower you will something of what I mean: knowledge of “RWP surveys” vanishes.
I suggest you restructure tables “B” and C” slightly. Here is a formula for the top left cell of table C that can be filled right and down:
=IF(AND($L25=$A$21,M$24=$B$21),C10,0)
For this to work properly, you need to make sure the row and column headers for Table C match those in Table “A”. You already have matching row headers, but the column headers do not match. If you like the abbreviated month labels you can simply format the column headers as “mmm”.
Hope this helps!
heh, I’m exactly three steps behind Hui (^:
🙂
hi guys,
how to we enter array in between formula like as entered below:
=SUMPRODUCT((B3>{0.25,0.5,0.75,1})*0.1)
when i hit CSE, bracket embraces whole formula??? Also when i paste above formula it is showing error (“Formula you typed contains error”).
Thanks
@Amit
Just enter the formula and press Enter
Excel knows that the insides of the { } is an array
I don’t get any errors when i copy/paste the above ?
Thanks Hui / Andy
I have taken your thoughts on board, and both of the formula’s work well – so thank you very much for your time, just to clarify my intention when i began to summarise the data in this way, was not to make table “B” dependant in relation to table “A” as this is an exercise – a dummy run if you like for a database that I have been working on and to which end would form the nuts and bolts to a Project Management Dashboard related to the construction industry,
All to often we see dashboards that are great for the final presentation, but lack the behind the scenes, Example being A respectful Pm or contracts Manager would be required to undertake either 3-4 large contracts – or many smaller contracts of various works, At present the database is able to collate on a single contract basis via linked site based activity work sheets, The challenge for me now is to be able to have the database track many projects and the relative info which then could be summarised on the dashboard by either individual projects – and as an overview of real performance by the contracts manager / Pm,
Sorry I have digressed,
But thank you again – Very Best Regards – To All
Peter
Hi.
If instead of numeric values, we wish text values (0, 0.1, 0.2, 0.3) ??as “maximum”, “minimum”, “medium” or “low”, what would be the formulation
Regards